

-
Welcome to Tacoma World!
You are currently viewing as a guest! To get full-access, you need to register for a FREE account.
As a registered member, you’ll be able to:- Participate in all Tacoma discussion topics
- Communicate privately with other Tacoma owners from around the world
- Post your own photos in our Members Gallery
- Access all special features of the site
 Instrument Panel / Climate Control Illumination Bulbs
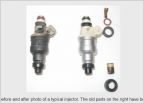 Prepping for Fuel Injector Service
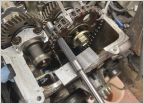 Timing gear set
 Tool code scanner
 New starter wont engage the flywheel
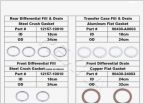 Transmission Drain Plug Leak
Proper way to press in new rear wheel bearing?
Discussion in '1st Gen. Tacomas (1995-2004)' started by wolfgang123, Apr 23, 2013.
Page 2 of 3
Page 2 of 3


