1. Welcome to Tacoma World!

    You are currently viewing as a guest! To get full-access, you need to register for a FREE account.

    As a registered member, you’ll be able to:
    • Participate in all Tacoma discussion topics
    • Communicate privately with other Tacoma owners from around the world
    • Post your own photos in our Members Gallery
    • Access all special features of the site

The Build

Discussion in '2nd Gen. Builds (2005-2015)' started by Chickenmunga, Oct 17, 2010.

  1. Oct 17, 2010 at 12:02 PM
    #1
    Chickenmunga

    Chickenmunga [OP] Nuggety

    Joined:
    Apr 10, 2008
    Member:
    #5877
    Messages:
    7,574
    Gender:
    Male
    First Name:
    Mike
    Keizer, Oregon
    Vehicle:
    08 TRD Offroad DC 4x4 with stuff
    All the normal TW BS
    I've been putting this off for a really long time!


    If you have any questions on how I did something, I'll try my best. Some of the mods I did quite some time ago, so I may not have a pic. There's some things I want to not tear into again, so some of the older stuff is going to be missing some photos.

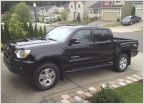
    Original
    This is about the oldest picture I have of the outside. It's the first 'real' trail I went on, and at the time I was thinking to myself that I'm pretty awesome.:p

    Original_c47841bf2e6e3713e5aebef021801c7cc61c34d8.jpg

    Version 1
    b6f5ec93_42576c373368c21c4f4eba64461072a075c2b7b0.jpg

    Version 2


    IMG_20150330_124748_zpsr3eptzyj_748f287418c01a867cbb3848b71542a8efb725e0.jpg

    Version 3
    39A34463-1307-42B2-A7B3-D586D3AA3BED_zps_bda505b532c8844fae5ab90e887c4bf9e586fdaa.jpg

    Modifications


    In the cab...
    Garmin GPS Hardwire
    Alpine iDA-X100 Head Unit
    Audio Install
    Midland 75-822 CB with with Wilson 4 foot flex antenna Install (radio removed)
    Cobra 19 DX IV
    GPS RAM mount

    Two hidden extra cigarette lighter power plugs
    OTRATTW Dash Switches

    Under the hood...
    Clifford Alarm & Remote Start
    Washable Cabin Air filter
    AFE Pro Dry S filter (although I use a paper filter for really nasty dusty areas)
    Accessory Fuse block
    Redline tuning hood struts

    Suspension...
    OME 2" Lift (removed 6/2015)
    Body Mount Chop (courtesy Auburn Car Repair & Offroad)
    Light Racing UCAs (removed 8/2016)
    Famous Fab Shackle Flip (removed)
    King Suspension and All-Pro Expedition leafs (700lbs coils)

    Tires and such...
    Ultra 164 Wheels, 285/75/16 Maxxis Bighorn Tires (removed 9/9/2012 due to a nasty railroad spike. rims sold because they weren't quite right, even though they worked at the time)
    255/85/16 BFG KM/2 (removed 12/4/2015)
    285/75/16 BFG A/T KO-2 (added 12/4/2015)

    Armoring up...
    Relentless Sliders
    Relentless Front Plate Bumper
    Relentless Fabrication Front and Mid skids
    High-clearance rear bumper with swing out and Rotopax

    Gearing up for adventure...
    Warn 9.5XP Winch
    Light Hoop and HID-converted Hella 700 Auxiliary Lights (courtesy Relentless Fabrication)
    Bed mounted shovel
    ATO Hi-Lift Jack Mount
    Superflow MV-90 Compressor with Easy Modifications

    Miscellaneous body...
    Trailer plug relocation
    Rear Differential Breather Relocation
    JLC Lighting CREE LED Reverse Lights
    Steel braided brake lines
    SnugTop Sportsman canopy (added 7/7/2013)
    CVJ Extended-length CV Axle Boots


    In Process

    Future
     
    Last edited: Dec 15, 2016
    Crom likes this.
  2. Oct 17, 2010 at 12:04 PM
    #2
    Incognito

    Incognito No better friend, no worse enemy

    Joined:
    May 25, 2009
    Member:
    #17626
    Messages:
    13,752
    Gender:
    Male
    VA
    Vehicle:
    2012 Pyrite AC TRD OR
    Spacer lift, bumper stickers, ejector seat, etc.
  3. Oct 17, 2010 at 12:08 PM
    #3
    Chickenmunga

    Chickenmunga [OP] Nuggety

    Joined:
    Apr 10, 2008
    Member:
    #5877
    Messages:
    7,574
    Gender:
    Male
    First Name:
    Mike
    Keizer, Oregon
    Vehicle:
    08 TRD Offroad DC 4x4 with stuff
    All the normal TW BS
    GPS Hardwire

    NOTE: I have since redone the wiring. See here

    I use my GPS all the time. I hate cords. A mod was necessary.

    I did a fairly big writeup here, so I'll just post a result. Since this picture, I've upgraded to a GPS with FM traffic, so I had to cut one of the vent slits to push the wire through, but it still looks about the same.

    [​IMG]
     
    Last edited: Jul 19, 2013
  4. Oct 17, 2010 at 12:13 PM
    #4
    RelentlessFab

    RelentlessFab Eric @Relentless Fab Vendor

    Joined:
    Feb 17, 2008
    Member:
    #4772
    Messages:
    15,719
    Gender:
    Male
    First Name:
    Eric
    Sparks, NV
    Vehicle:
    07 AC 6mt>03 SR5 >08 Sport and 17 6MT TRD OR
    Relentless Armored! Too many others to list.
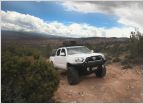
    Its about time Mike!!
    I snapped this pic and kinda like it.... first day of wheelin with the new bumper:)
    TacomaworldTSFmeet112_d4eb22368194e70086f82cc7d420774e1d94ebad.jpg
     
  5. Oct 17, 2010 at 12:24 PM
    #5
    Chickenmunga

    Chickenmunga [OP] Nuggety

    Joined:
    Apr 10, 2008
    Member:
    #5877
    Messages:
    7,574
    Gender:
    Male
    First Name:
    Mike
    Keizer, Oregon
    Vehicle:
    08 TRD Offroad DC 4x4 with stuff
    All the normal TW BS
    Alarm System Install

    I thought this was going to be too much for me to take on, so I just let the local stereo hack job shop do their worst. I know I would have done a better job with the actual wiring and placement, but I didn't have the knowledge of all the connections and I didn't want to take the time.

    It's a Clifford System, I think it's an R3x or something. I figured that the systems with the display on the fob would wear down the battery too quickly, so I decided on this model. if I had to do it again, I'd probably go the other way because I still don't know what 3 beeps in a row mean other than someone's tryin' to pounce on my ride.
    I sprung for the remote start because my friend talked me into it. I don't use it much, but it's damn nice in winter.
     
  6. Oct 17, 2010 at 12:38 PM
    #6
    Chickenmunga

    Chickenmunga [OP] Nuggety

    Joined:
    Apr 10, 2008
    Member:
    #5877
    Messages:
    7,574
    Gender:
    Male
    First Name:
    Mike
    Keizer, Oregon
    Vehicle:
    08 TRD Offroad DC 4x4 with stuff
    All the normal TW BS
    Head Unit Install

    I again let the stereo shop take care of it because when you buy a HU over $100, they do the install for free. I also had them do the steering wheel controls because I hate buttons that do nothing (I'm a bit OCD, but aren't we all?)

    I had a really nice Pioneer Premiere unit in my last vehicle, but the display was blue and the iPod interface was awful - there was no percentage search or alphabetical jump, nothing - you always started from the top of your list and just got cranking until you finally got to the song or gave up.


    As a result, I went with an Alpine iDA-X100. The iPod controls are phenomenal. However, it only has 2.0V preouts, which really piss me off because I can really tell the lack of power. The Pioneer had 4V, and a deck before that had 5.5V, so I really miss how much of an edge that gives. The Alpine also has some hokey controls over crossovers. Their idea is that you will buy their $100 add-on system that does auto-imaging, upgrades to 4V preouts, gives an EQ, and a bunch of other nonsense, and they are totally assholes for trying to force you into that. I don't want a bunch of complex bullshit when it's perfectly reasonable to build things right. I don't try to cuss much, but there is no better word for what they do.


    I might change later, but I haven't found a good replacement yet... and I've got more important mods :D When Pioneer makes a deck in red that has good iPod controls, I am all over that.
     
  7. Oct 17, 2010 at 1:11 PM
    #7
    Chickenmunga

    Chickenmunga [OP] Nuggety

    Joined:
    Apr 10, 2008
    Member:
    #5877
    Messages:
    7,574
    Gender:
    Male
    First Name:
    Mike
    Keizer, Oregon
    Vehicle:
    08 TRD Offroad DC 4x4 with stuff
    All the normal TW BS
    Audio Install

    I used to have an '86 Accord from high school all the way through graduating college... and then some! I tried modifying stuff, but there's only so much you can do with a limited budget and the car I had. I had a carbed engine and didn't want to do an engine swap, so I dove into audio instead... and I haven't been able to listen to a stock radio since.

    After the head unit, I tried re-using most of my gear, which was a pain... but when you sink enough money into a decent set of gear, it's hard to start over.


    I had a Memphis Audio 12" in an oversize sealed box. There was no way that was fitting, so I knew I was going to have to get at least a truck box... but I've been through enough really trashy gear that I didn't want to settle. I was going to have to pony up on this one.

    I also had the following amps:
    Memphis 16-MCA3004 (75 watts x 4 chan. @ 4 ohms, 115 watts x 4 chan. @ 2 ohms)
    Memphis 16-MCD1000 (300 watts x 1 chan. @ 4 ohms, 600 watts x 1 chan. @ 2 ohms, 1100 watts x 1 chan. @ 1 ohm)
    These things are ridiculously big. The 4 channel measures 18.5" L x 7.6" W x 2.4" H, and the monoblock is not much smaller.

    I went with JL 10w3v2-D4 for the sub because it fit the enclosure I was having made, and more importantly, it was shallow enough to squeeze in.


    This was going to take a ton of work trying to mash this behind the seats (thank god I opted for the doublecab).

    Through a LOT of help from Mr. Marv, I made it all work. I've probably cut some years off of his life with all the headaches I gave him.

    I meant to have a big writeup on this, but never got to it, so I'll try to give some commentary over the pics I have lying around.

    I don't have any pics of them, but I hopped on the group buy for the Hybrid Audio Clarus 6.5, and I put them in the front doors. I did a lot of research and talking with Marv, and decided that rear speakers were unnecessary. So far he's been right :)

    I managed to talk myself into getting sound deadener, and was recommended RAAMmat. It's a pretty good product and I think it went on easier than the I've seen Dynamat done. Dynamat is also smelly and seems to get tar everywhere, even after having it on for years.
    I did the front doors and rear wall, also did ensolite, and I have leftovers. I will do the rear doors someday :rolleyes:

    Here's a shot of the RAAMmat going up on the rear wall. The box and amp rack Marv made for me fit so tightly that I couldn't simply stick on one big roll, I could only hit the crevasses. I put ensolite over the top

    IMG_1661_69ec6d7b4a8366a301ce731e2f8bd3a23da87fef.jpg

    Wiring was a pretty big undertaking. I ran new wire from the amps to the doors. Below is briefly how I did it, passenger side to driver side. Note that the driver side is where the amp rack is.
    I used the center 'brace' on the back wall as a track, and I cut out holes where it was necessary for stuff like power wires.

    IMG_1660_53e7ee85050e9d3c2edaa17e1c74f7c65371d523.jpg

    IMG_1666_25517ffb083d4fb9fe5e793ed779beb08259cb8a.jpg

    IMG_1667_21f36f7c9018adce314ec27b0455cb38aa7ca7cb.jpg

    IMG_1668_292ad1c28fb9984be2dd702f438a2678194bf936.jpg

    I carpeted the box and amp rack. For a first time job I did OK, but if you look close you can probably tell that yeah... it's a first time job. :eek:

    You may notice that the sub box is a half-height. I had this plan that I could make a tool tray above the box so I could still have some behind-the-seat storage, but after getting things in I know there's simply no room!!

    IMG_1670_d5f39717ee0a09408276d6c49e20a983ac673dd1.jpg

    IMG_1672_118d6057acc339bab993a071c42bc2c4c6564e8c.jpg

    Mr. Marv's dimensions are VERY exact. The boxes are practically poured into place.

    IMG_1673_db886cc6237fee38f7345b4a585eedcfb25b062a.jpg

    IMG_1679_8033ea388afb3cc5970616d57136e0cbcdf150be.jpg

    Things are so tight that I can't get a speaker grille on to save my life! I eventually removed the plastic off the back of the seat.

    IMG_1671_e9a6375194e2ca6c69e2196e439e513101113cab.jpg

    IMG_1681_1fb343b02e286d23d0bd166b44361698f2fce7dc.jpg

    The clarity and balance in my system is the best I've had, but as I had mentioned, I'm really lacking some of the 'jump' that a 4.0V deck could provide, so no real rap competitions just yet :rolleyes: I'll stick with Van Halen for now.
     
  8. Oct 17, 2010 at 1:18 PM
    #8
    Chickenmunga

    Chickenmunga [OP] Nuggety

    Joined:
    Apr 10, 2008
    Member:
    #5877
    Messages:
    7,574
    Gender:
    Male
    First Name:
    Mike
    Keizer, Oregon
    Vehicle:
    08 TRD Offroad DC 4x4 with stuff
    All the normal TW BS
    yeah I know! :eek:


    Yeah, I was either yelling "WHEE!" or laughing maniacally.


    More to come, but I have to head off to play some ultimate
     
  9. Oct 17, 2010 at 1:24 PM
    #9
    jandrews

    jandrews Hootin' and Hollerin'

    Joined:
    Jun 7, 2009
    Member:
    #18122
    Messages:
    16,171
    Gender:
    Male
    Vehicle:
    '09 FourDubDee TRD OR
    A-TRUCK, Fat Kid in the Bed, Custom Pinstriping, Ported and Polished Muffler Bearing, Hi-Performance Bed Mat
    Just looking at the pic, and it may be the angle, but your front bumper appears to be mounted offset side to side...looks like a lot more gap on the driver side.
     
  10. Oct 17, 2010 at 3:44 PM
    #10
    RelentlessFab

    RelentlessFab Eric @Relentless Fab Vendor

    Joined:
    Feb 17, 2008
    Member:
    #4772
    Messages:
    15,719
    Gender:
    Male
    First Name:
    Eric
    Sparks, NV
    Vehicle:
    07 AC 6mt>03 SR5 >08 Sport and 17 6MT TRD OR
    Relentless Armored! Too many others to list.
    Its level. The truck is flexed out a bit and the frame twists making it appear that way. :cool:
     
  11. Oct 17, 2010 at 5:53 PM
    #11
    Chickenmunga

    Chickenmunga [OP] Nuggety

    Joined:
    Apr 10, 2008
    Member:
    #5877
    Messages:
    7,574
    Gender:
    Male
    First Name:
    Mike
    Keizer, Oregon
    Vehicle:
    08 TRD Offroad DC 4x4 with stuff
    All the normal TW BS
    Just because it would haunt me in the middle of the night, I went out to measure. I might be 1/32" off. I think I can live with that ;)
     
  12. Oct 17, 2010 at 6:50 PM
    #12
    Chickenmunga

    Chickenmunga [OP] Nuggety

    Joined:
    Apr 10, 2008
    Member:
    #5877
    Messages:
    7,574
    Gender:
    Male
    First Name:
    Mike
    Keizer, Oregon
    Vehicle:
    08 TRD Offroad DC 4x4 with stuff
    All the normal TW BS
    Lift & Sliders

    In September '09 I joined an offroad club and went on my first official wheeling trip. I arrived at TSF with my bone stock rig and parked next to the rest of the group - about 4 FJ Cruisers that were built to the hilt: Budbuilt skids, Metaltech and ARB armor, racks full of recovery gear, and tires no smaller than a 285. What did I just get into?
    The guys did a fantastic job of putting up with me, teaching me, and protecting me through routes such as Cedar Tree and University Firepower. For the harder trails they were kind enough to tell me the alternate access route (which was fine by me!).
    I had some hairy moments with some stumps, and it was quickly apparent that I needed to mod something if I wanted to keep doing this and retain sanity.

    I must have changed my mind a zillion times. Revenge Fab, Metaltech, Demello, or something else for sliders? SAW, ICON, Toytec, or OME lifts?

    After enough research, I determined an OME kit from Wheeler's offroad was exactly what I needed: Affordable and can withstand more than I'll be throwing at it.

    Sliders were harder to figure out. I got to the point where I was emailing Metaltech and RelentlessTaco back and forth. Long story short, Metaltech had only built for FJC's and would need a significant amount of build time. About that same day I got an email from RelentlessTaco that he could meet me in Tillamook in 2 weeks to install sliders AND the lift, we'd be done in one day, AND we'd go wheeling the next day!!!

    I'm not sure if Timicha knew he was going to be helping, or if he knew that we were going to use his dad's shop :eek:, but I showed up on a Saturday and we got crackin'. I don't think any of us realized that we wouldn't be done until about midnight!

    We installed:
    OME N140S front shocks with 885 springs (UPDATE: I switched to 886 springs after installing the winch)
    Steel Spacers for the top of the front shocks (made by RelentlessTaco)
    OME N182 rear shocks
    extra Wheeler's ACH22 1.5" leaf in the rear (I already had the rear TSB spring in)
    the sliders

    We worked pretty quick, but most of the time was spent waiting for paint to dry


    Test fitting
    IMG_2092_be75e4214a3a6ca3a7c88b9750462009aac20e80.jpg

    Welds complete
    SlidersandLift-7_c62d12a2c5eeb48e5204ff2d4e30448899582d1c.jpg

    Painting. I accidentally picked a really glossy black, but it actually came out really nice... up until I hit the trails. Now you can't really tell so much since the trail dust, etc. has faded them :) They look great either way.
    IMG_2098_4c2c94a38d3477f69c599bba805fcad1434c82ce.jpg

    Mounted
    IMG_2102_9ac78ed90371483a69fc904bb8440e015b755c7b.jpg

    Nekkid wheel wells. It wasn't until we got this far along that I thought about taking pics.
    SlidersandLift-1_b374364d805201b00721d9d0cdca3b121e515f3b.jpg

    Just about done!
    SlidersandLift-9_56f6e431db7f09a3487d33887bea5681ee5a40bb.jpg

    Beauty shot at the staging area. I'm still on stock tires in this pic - I had tread left and felt that I should try to let the bank recover a bit.
    SlidersandLift-12_df8fd8869f13dcd6e1e3f0798cf22e2321bca0f2.jpg

    On the trail. I don't have better pics because it started raining like mad. It's too bad, because we found an area where I put the sliders to use to pivot on a rock. As I told Eric, it's really great when a product pays for itself in under 24 hours :woot:
    SlidersandLift-13_a942f146e8b77be42a1a26f972616fc1fada4aaf.jpg

    If I had the chance, I'd make the exact same choices again. the OME lift is treating me well so far, and nothing compares to these sliders.
     
  13. Oct 17, 2010 at 7:09 PM
    #13
    Chickenmunga

    Chickenmunga [OP] Nuggety

    Joined:
    Apr 10, 2008
    Member:
    #5877
    Messages:
    7,574
    Gender:
    Male
    First Name:
    Mike
    Keizer, Oregon
    Vehicle:
    08 TRD Offroad DC 4x4 with stuff
    All the normal TW BS
    Trailer Plug Relocation

    I saw this mod and thought I should do it sooner than later. I didn't want to remove the light, so I drilled my own hole (that's what she said). I found that it sat more flush if I installed it at an angle, so I went with that and used Permatex black RTV silicone to make a seal. In the pic, the silicone is a bit brown from dust.

    8273fd67-1_3982b31368ce6398444b1c393a0da433f190e4bd.jpg
     
  14. Oct 17, 2010 at 7:49 PM
    #14
    Chickenmunga

    Chickenmunga [OP] Nuggety

    Joined:
    Apr 10, 2008
    Member:
    #5877
    Messages:
    7,574
    Gender:
    Male
    First Name:
    Mike
    Keizer, Oregon
    Vehicle:
    08 TRD Offroad DC 4x4 with stuff
    All the normal TW BS
    Front Plate Bumper

    The first time I saw this, I knew that I must have one. It was so incredibly in-your-face and intimidating that it blew my mind every time RelentlessTaco posted a pic.

    SlidersandLift-15_3426a03351ea230bbc112790166c1ba4d8de1129.jpg

    I managed to snag the perfect moment. Eric had finished fabbing up his second prototype bumper in readiness for the Group Buy currently going on, and was selling it to the first person who had $550 - already painted, with an offer of help on mounting.

    I made it mine in less than 2 hours from his post. I think there was 5 minutes when I thought "I should check my bank account", but I think I already was pressing 'send'. :cool:

    If you look at the thread here, you can see us working on the install.

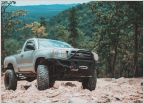
    Eric calls it a 'prototype', but I have no idea how you could tell. I know it sounds like I'm gushing, but the guy really is a master at what he does. This model is significantly improved, as you can see in the overall finish and how the bumper has been redesigned for a better approach angle. It's probably lighter, too.

    TacomaWorld_NW_at_TSF-25_b2507bceb777f2d5bcc8a6a2506c1f112606b8ac.jpg
     
  15. Oct 17, 2010 at 7:57 PM
    #15
    Chickenmunga

    Chickenmunga [OP] Nuggety

    Joined:
    Apr 10, 2008
    Member:
    #5877
    Messages:
    7,574
    Gender:
    Male
    First Name:
    Mike
    Keizer, Oregon
    Vehicle:
    08 TRD Offroad DC 4x4 with stuff
    All the normal TW BS
    Washable Cabin Air Filter

    There's not much to say about this one other than I did this. It was kind of a pain to trim up the filter bracket so it would fit, but it came out great. Seems to be working fine, and if I don't like it I'll go back to regular filters.
     
  16. Oct 17, 2010 at 8:10 PM
    #16
    Chickenmunga

    Chickenmunga [OP] Nuggety

    Joined:
    Apr 10, 2008
    Member:
    #5877
    Messages:
    7,574
    Gender:
    Male
    First Name:
    Mike
    Keizer, Oregon
    Vehicle:
    08 TRD Offroad DC 4x4 with stuff
    All the normal TW BS
    Rear Differential Breather Relocation

    I've been meaning to do this for awhile, just because it's a good idea. I found time yesterday and got to work.

    I got the idea and instructions here.

    If you read through the posts, one guy had an alternate place to mount the breather, and I thought it was a great idea.

    In this pic, I'm sitting in the bed looking at the driver side cubby. through the hole you see the back end of the fuel filler. I liked this location because it keeps the breather away from accidental smacks, fuel contamination, and overzealous sprays with the garden hose.
    4c870bd5_85fc9a2c9466a748957b9cbbe128141a31cc4ae3.jpg

    Here's a bit closer pic. The metal hook can be found at Home Depot in the electrical aisle. I didn't really need a rubber insulated one, but that's all they had. I used a self tapping screw to secure it.
    ed069440_e391643e572fd34e3b604f997d87db5820bfcf74.jpg

    Here's what you see when you go to fill up... or what the gas attendant sees because you live in a state where they think a guy with a bachelor's degree is too stupid to pump his own gas :mad:
    Anyway, I like how it leaves a nice clean look.
    88754ee6_e518f5de955367249d486479c2e2d582d2742ec2.jpg
     
  17. Oct 17, 2010 at 8:13 PM
    #17
    Fluffymonkey

    Fluffymonkey Token

    Joined:
    Jul 14, 2008
    Member:
    #7932
    Messages:
    2,969
    Gender:
    Male
    First Name:
    Matt
    College Station, TX
    Vehicle:
    2013 Trd Sport DC, 07 DC sr5, 03 Prerunner
    2003: Stock 2007: Avid Offroad sliders, 30% front tint, bed mat, Truxedo low-pro qt tonneu cover, aero turbine 2525 muffler w/ 8'' tip, AR25 Resonator, 16x8 Dick Cepek DC-1 w/ 265/75 Goodyear Wrangler Duratracs, 2010 headlights, ome 884 coils with .5'' top plate spacer, OME sport front shocks, bilsten 5100s rear, 2'' aal, locking gas cap, LR ucas, Viper 2-way remote start, afe drop in filter, Rocky locking bike mounts, gear chest, scangauge, pop n lock tailgate lock 2013: most things transferred over from my 07, 5100s @ .85 + eibachs and Toytec tps for 3'' front lift, wheelers progressive aal w/ overload; compustar 2-way remote start; Antennex shorty antenna, pop n lock tailgate lock with programmable key, seat covers, Toyota's crappy all-weather floor mats (should have got Husky's or Weathertechs), TRD skid plate, led light pods mounted in front bumper valence w/ Eyourlife wireless harness and remote, led bed lights, light pods mounted in bed, Devil Horns emblem from Diaz Fabrications, rear facing pod lights in bed, under seat lights,
    awesome build!
     
  18. Oct 17, 2010 at 8:37 PM
    #18
    Chickenmunga

    Chickenmunga [OP] Nuggety

    Joined:
    Apr 10, 2008
    Member:
    #5877
    Messages:
    7,574
    Gender:
    Male
    First Name:
    Mike
    Keizer, Oregon
    Vehicle:
    08 TRD Offroad DC 4x4 with stuff
    All the normal TW BS
    CB Install

    I thought I was going to be all smart and save myself having to do a mod on this one. No such luck :p

    I got a Midland 75-822 for Christmas last year. the great part about it is that you can use it either as a handheld or quickly plug it in your vehicle via the cig lighter and a standard CB antenna.

    75822_Lg_d326a7c9c28d5994332fb76456d582b8035e22d1.jpg

    I thought I could get away with using the handheld antenna and not have to install anything. Yeah... that doesn't work. I get dead silence on the freeway, and on the trail I've got an effective range of about 5 feet. :boink:

    Since this is yet another adventure down the road called, "Stuff I know nothing about", I went down to D&R Communications in Clackamas.

    The guy there really knows his business, and gave me all the gear to get an antenna installed. Once I'm done, I can go back and get tuned for free. Sounds good.

    First up, I need a place to mount my in-cab connection. I had to make sure that when I pulled on the radio, I wasn't pulling the cable out. I chose the right side coin pouch because the cord gets tension from the cig lighter plug before the coax. If you have this radio, you'll see what I'm talking about. If you don't, then you probably aren't doing anything like this.

    I used a 7/16" bit if I remember right. Ignore the dirt, I haven't cleaned it up yet.
    77f4cd48_ea622aff5efc48816c2ad1d49ddef56a13427aae.jpg

    Toyota was nice enough to give me a target
    e7a81d76_4262891f276087ffe09cd53a9d1f1e005a1f5845.jpg

    I sent the rest of the cable through the factory hole near the steering column, just above the driver wheel well.

    IMG_0204_de25bf647712bfeb0b3193e399986a1be1e08a62.jpg

    I originally wanted to go with a custom mount off the rear corner of the tailgate area, but learned that is a big no-no: It turns your antenna into a directional antenna and you get totally crap signal from anything in front of you.

    As a a result, I went with a hood mount. However, the one I bought is designed for a T100, and is completely incompatible with the 2nd gen Tacomas without serious modification :mad:

    b10e9267_ec736baea8e79f0a715d1fa89b028d1a26af500b.jpg

    I was completely out of options, so I turned to TW for help. I found a guy who had a interesting design... wasn't what I really wanted at first, but I was desperate. It involved a piece of plate metal mounted to the hood screws and bent so the antenna stud sat near the base of the driver's wiper. Since I was already headed down to RelentlessTaco's place for other work, I thought I'd work with him on this, too. For a prototype, I think we came out with a success!

    I unfortunately don't have a pic of the piece off of the truck because I was in a rush to get it mounted, but you can see well enough in the pictures to follow. It's a piece of scrap steel that Eric had cut and CNC bent, and I hit it with a layer of primer and two layers of gloss black. I used a heat gun to speed up drying. Note that I scraped some paint off near the antenna stud and one of the bolt holes for grounding, and scraped some paint off the bolt hole on the hood.

    First, I took care of my cable management. With CB wire, you can't cut it to length, and you can't spool it up (UPDATE: I was wrong, read here. Correct length is whatever gets to the stud and back to your radio, no need for this 18' increments BS). You should run it the length of the engine bay back and forth. I routed my cable so that it would go to this area near the battery, back to the firewall, and back again. I ziptied the bundle against the factory wires.

    IMG_0202_8cc81fb95d4c20b94b86b4b055cfa6da15c75c6b.jpg

    Next, I attached the custom bracket, wrapped a bit of the cable in plastic shroud with zipties, and attached the cable to the antenna stud. To help protect the wire, I routed under the rubber strip before attaching to the stud. Notice that the mount attaches to the hood's factory bolts. DO NOT TAKE BOTH OUT AT THE SAME TIME. Take out one bolt, attach bracket with that bolt, take out other bolt, swing bracket into place and tighten up both bolts.

    IMG_0206_f560ecde3c78251487464d59e77155848549ba85.jpg

    IMG_0211_1fa682707f4b9a9a1500662bcdfadd99c647fc6d.jpg

    IMG_0209_bf2095088e639a0f3332edb50b1d0f67a9c60423.jpg

    When I put the hood down, I noticed the wire gets squeezed between the mount and the plastic sill. It's not a big deal, as the sill flexes a bit, the wire is protected, and the bracket isn't going to budge. It's hard to tell in the pic, but the bracket isn't touching the hood, there's clearance between the two pieces.

    IMG_0213_267f9ecbc055659170a87bc629b78a12c44116df.jpg

    Antenna mounted finally!!! It's a Wilson 4' Flex with a tunable tip.

    IMG_0217_ec13df098998bfc7f7a69fbb7b738a7dc3124d98.jpg

    IMG_0229_66c2323c892420a096f1d59ec76f1fa3999ceaa8.jpg

    IMG_0232_f7e6045e0ee5b222e592df250a6a27d6e4051c92.jpg

    Yes, the antenna is canted a bit forward and passenger, but remember it's a prototype and there's some really odd, tight angles to watch for. I think Eric did an OK job - install was cake, part is sturdy, and it worked great on the trail last week. You do notice the antenna being there, but it isn't enough to get in the way of driving.

    Out on the trails, the setup did great. Driving the highway, I can get plenty of chatter. I will say the Midland is hard to use in the dark. It has a momentary light for the LCD screen, but it would be nice to have something always lit and bigger. There's also too many buttons... not that you need to use them, but if I had to do it over I would try getting something like a Cobra 19 DX IV or a 25 LTD and see about mounting it under the stereo...
     
  19. Oct 17, 2010 at 8:48 PM
    #19
    pinktaco808

    pinktaco808 Hot Steppa

    Joined:
    Jul 23, 2010
    Member:
    #40651
    Messages:
    4,621
    Gender:
    Male
    dammmmmmmm
     
  20. Oct 17, 2010 at 8:54 PM
    #20
    Chickenmunga

    Chickenmunga [OP] Nuggety

    Joined:
    Apr 10, 2008
    Member:
    #5877
    Messages:
    7,574
    Gender:
    Male
    First Name:
    Mike
    Keizer, Oregon
    Vehicle:
    08 TRD Offroad DC 4x4 with stuff
    All the normal TW BS
    Light Hoop and Auxiliary Lights


    I'll start off with my catchphrase:

    After a lot of research

    Ok, now we can continue:


    ... I have decided that I want to add some auxiliary lights to the bumper, with a light hoop welded on to the bumper.

    I spent an immense amount of time waffling between PIAA, IPF, LightForce, and HID-converted Hellas. I had really wanted LightForce after hearing so many good things about them, but I didn't have the mounting depth without getting really crafty - LF lights are really deep, and Relentless bumpers are really narrow. Alternatively, I could go with the HID-converted Hellas, which were a really cheapo light but mounted with very little work. I drove my family mad, I hounded RelentlessTaco, I bugged plenty of people on the forum - what to do??
    It finally took a call from HBMurphy to set me straight. He told me, "You could spend $300 on a good set of spendier lights which you might not like for some reason and have to sell them for $150, or you could go with a cheap set for $150 and sell them for $75. Swallowing $75 worth of mistake sounds a lot nicer."

    I couldn't argue with that, so I got some Hella 700FF and a DDM Tuning Apexcone Raptor 55W HID kit, H3 bulb. I went with a 5000K temperature because I wanted to avoid blue, and hope to get more light.

    I drove down to RelentlessTaco's house to get the hoop put on and the lights converted. It's quite a drive down there, but I had a college buddy living down there and it was a good excuse to visit.

    Arriving at RelentlessTaco's house is a weird experience, because not only is it his house, you also get Timicha of Elite Off-Road, along with all their housemates. I didn't get a picture, but I was one of six Toyota trucks that were parked in the driveway and spilling out to the street. It was like an eternal mini-meet, and I probably had the least mods!

    We had a lot to do that weekend with the hoop, lights, and CB mount (which I talk about earlier in this thread), plus Eric was involved in other people's bumpers and sliders as well, so I didn't get any pics, but you can see the results are great!

    I wired the lights into the stock fog wiring, which I might change later because the wiring looks thin. I went ahead with the fog light anytime mod simply because it's easier to get fogs pointed.

    I'll try to get some night shots later on. I'm not sure if I'm pointing them quite right. They are bright enough that it's pointless to try using stock headlight high beams at all, but I think I have some pretty heavy hot spots. Overall I think they will do fine for my purposes.

    IMG_0246_59b6fe891c6dffadda65a0465ff7aa5a92869388.jpg
     

Products Discussed in

To Top