1. Welcome to Tacoma World!

    You are currently viewing as a guest! To get full-access, you need to register for a FREE account.

    As a registered member, you’ll be able to:
    • Participate in all Tacoma discussion topics
    • Communicate privately with other Tacoma owners from around the world
    • Post your own photos in our Members Gallery
    • Access all special features of the site

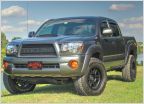
GoufCustom's Taco Build

Discussion in '2nd Gen. Builds (2005-2015)' started by goufcustom, Nov 3, 2011.

  1. Nov 3, 2011 at 6:15 AM
    #1
    goufcustom

    goufcustom [OP] 7.62x63mm

    Joined:
    Oct 3, 2011
    Member:
    #64586
    Messages:
    1,321
    Gender:
    Male
    First Name:
    Mike
    MD
    Vehicle:
    2021 4x4 TRD Sport DCLB
    UPDATE - I am back in a Tacoma as of October 2023

    SOLD my 2006 DCSB TRD OR IN JANUARY 2014

    Bought a used 2006 DCSB TRD Off Road 4x4 in 2011.

    Truck:
    • 2006 Tacoma Double Cab 4x4 4.0L V6 with TRD Off Road Package and Short Bed. Bought it used with 97k miles on it, but it was in near perfect condition, looked like it only had 20k miles on it.
    Suspension:
    Wheels and Tires:
    • Stock Off Road Rims.
    • 1" BORA Wheel Spacers
    • TRD Center Caps
    • 285 75 R16s Firestone M/Ts
    • BAMF Cab Mount Chop Done.
    Performance:
    • aFe CAI Pro 7.
    Armor:
    • TRD Front Skid Plate from littledvl.
    • BAMF Sliders, PCed with KickOut, Bolt On.
    • BAMF LCA Skids.
    • BAMF Diff Skid.
    Audio:
    • Added 1/8" Audio Connector - and it is working perfectly.
    • Plan to replace the speakers.
    Appearance.:
    • Satoshi Grill Mod with HomerTaco Mesh.
    • Satoshi Grill Mod with TOYOTA Letters on Custom Stand-Offs. (Part # 75311-90K00)
    • Moved Horns for Satoshi Grill.
    • In-Channel VentVisors.
    • Lower grill with matching HomerTaco Mesh.
    • Paint lower grill center black.
    • Restored Headlight Lenses.
    • New Husky Front Mud Flaps.
    • LED Lights in Brakes/Reverse/Signals/Markers.
    • LED Dome Light.
    • Illuminated 4x4 Switch.
    • BAMF Behind Grill Light Mount.
    • Behind Grill Hella 500 FF Driving Lights.
    • PLAN - Color Match Door Handles.
    Added Functionality:
    • Rear Diff Breather Mod.
    • Heated Driver Seat - Dorman Kit
    • HomeLink in Roof Liner
    • Black UnderCover Tonneau Cover.
    • Oil Catch Can.
    • Fog Lights Anytime Mod.
    • iPhone Charging Cable.
    • CrimeStopper backup sensors. (uninstalled, looking for better alternative)
    • More Tie Down Points in the Bed.
    • Mounted my Surefire G3 LED on the side of my drivers seat.
    • Bed Lights. - My switch is wired up off my horns fuse.
    • Sienna Heated Mirrors. - http://www.tacomaworld.com/forum/2nd-gen-tacomas/193528-oem-heated-mirrors-diy-mod.html
    • Parking lights as additional turn signals.
    Misc.:
    • New Battery, New Fluids in Everything, Slip Yoke Re-Greased.
    • New CandlePower Headlight bulbs, 65/70W H4.
    Pics:

    How it sits now:
    null_zpsafd342f0_2ff56f3d982b554986df25b7174d4eabf3923aae.jpg

    null_zps09f8d446_a73ff22b19a156b04a8fd8f48ac93e5829bb0a3e.jpg

    [​IMG]

    73c32287_876aeae33d7dc0135d635bb96c73e33cfaedbaa7.jpg

    My Custom Satoshi:
    photo4-2_9d0ec6215743b75c53a125f276f1fb6901e49c6a.jpg
    photo3_7416a3c5caf056eb08a4f23c55e680ab6d9b636f.jpg

    More to come...
     
    Last edited: Nov 6, 2023
  2. Nov 3, 2011 at 7:28 AM
    #2
    goufcustom

    goufcustom [OP] 7.62x63mm

    Joined:
    Oct 3, 2011
    Member:
    #64586
    Messages:
    1,321
    Gender:
    Male
    First Name:
    Mike
    MD
    Vehicle:
    2021 4x4 TRD Sport DCLB
    My grill when I first got it home:
    [​IMG]

    Truck in Work, and I moved my horns out of the way:
    [​IMG]

    Parts in my "paint booth":
    [​IMG]

    Mockup before final paint:
    [​IMG]


    My new almost complete Satoshi Grill that I color matched:
    [​IMG]

    My Emblem showed up: (Part # 75311-90K00)
    [​IMG]

    After some Dremel work, now for some hand sanding:
    [​IMG]

    Installed my aFe Pro 7 Cold Air Intake, the engine has a much nicer, deeper sound now, not sure if it really made my truck faster, but it sounds good:
    [​IMG]

    Installed a Catch Can:
    [​IMG]
    [​IMG]

    Started removing the lower grill slats to put matching mesh there to match my Satoshi grill:
    [​IMG]

    My head unit in pieces, about to solder in the wires for the 1/8" audio in line:
    photo3-1_058a54ca0fce38bc268c50e3f5d19bea005e5102.jpg

    All Wired up:
    photo4-1_714ad8bfb0922c67028d8a681843271dd96c4e9d.jpg
    photo5_935934484200a2544792ab89babbf59d31ba50a2.jpg

    Head unit installed and everything is working, unlimited Pandora in my Tacoma!
    photo-2_89d4f6e825e63405b20bca6cf54da3a7255799eb.jpg

    Installed a iPhone Charging Cable under my dash, for a nice clean charge:
    [​IMG]

    More work on the letters:
    photo3-2_dded091a222bbc37efbfc8975ecfe13037adfc9f.jpg

    About ready to epoxy them the the stand offs:
    photo2-1-1_f11b3fb63c52d81c1a7f31ae5d3810617673a105.jpg

    Half way done:
    photo4-2-1_f24738d811f3a7aa24b68387958537c171c5b0a0.jpg

    Removed from the mesh and ready for paint:
    photo5-1_4c76015587efabb0206c237c95773da2a059a1ef.jpg

    On my Truck:
    photo4-2_9d0ec6215743b75c53a125f276f1fb6901e49c6a.jpg
    photo3_7416a3c5caf056eb08a4f23c55e680ab6d9b636f.jpg
    photo2_d626f8e2c37306a8c88fd7bd040cda11446d123b.jpg

    New Husky Mud Flaps: (these are so much better than the factory ones and cheaper)
    [​IMG]
    [​IMG]

    First time on some dirt:
    Tacoma2_0e819c0d0064151ca1c1d3a52ca8ea79502d7bf9.jpg
    [​IMG]
    TacomaLow_9f6e54092ab218d46e3f1bf0efbafed6bb25e92f.jpg

    My dogs, they love the big backseat and the dirt road smells:
    TacomaDogs_de1439bce57529b9ca93507e416c57ac440478f8.jpg


    More to come...
     
  3. Nov 3, 2011 at 7:28 AM
    #3
    goufcustom

    goufcustom [OP] 7.62x63mm

    Joined:
    Oct 3, 2011
    Member:
    #64586
    Messages:
    1,321
    Gender:
    Male
    First Name:
    Mike
    MD
    Vehicle:
    2021 4x4 TRD Sport DCLB
    I emptied my Catch Can for the first time today, some very nasty stuff in there... The shut off valve worked great, and the drain one is run into the wheel well, very easy to get at, took about 3 mins to drain and put back.
    [​IMG]
    [​IMG]

    And my help for the day:
    [​IMG]

    Reserved for more pictures and truck work.

    Backup Sensors Installed:
    photo-3_5e4f06c4eb822b5c3eea4cb106b6496ed1c01064.jpg

    4x4 Switch Illuminated:
    [​IMG]
    [​IMG]

    LED Reverse Lights in: (LEDs on the left, stock bulbs on the right)
    [​IMG]

    LED Brake Lights in: (LEDs on the left, stock bulbs on the right)
    [​IMG]


    Added white led strips in the bed, running off a sing switch that is wired up to the horn fuse for constant power even with the truck is off.

    I drilled small 7/32" holes in the bed to run the wires to ground and power, I am sure a few go you would disapprove, but this worked out great, completely hidden wires.

    [​IMG]

    [​IMG]

    [​IMG]

    SWITCH
    fe97630b_0b132848933ba3c31335096aa61e6018bfff7107.jpg

    [​IMG]
     
  4. Nov 4, 2011 at 10:42 PM
    #4
    littledvl

    littledvl ride BMX!

    Joined:
    Oct 28, 2008
    Member:
    #10345
    Messages:
    3,642
    Gender:
    Male
    First Name:
    Eric
    Saint Leonard MD
    Vehicle:
    08 taco dc 4x4 / 15 tundra dc 4x4
    Too many to list
    Good start man, always good to see another tacoma in MD.

    I have a stock trd plate id sell for $60, I herculined it so its not the brushed aluminum look tho.
     
  5. Nov 19, 2011 at 9:12 PM
    #5
    htowntaco23

    htowntaco23 Well-Known Member

    Joined:
    Oct 19, 2011
    Member:
    #65483
    Messages:
    143
    Gender:
    Male
    First Name:
    Matthew
    Austin, TX
    Vehicle:
    07 PreRunner SR5
    Carr side steps, Flowmaster 40 series dual exhaust, Spyder projector headlights, black housing LED taillights, 2 10' JL Audio subs, Polk amp, Famous Fabrication hood mount brackets, 2 Rigid Industries Dually LEDs
    Did you sand the chrome before you painted it?
     
  6. Nov 20, 2011 at 6:44 PM
    #6
    goufcustom

    goufcustom [OP] 7.62x63mm

    Joined:
    Oct 3, 2011
    Member:
    #64586
    Messages:
    1,321
    Gender:
    Male
    First Name:
    Mike
    MD
    Vehicle:
    2021 4x4 TRD Sport DCLB
    Yes, started with 220 grit and finished with 600 grit and then primed it once and then bondo'd a few spots and sanded and primed again before color matching it.
     
  7. Dec 11, 2011 at 7:27 PM
    #7
    goufcustom

    goufcustom [OP] 7.62x63mm

    Joined:
    Oct 3, 2011
    Member:
    #64586
    Messages:
    1,321
    Gender:
    Male
    First Name:
    Mike
    MD
    Vehicle:
    2021 4x4 TRD Sport DCLB
    Used the 3M headlight lens restoration kit, was very skeptical of this, but figured it was worth a try. Overall I am very happy with it, took about 1.5 hrs, and the headlights look like new, and the light transmission is much nicer.

    Big take aways for anyone else doing this - you can't tape off enough!, go slow and be careful, and this might be safer/easier if you remove the headlights completely. I got the wax residue all over my engine bay and outside of my truck. I used a corded drill that went up to 3000rpm, worked great.

    anyway - pictures:

    Taped off Lens:
    [​IMG]
    [​IMG]

    Sanded Lens: (this was the scary part, but after the 500 then 800 then 2000 grit sanding process it got so much better, then finished it off with the polishing compound, it all worded out.)
    [​IMG]

    Other Lens after the polish, they both turned out the same:
    [​IMG]
    [​IMG]

    Comparison, Driver's side is done, Passenger side is not: (in hind sight, my headlights were probably fine, but they look better now, and I feel better now that it is done.
    [​IMG]

    All Done:
    [​IMG]
     
  8. Dec 28, 2011 at 10:45 PM
    #8
    goufcustom

    goufcustom [OP] 7.62x63mm

    Joined:
    Oct 3, 2011
    Member:
    #64586
    Messages:
    1,321
    Gender:
    Male
    First Name:
    Mike
    MD
    Vehicle:
    2021 4x4 TRD Sport DCLB
    Just ordered all the stuff that I didn't get for Christmas, now to get home and get to work.
     
  9. Jan 3, 2012 at 8:21 PM
    #9
    tacomarotto

    tacomarotto "Change is inevitable, but growth is optional."

    Joined:
    Jan 27, 2010
    Member:
    #30187
    Messages:
    3,654
    Gender:
    Male
    First Name:
    Jon
    Jacksonville
    Vehicle:
    Audi S3
  10. Jan 6, 2012 at 5:23 PM
    #10
    goufcustom

    goufcustom [OP] 7.62x63mm

    Joined:
    Oct 3, 2011
    Member:
    #64586
    Messages:
    1,321
    Gender:
    Male
    First Name:
    Mike
    MD
    Vehicle:
    2021 4x4 TRD Sport DCLB
    EDIT: I uninstalled the backup sensors, they were not working properly, I am currently looking for an alternative system to use in the holes I have made...


    Check out my HOW TO Thread here: http://www.tacomaworld.com/forum/technical-chat/196138-back-up-sensor-install-how.html for more discussion on this install.


    My Install guide for the CrimeStopper Back Up Sensors; I bought these rather than a camera because I always turn around to backup and don’t hook up to a trailer, so a camera isn’t a good option for me. This was $30 at Walmart, and can be found easily on the rest of the internet. Anyway, this install is really not that hard, you just have to get past the fact that you have to drill your bumper, and because you cant undo that.

    Here’s the unboxed kit:
    [​IMG]

    [​IMG]

    The included instructions are useless, in the electrical hookup portion is just says “do it correctly…”, really… I planned to do it wrong.

    [​IMG]
    [​IMG]
    [​IMG]
    [​IMG]

    So for some tools you will likely need:
    High Speed Corded Drill
    Tape & Marker
    Silicon
    Conduit ~10’
    Zip Ties
    Electrical Tape
    Wire Tap
    Dremel
    ¾” Hole Saw or 21mm Hole Saw (quality one)
    Center Punch & Hammer

    I started by taping off the area that I would drill into, this allowed me to mark all 4 sensor locations, and then you can check out the placement.

    [​IMG]

    Start Drilling after you use the center punch to start you off:
    [​IMG]

    The finished hole, I cleaned it up with my dremel, and test fitted the sensor:
    [​IMG]

    ** Before you get out the silicon, tape the front of the sensors off, apparently if you get anything (water/paint/silicon/etc) in the grove between the sensor and the bezel you can mess up the sensors. ** I did not do this and had to go back and clean out some silicon from the grove, because the silicon gets everywhere… :/

    **** I talked to the manufacturer, they recommend against using any glue,silicon, they claim that messes up the sensors. Not sure how else to protect the bumper from rusting... ****

    They are also claiming that any pressure on the sensors causes them to miss read distance.


    See the sensor and the backing plate here:
    [​IMG]

    Use the silicon to coat the hole and sensor to prevent rust:
    [​IMG]

    Install the sensor and the backing plate to secure the sensor, and repeat 3 more times:
    [​IMG]

    Installed:
    [​IMG]

    So the cheapo hole saw that came with the kit lasted for one hole, so I went from the 21mm hole saw that came with the kit to a ¾” hole saw from Lowes, it required additional dremel sanding to open the holes up, but the fit was much better, and it took me a hour to get the first hole with the supplied hole saw, and the other 3 holes took me an hour total with the quality hole saw.

    [​IMG]

    Burnt up!
    [​IMG]

    I did not see any meaning for the “A-B-C-D” labels on the wires, the sensors where not labeled, and there was no instructions on connecting the wires in a certain order.

    Now it is time for the conduit, this isn’t required, but makes things cleaner:
    [​IMG]
    Endless wire, almost 16’ of wire, and you need it!
    [​IMG]

    [​IMG]


    Now to snake it from the bumper to the cab, I started by running it next to the brake/reverse light wires, on the drivers side. I then went over the wheel well, came back down and ran up along the underside of the cab, and to the boot that goes into the cab for the other wires.

    Looking aft, from where the boot is to go into the cab:
    [​IMG]

    Snaking the cables through the boot, I removed the boot from the body, and snaked the cables through one at a time, it is a really tight fit, and you have to remove the factory electrical tape. Then run the wires into the cab, they come up underneath the drivers seat, and finally replace the boot:
    [​IMG]
    [​IMG]

    Next, I ran the wires towards the center console, under the shifter panel there is a lot of space for the control module, getting the wires there took some time. I mounted the control module to the inside of the center console out of sight, and started to run the power cable back to the drivers side door sill and up to the reverse light cable shown here. I also ended up taking the drivers seat out, this made things so much easier, but I did not unplug the cables from the seat, I just shifted the drivers seat back a foot so I could work:

    I would not recommend putting the control unit in the center console, too much work.

    [​IMG]
    [​IMG]
    [​IMG]

    Splice into the reverse power cable and find a place to ground it to:
    (this image it not of my truck, I forgot to grab a picture from my actual install, but the wire that I tapped into for reverse light power is the same one pointed out in this picture, only difference was my wire was red with a white stripe)
    [​IMG]

    I tapped the wire in the wire bundle under the seat, and was all set.
    [​IMG]

    Time to run the supplied speaker someplace, I went behind my second row of seats, the speaker is rather loud even on the “low” setting, so I hid it under the driver side rear seat, seatbelt cover panel.

    Time to Test: This has and is turning into a nightmare, I was at first getting a constant beep, as if the system thought I was 0-1 ft from something, I disconnected all the sensors, and connected them one by one trying each on out to locate the issue, I also started rotating the sensor to “aim” them, which you should NOT need to do since they are round… I finally got the entire system to get quiet while I was reversing around nothing and then it would beep as it is supposed to around objects as I backed up towards them. All good right… Nope, now I am getting a intermittent beep when I start backing up and there is nothing around, the sensors are picking up something, not sure what, maybe a bad sensor in the bunch, because I have isolated the issue down to one sensor, I think… For now it is installed and I will fiddle with it later. I plan to call the manufacturer and talk to them, the install guide basically says if something doesn’t work, then the entire system is defective and should be returned… I am not ripping out all of the wiring at this point, and if I do I would put in a different system.

    Not sure if I would recommend this system, it is nice, it looks like it is quality made, but these little headaches are ruining if for me at the moment. My wife has the Honda sonar system and I love it, but it is $360, well I found it and it looks to be rather universal, just sold by Honda.

    I will update this if I come across anything that resolves the issues that I am having.

    Oh, go back and zip tie all the cables under the truck out of the way, I mostly just zip tied it to the existing wire bundle that was under there.

    Final look from the back:
    photo-3_5e4f06c4eb822b5c3eea4cb106b6496ed1c01064.jpg


    Ok, so I tried a few other things, and decided to rip open the control box as you said, and here are some pictures:

    [​IMG]

    [​IMG]

    I was careful and the warranty sticker is intact! YES!

    Anyway, took it back out to try and "tune" it, using a small flathead I adjusted the 4 black circular knobs with the red sealant on them, one sensor at a time, the first three sensors showed promise that this would work, and then the last sensor failed to be tunable, so I left it unplugged and tried the other 3 out. Well, I wish I had good news. once I set the control unit down, on my lap it started the constant beeping again. I narrowed down the issues to two things, first one of the sensors is shit, and second and this is much more of an issue, the connectors between the sensor wires and control unit are extremely loose, and if you move the wires even slightly then the constant beep comes back. :(


    So time to sleep on it and think about taking it out and back to Walmart, then give the AudioVox system.
     
    This site contains affiliate links for which the site may be compensated.
    #10
  11. Jan 7, 2012 at 5:03 PM
    #11
    goufcustom

    goufcustom [OP] 7.62x63mm

    Joined:
    Oct 3, 2011
    Member:
    #64586
    Messages:
    1,321
    Gender:
    Male
    First Name:
    Mike
    MD
    Vehicle:
    2021 4x4 TRD Sport DCLB
    Went to the local you pick it junk yard, not a single Tacoma, not really all that surprising. Ended up picking parts with my friend for his Neon.

    Cool kit car:
    [​IMG]

    [​IMG]
    [​IMG]
    [​IMG]
    [​IMG]
    [​IMG]
     
  12. Jan 14, 2012 at 2:35 PM
    #12
    goufcustom

    goufcustom [OP] 7.62x63mm

    Joined:
    Oct 3, 2011
    Member:
    #64586
    Messages:
    1,321
    Gender:
    Male
    First Name:
    Mike
    MD
    Vehicle:
    2021 4x4 TRD Sport DCLB
    Installed some AALs to bring the rear up to TSB leaf spring standards:
    7db34b13_99eaadf6a45ec43ff22e95c26f98a999450c40b0.jpg

    1759b990_9696b68526fa13ba91fefa259c250e1476df7a7f.jpg

    Relocated the resistors for my rear turn signals, now I don't have to worry about them melting the plastic housing.

    [​IMG]

    [​IMG]
     
  13. Jan 20, 2012 at 5:51 PM
    #13
    goufcustom

    goufcustom [OP] 7.62x63mm

    Joined:
    Oct 3, 2011
    Member:
    #64586
    Messages:
    1,321
    Gender:
    Male
    First Name:
    Mike
    MD
    Vehicle:
    2021 4x4 TRD Sport DCLB
    I wired up my parking lights to alternate blink with my turn signals, works great and looks really good, also adds extra turning lights on the side of the truck for safety.


    I started two separate projects with the same waterproof LED strips from eBay today.

    First is strips for bed lights, one strip under each of the 3 bed rails, so I wired up the strips after I cut them to length, and added leads, and then put silicon in the ends to water seal them.
    [​IMG]

    Other end
    [​IMG]

    Went crazy with the electrical tape to make sure the ends were solid.
    [​IMG]

    [​IMG]

    Used some 3M double sided automotive tape on the back:
    [​IMG]

    That is as far as I have gotten here, got dark and dropped to 20 deg outside so no work on the truck tonight. I did test out the strips to make sure they still work after everything that I did to them.

    (bad cell phone pictures, they are much more white than this)
    [​IMG]


    Other LED project, not sure if this will look stupid but, the plan is to backlight my Satoshi grill and letters. I used twist ties to attach it for now, I want to test it out, I have it all set to go, just haven't connected the power to anything yet.

    [​IMG]

    [​IMG]

    [​IMG]


    I wired these up to the parking lights, check it out.
    [​IMG]

    [​IMG]

    [​IMG]

    With headlights:
    [​IMG]

    [​IMG]

    Not sure if I am a fan of them, I will try it out for a little while, let me know what you think.


    These lights got removed, my wife hated them, and I think they light up the radiator too much.
     
    This site contains affiliate links for which the site may be compensated.
    #13
  14. Mar 6, 2012 at 1:26 PM
    #14
    goufcustom

    goufcustom [OP] 7.62x63mm

    Joined:
    Oct 3, 2011
    Member:
    #64586
    Messages:
    1,321
    Gender:
    Male
    First Name:
    Mike
    MD
    Vehicle:
    2021 4x4 TRD Sport DCLB
    testing out the new signature picture, Tacoma near some tanks...

    [​IMG]
     
  15. Mar 11, 2012 at 6:49 PM
    #15
    goufcustom

    goufcustom [OP] 7.62x63mm

    Joined:
    Oct 3, 2011
    Member:
    #64586
    Messages:
    1,321
    Gender:
    Male
    First Name:
    Mike
    MD
    Vehicle:
    2021 4x4 TRD Sport DCLB
    Stickers

    38a560f3_18490a550e7c05ff06b507b75eef22e7ce36198e.jpg
     
  16. Mar 11, 2012 at 6:52 PM
    #16
    goufcustom

    goufcustom [OP] 7.62x63mm

    Joined:
    Oct 3, 2011
    Member:
    #64586
    Messages:
    1,321
    Gender:
    Male
    First Name:
    Mike
    MD
    Vehicle:
    2021 4x4 TRD Sport DCLB
    Finally added my third strip of LED light strips to my bed, now there is a lot of light back there.

    [​IMG]

    2b1d9ef5_7d0450229270897ff81458099cf41ec0d0266d98.jpg
     
  17. Mar 11, 2012 at 6:57 PM
    #17
    goufcustom

    goufcustom [OP] 7.62x63mm

    Joined:
    Oct 3, 2011
    Member:
    #64586
    Messages:
    1,321
    Gender:
    Male
    First Name:
    Mike
    MD
    Vehicle:
    2021 4x4 TRD Sport DCLB
    Finally got a mount for my SureFire G3 LED, I found a M15 SureFire Helmet Mount, and I think it is going work great for mounting my light. Hope to mount it later this week.

    [​IMG]

    [​IMG]

    [​IMG]
     
  18. Mar 11, 2012 at 7:51 PM
    #18
    littledvl

    littledvl ride BMX!

    Joined:
    Oct 28, 2008
    Member:
    #10345
    Messages:
    3,642
    Gender:
    Male
    First Name:
    Eric
    Saint Leonard MD
    Vehicle:
    08 taco dc 4x4 / 15 tundra dc 4x4
    Too many to list
    Bed lights look good man, I wanna do the same to mine.
     
  19. Mar 16, 2012 at 2:21 PM
    #19
    goufcustom

    goufcustom [OP] 7.62x63mm

    Joined:
    Oct 3, 2011
    Member:
    #64586
    Messages:
    1,321
    Gender:
    Male
    First Name:
    Mike
    MD
    Vehicle:
    2021 4x4 TRD Sport DCLB
    Thanks,

    Total cost on that project was $45, spent $18 on the LEDs on eBay, the switch was less than $5, and the wire cost about $5, double sided automotive tape, and the add a fuse to connect to the horn, plus some silicon and soldering time, it was pretty easy.

    It makes a huge difference, I use them all the time now, I can finally see stuff in the bed at night, my cover makes things really dark at night.


    Also mounted me Surefire today.

    a4b83156_4f7a6f7081e64186c195fe0055153ed41fb158b9.jpg

    [​IMG]
     
    This site contains affiliate links for which the site may be compensated.
    #19
  20. Apr 7, 2012 at 3:42 PM
    #20
    goufcustom

    goufcustom [OP] 7.62x63mm

    Joined:
    Oct 3, 2011
    Member:
    #64586
    Messages:
    1,321
    Gender:
    Male
    First Name:
    Mike
    MD
    Vehicle:
    2021 4x4 TRD Sport DCLB
    Installed a new switch for my bed lights, this time I went with a waterproof switch, the last one fried when I was washing my truck...

    [​IMG]
     

Products Discussed in

To Top