

-
Welcome to Tacoma World!
You are currently viewing as a guest! To get full-access, you need to register for a FREE account.
As a registered member, you’ll be able to:- Participate in all Tacoma discussion topics
- Communicate privately with other Tacoma owners from around the world
- Post your own photos in our Members Gallery
- Access all special features of the site
 Bleeding the ABS/VSC system
 Another oil question.
 Truck Cover for hail protection?
 Adding Bluetooth on cheap
 4.0 6spd Manual URD Stage 3 Clutch, TOB Sleeve & Lightweight Flywheel Install Write-Up
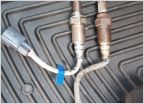 2006-2007 O2 (Air/Fuel) Oxygen Upstream Sensor
Fitting OTRATTW Contura V/Carling in stock switch location
Discussion in '2nd Gen. Tacomas (2005-2015)' started by BBYE V8, Jul 22, 2012.
Page 1 of 4
Page 1 of 4


