

-
Welcome to Tacoma World!
You are currently viewing as a guest! To get full-access, you need to register for a FREE account.
As a registered member, you’ll be able to:- Participate in all Tacoma discussion topics
- Communicate privately with other Tacoma owners from around the world
- Post your own photos in our Members Gallery
- Access all special features of the site
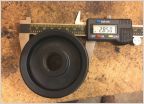 URD 2.85 stealth supercharger pulley install
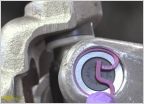 Looking for part recommendations
 Mirror backup camera in aftermarket headunit
 What are y’all paying for diagnostic scans?
 Exhaust Replacement Advice
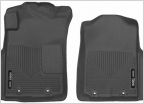 Husky Exact Contour Mats on sale at Amazon
DIY leather arm rests
Discussion in '2nd Gen. Tacomas (2005-2015)' started by reid, Sep 1, 2007.
Page 17 of 23
Page 17 of 23


