

-
Welcome to Tacoma World!
You are currently viewing as a guest! To get full-access, you need to register for a FREE account.
As a registered member, you’ll be able to:- Participate in all Tacoma discussion topics
- Communicate privately with other Tacoma owners from around the world
- Post your own photos in our Members Gallery
- Access all special features of the site
 OEM All Weather Flooring Part Numbers
 How to: Heated cup holder by the shifter?
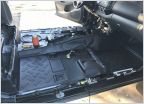
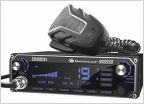 Where is good places to put cb radio?
 Hazy Headlights
 Paintable Bug and Window deflectors?
 Bed mounted d rings tie downs
Angry Monkey Winch Bumper BUILD
Discussion in '2nd Gen. Tacomas (2005-2015)' started by tweeek, Aug 1, 2013.
Page 1 of 2
Page 1 of 2


