1. Welcome to Tacoma World!

    You are currently viewing as a guest! To get full-access, you need to register for a FREE account.

    As a registered member, you’ll be able to:
    • Participate in all Tacoma discussion topics
    • Communicate privately with other Tacoma owners from around the world
    • Post your own photos in our Members Gallery
    • Access all special features of the site
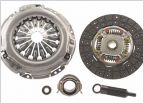
**UPDATE**My Tacoma is back in action!

Discussion in '1st Gen. Tacomas (1995-2004)' started by Ktaco, Oct 14, 2013.

  1. Oct 14, 2013 at 5:47 PM
    #1
    Ktaco

    Ktaco [OP] Well-Known Member

    Joined:
    Mar 25, 2009
    Member:
    #15130
    Messages:
    286
    Gender:
    Male
    New Brunswick, Canada
    Vehicle:
    03 Black 4x4 TRD SR5 Xtra cab.
    Grey wire mod, Deck plate mod, diff breather mod. K&N air filter. Toytec coilovers. AAL. Custom rear lift shackles. diff drop. Centerforce clutch. Superwinch LP8500 with custom "behind bumper" mount. Winch solenoid relocation with in cab winch control. 33x12x15 Duratracs. Aisin manual hub swap.
    Warning you now for the long read.

    Well once again it has been a while since I've posted but I always like to see update threads so I figured I would fill you guys in. Some of you may remember that I rolled my truck last year and was up in the air with what to do with it. I made a thread about it with pictures to refresh your memories. http://www.tacomaworld.com/forum/1st-gen-tacomas/251602-what-do-you-think-fair-price-my-truck.html.

    Well the truck sat all winter in my yard as I responded to 150 (+/-) email responses from people who were interested. The majority of them were just low ball offers or the typical run around story. I did have a few offers of $3500 and some interesting trade offers for a few early 90's Toyota pickups. In the end I just couldn't part with my truck and by the end of the winter I decided I was going to keep it for better or for worse.

    I waited until the weather warmed up and got into action. I have a friend who works at a scrap yard in another province (about a 4 hour drive). He was able to get me a front fender, door with mirror, rear bumper, box with tailgate, tail lights, a front windshield, and the complete top chopped off a cab all for $1000. All these were off a year 2000 Tacoma. I also got a few other odds and ends thrown in when I went to get the stuff like a old rusted out diff lock actuator (a whole story on it's own). So by the time all that got taken off and I had a chance to go get the stuff it was a few months. I didn't really take any pictures of the removal of the old parts besides this.
    IMG-20130429-00172_zps2916aa1e_2561c32f9ec82f09abcd447e3eb8bae26c99e57b.jpg

    The removal process was straight forward stuff and there were a few expected headaches along the way like rusted bolts and things but nothing out of the ordinary. Removing the old shattered windshield was the worst. So with all the old stuff off I started putting the "new" parts back on.

    Things going on required a little more work and craftiness. Let's start with the rear bumper. The easiest part to put on as it was a direct bolt on process. No issues with the install except for the fact that the bumper is chrome. I have yet to sand and prime it black but it will be happening in the near future.

    Next was the box. The only snag in the job was removing a broken bolt my friend had broke off in the bed when removing it. The "new" box also had chrome thin fender flares which I didn't care for so I put on my black fender flares. The new box didn't have the predrilled holes for the flares to clip into but it turns out by just bolting the flare along the bottom where the inner fender is holds them on pretty good. I'll be putting some double sided 3m body trim tape along the inside of the top of the flares to secure them even better.

    Next was the front fender. The only part he didn't get in black. So first step was to prime the silver fender a nice flat black. Install went good until I noticed the pre 01 Tacoma fenders do not have the front built in bracket which bolts into the side of the headlight and supports the turn signal. Other than that the fenders are identical. Minor problem. I drilled the tack welds out holding the bracket on the old fender and put the bracket onto the new fender. That was done.

    Next was the door. The new door had a blue interior so that wasn't going to match the tan interior of my truck very well. The wiring between the 2 doors were very similar but my truck has the little speakers in the door and this new door didn't. So I ended up pulling all the wiring out of the 2 doors and swapping them. Anyone who has had a door apart and started pulling the plastic lining off knows how fun that is. In hot summer temps the tar used to hold the plastic on was extra sticky. The only other thing I had to change between the 2 was the main speaker because they changed the shape of it between the years and the 00 speaker wouldn't fit in the 03 door lining. Other than that the door interior snapped into the 00 door no problem. I also installed the side mirror which is also chrome but was the only power mirror he had. I will eventually change it because the shape of it is not even the same as the mirrors I had on.

    Next thing I put on was the tail lights. I had read that the older style (95.5-00) would work on a 01-04 Tacoma but the 01-04 style wouldn't work on the 95.5-00. So I figured it was going to be a matter of just plugging them in and screwing them on. Wrong. Turns out the connectors are the same but the 01-04's use 6 pins where as the 95.5-00 use 5 pins. When plugged in the lights would work a-1 with the park light off. Everything worked as it should. However when I turned the park light on and started trying things like turn signals, brakes, etc that's when things went wacky. I'd have lights flashing that weren't supposed to etc. Luckily I had the connector of the tail light that had smashed during the accident and I was able to pull 2 pins from there with wiring attached and studied the differences between the two styles of lights and wired the 6th pin into the new lights. Plugged in and all was good to go.

    Of course these were all the minor details. I still had to tackle the biggest job.
    IMG-20130710-00235_zps4c1e988e_cbb2ef7fb71867bec3279b90879f7725f945c124.jpg

    Luckily I have friends in the right places. A friend of mine that lives about 2 hours away happens to be a welder/fabricator and had the tools and place to do the job. He stressed he was by no means a body man and the results weren't going to be pretty. Pretty was not what I was looking for.

    Fast forward another month or so and I have a rented truck and trailer ready to pull the Tacoma to his house.
    20130920_124839_zps692a79f3_dd7091d5026648d383c2600db9dc9ff18945856f.jpg

    I got there on a Friday around 9am and started getting to work. He decided prior to me bringing it that he wanted to cut the front pillar very low in where you can't see it when the door is closed. Of course this meant the entire dash needed to be pulled in order to have space to make the cut and weld. I was not looking forward to this. I started by removing the front fender (again), door (again), driver seat and then dived into the dash. You can find write ups on removing the stereo or maybe the speedo but not many on removing the whole dash. I decided to just wing it. My efforts of trying to organize what screws came from where soon went out the window and I just started piling matching fasteners and screws alike in groups. The process was slow but not overly difficult. In the end I had the whole dash disconnected and was able to pull it up and away from the pillar without having to pull the whole thing out of the truck.

    When he got done work at 5pm the major work started. A friend of his from work came along to help. I can't take any credit in the work that followed as metal working is not my thing. They decided they were not going to cut the entire top off and rather just cut the damaged section out and replace it. A few hours were spent just making measurements on both tops and finding reference point from where to make the cuts. Once measurements were double checked and lines were drawn the cutting began. They cut the damaged section out of my truck and then the section out of the new top. We all were rather relieved and impressed when we fit that new piece into place and it wasn't way off. There was some tweaking, bending and pulling that took place next as the damage on my cab was spread a little further then we had thought and things weren't quite as square as they should have been. In the end things were looking good and the welding started. This was not as easy as just laying a bead across the whole thing as the heat would warp the thin metal badly. They just tacked the piece into place and by that time it was 11pm so we called it a night. My truck was looking like a truck again!

    The next day the welding continued. He worked his way from the front of the cab to the back just making tacks so there would be minimal heat damage. It took a few hours or making tacks and grinding to fill everything in. As he was doing this I took a grinder and wire wheel to the old rubber calking around the window opening to get it down to bare metal and then primed it to get ready for the new windshield placement. When his welding was done I gave it a quick spray of black primer. Of course I took a few pictures of all this.
    20130927_132353_zpsb2f72db1_cd9c8760f06ce49d54dad0ed405df8a1e004561a.jpg

    20130927_193741_zpsffa5c804_5d7c8d67d8e1605902d5c5e20527bb1d52f35842.jpg

    20130927_194021_zpsd31968f3_6c0270d5ac243dd7b7090fb90e0a03a2eda77535.jpg

    20130927_224232_zpsf23b97f6_8ad2a5cc356c2d433865d85649c2deff36319bad.jpg

    20130927_224324_zpsf6c696a0_9e9bb4ab9d676970ac1aea780da8094cf6a57a51.jpg

    20130928_202507_zps44fda3b9_b2ce318abf20cc9878ee90553384d7a5cd7256bf.jpg

    20130928_202521_zps21e38247_a667c0ae33a9b0d3b11c59579d11c7b7264f4895.jpg

    When that was all set and done I decided that it was a DIY project this far so we might as well try installing the windshield too. After going to the store and getting some suction cups and windshield calking it was time. I put a bead all around, stuck that windshield on and held it in place with tape while things dried. Next was the unfortunate task of reassembling the dash. There was some confusion of what went where and maybe a few extra parts left over but it went pretty smooth. By this time it was 8pm Saturday and the work was all done. I hoped in my car and drove home.

    The next weekend was pickup time. I got a ride to his place and had a appointment for vehicle inspection and alignment. I knew it wouldn't pass inspection as there were things I was aware of that need to be changed. A rejection sticker is better then having no sticker at all so that's all I was looking for. My main concern was the alignment as my camber and toe were waayyy off. As it turns out I wasted my time as the truck failed inspection and they wouldn't perform a alignment because of a worn tie rod end. I was willing to pay for the alignment even though I knew it wasn't going to be perfect and I would need one again after replacing the part but there was no way they were going to do it. So, frustrated, I decided to just make the 2 hour drive back home as it was.

    So that's about enough. Bottom line is truck is back home, on the road and being driven daily. Got it back in time for bird hunting to top it off. I'm still working on getting the alignment done as that has been a saga of it's own and I still need to do some body work to smoothen things out a little. I decided that when I do paint it I'm going to use bed liner on the whole truck as it will be more durable and hide a lot of imperfections. I plan on keeping the truck resale is not an issue. Cleaning the truck isn't a top priority either. I'm going to be bringing it for inspection tomorrow and I expect it should pass now. I'm also looking into trading or selling my bfg a/t's for some m/t's as I'll be doing a lot more offroading with the truck now.

    Still needs work here and there but I'm smiling from ear to ear when driving it and it's sparked the love that had dwindled over the years.

    Happy to have her home.
     
  2. Oct 14, 2013 at 5:48 PM
    #2
    Ktaco

    Ktaco [OP] Well-Known Member

    Joined:
    Mar 25, 2009
    Member:
    #15130
    Messages:
    286
    Gender:
    Male
    New Brunswick, Canada
    Vehicle:
    03 Black 4x4 TRD SR5 Xtra cab.
    Grey wire mod, Deck plate mod, diff breather mod. K&N air filter. Toytec coilovers. AAL. Custom rear lift shackles. diff drop. Centerforce clutch. Superwinch LP8500 with custom "behind bumper" mount. Winch solenoid relocation with in cab winch control. 33x12x15 Duratracs. Aisin manual hub swap.
    Cliff notes:

    -Rolled truck

    -DIY fixed truck

    -Now driving truck again
     
  3. Oct 14, 2013 at 5:49 PM
    #3
    Pugga

    Pugga Pasti-Dip Free 1983 - 2015... It was a good run

    Joined:
    Jun 18, 2010
    Member:
    #39131
    Messages:
    38,444
    Gender:
    Male
    First Name:
    Mike
    Massachusetts
    Vehicle:
    '19 Ford F-250 6.7 SCrew
    F-250 Land Yacht Mod
    Much better :thumbsup:
     
  4. Oct 14, 2013 at 5:52 PM
    #4
    RAT PRODUCTS

    RAT PRODUCTS Well-Known Member

    Joined:
    Apr 12, 2010
    Member:
    #35140
    Messages:
    13,728
    Gender:
    Male
    First Name:
    Ryan
    Farmington, MN
    Vehicle:
    Cummins Coal Roller
    Smokin with a smarty.
    Nice work man!
     

Products Discussed in

To Top