

-
Welcome to Tacoma World!
You are currently viewing as a guest! To get full-access, you need to register for a FREE account.
As a registered member, you’ll be able to:- Participate in all Tacoma discussion topics
- Communicate privately with other Tacoma owners from around the world
- Post your own photos in our Members Gallery
- Access all special features of the site
 Rack and pinion bushings replacement question
 Turning my camper shell into a RV. Electrical help!
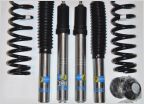 Front Struts on a 2003 DC PreRunner
 Cheap relatable upgrades
 Aftermarket stereo
 Front Turn Signal and Bumper Skirt Coming Loose
2004 Tacoma Projector Retrofit
Discussion in '1st Gen. Tacomas (1995-2004)' started by Rubio92, Jan 12, 2014.
Page 1 of 3
Page 1 of 3


