

-
Welcome to Tacoma World!
You are currently viewing as a guest! To get full-access, you need to register for a FREE account.
As a registered member, you’ll be able to:- Participate in all Tacoma discussion topics
- Communicate privately with other Tacoma owners from around the world
- Post your own photos in our Members Gallery
- Access all special features of the site
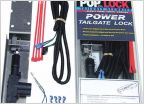 Locking tailgate for 2013 tacoma with back up cam, suggestions?
 What kind of Radio (stock or aftermarket) does my 08 support?
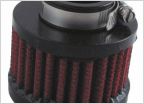 Air pump filter
 Tweeter wiring colors on my 2nd gen
 Drivers CV Axle "pulling apart"
Easiest Place To Tap Dome Light Wire (2nd Gen w/ link to 3rd Gen)
Discussion in '2nd Gen. Tacomas (2005-2015)' started by .jake, Nov 22, 2013.
Page 2 of 4
Page 2 of 4

