

-
Welcome to Tacoma World!
You are currently viewing as a guest! To get full-access, you need to register for a FREE account.
As a registered member, you’ll be able to:- Participate in all Tacoma discussion topics
- Communicate privately with other Tacoma owners from around the world
- Post your own photos in our Members Gallery
- Access all special features of the site
 Wrap Armour anti glare hood stamp long term care
 Gtechniq Crystal Serum???
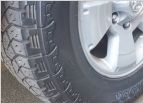 Tire shine I can [nearly] swear by!!!
 Bakflip MX4...Clean/Protect....?
 Grit Guard. Yes or No?
 Chemical Guys J97 Wax
Another De-badge/Re-badge thread...
Discussion in 'Detailing' started by Snyperx, Aug 29, 2009.


