

-
Welcome to Tacoma World!
You are currently viewing as a guest! To get full-access, you need to register for a FREE account.
As a registered member, you’ll be able to:- Participate in all Tacoma discussion topics
- Communicate privately with other Tacoma owners from around the world
- Post your own photos in our Members Gallery
- Access all special features of the site
 Light Bar + Ditch + Fog?
 HOW TO: LED Foglights
 Anyone have a tow hitch light?
 Piaa Intense White bulbs
 Are Hella 500's any good?
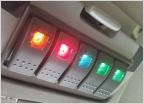 Switch panel using the overhead sunglass holder
HID Retrofit 2009 Tacoma Extended Cab
Discussion in 'Lighting' started by 95SLE, Mar 27, 2012.
Page 1 of 5
Page 1 of 5


