1. Welcome to Tacoma World!

    You are currently viewing as a guest! To get full-access, you need to register for a FREE account.

    As a registered member, you’ll be able to:
    • Participate in all Tacoma discussion topics
    • Communicate privately with other Tacoma owners from around the world
    • Post your own photos in our Members Gallery
    • Access all special features of the site

2006 4WD Ball Joint Swap

Discussion in 'Suspension' started by 907doublebass, Aug 16, 2012.

  1. Aug 16, 2012 at 11:18 PM
    #1
    907doublebass

    907doublebass [OP] Just a practical Taco

    Joined:
    May 14, 2012
    Member:
    #78812
    Messages:
    16
    Gender:
    Male
    First Name:
    Dave
    Anchorage, Alaska
    Vehicle:
    06 Tacoma, Base, Regular Cab
    12" MA audio subwoofer, JL audio amplifier, DICE IPod adapter, 2.5" AAL's + 1" Rough Country Block, Rancho Quicklift Loaded Struts, Undercover Swing Cases, K2 Motors LED taillights, Total Chaos UCA's, Toytec Front Differential Drop Kit and a Rhino-Lined ARE Canopy Cover.
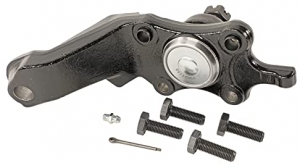
    Being an attentive owner when I can be, I noticed my stock upper ball joints (UBJ) had taken a beating after installing my new rancho quick lift struts and 52k miles on rough Alaskan roads didn't help either. So I ordered up some Moogs since the majority of other Tacoma owners approved of them and got to it. I've read a lot of other posts regarding ubj swap but they usually take place in "cleaner" environments like California etc. Here on Kodiak island we have this substance called Kodiak Krud, a mixture of dirt, sand, mud, and who knows what else that over time gets caked and baked onto your undercarriage, you can pressure wash or whatever all you want, it still finds a way to stick on. The following info isn't going to be a step by step write up, I didn't have time and was on borrowed time in a buddy's shop. So here are some the thing I encountered and some suggestions you may want to consider when the time comes to swap ubjs on your 2nd gen:

    1. Use liberal amounts of PB blaster or Break Free to free things up on the top of the ubj and uca, as well as the castle nut. Give a few minutes to soak in for good measure, use rags to clean the krud off if need be. Jack up and remove tire during this time obviously.

    2. When undoing the castle nut, I had to use a cheater bar and slow steady tension to avoid rounding the nut off, worked just fine.

    3. Loosen the upper control arm (uca) bolt to relieve tension off the ubj when you separate it from the arm. Do not remove it yet. Yes, I'm saying your going to have to remove the uca to do the ubj swap, a ball joint separator won't work. The uca removal method is quicker in my opinion.

    3. The fun part... Don't bother with a ball joint separator, human strength is futile against Kodiak krud, I had to use a big hammer and a pneumatic pitch/pickle/chisel (whatever you want to call it) fork to separate the ubj from the arm. After about 10 seconds of using both at the same time the ubj popped out. You will notice how freely the uca moves, thanks to loosening the uca bolt you saved yourself a few curse words.

    4. Now removing the uca's wasn't too bad of a task, I had to use a crescent wrench and channel locks to bend sheet metal above them so the bolt would have clearance. Once the bolt has a clear path, it should come out with with little effort, if need be you can take a long flathead screwdriver and hammer to nudge the bolt as needed. Upon the bolt coming out, the uca and ubj should pop off as well.

    5. I ended up using a hydraulic press to press the old ball joints out and the new ones in, it literally took only a couple minutes to knock out, set up took longer. Put the snap ring on or you'll be sorry. If you buy Moogs as I did, you may notice the dust boot can be difficult to put on, so I took a metal sleeve from a ball joint separator kit and used the press to SLOWLY push the boot onto the ball joint. I tried needle nose, flathead screwdrivers, and profanity, just wasn't going on with out risking damage.

    Putting everything back together was easy, just remember to torque everything to spec and bend back the sheet metal above the uca's. I found this experience rewarding, and an eye opener...next time around I'll be putting on some Total Chaos uca's and remove the headache all together. Hooray uniball!:D Thanks for reading. Regards,
     

Products Discussed in

To Top