1. Welcome to Tacoma World!

    You are currently viewing as a guest! To get full-access, you need to register for a FREE account.

    As a registered member, you’ll be able to:
    • Participate in all Tacoma discussion topics
    • Communicate privately with other Tacoma owners from around the world
    • Post your own photos in our Members Gallery
    • Access all special features of the site

Nate's build

Discussion in '2nd Gen. Builds (2005-2015)' started by Nate87, Oct 2, 2014.

  1. Dec 16, 2015 at 2:21 PM
    #321
    cabo wabo

    cabo wabo Well-Known Member

    Joined:
    Jul 25, 2012
    Member:
    #83370
    Messages:
    2,620
    Gender:
    Male
    First Name:
    billy
    virginia
    Vehicle:
    2019 dbc short bed trd sport
    Nice Tacoma
     
  2. Jan 7, 2016 at 12:05 AM
    #322
    Nate87

    Nate87 [OP] Well-Known Member

    Joined:
    May 7, 2013
    Member:
    #103748
    Messages:
    751
    Gender:
    Male
    First Name:
    Nate
    CONUS
    Vehicle:
    2013 AC TRD OR
    Thanks man!
     
  3. Jan 7, 2016 at 2:05 AM
    #323
    Nate87

    Nate87 [OP] Well-Known Member

    Joined:
    May 7, 2013
    Member:
    #103748
    Messages:
    751
    Gender:
    Male
    First Name:
    Nate
    CONUS
    Vehicle:
    2013 AC TRD OR
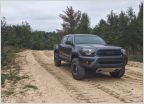
    After the trip to the Grand Canyon it was time to install the Prinsu AccessRack. I did all the research I could on the install since you only get one shot at drilling into your perfectly good roof. I also asked around and got plenty of help from fellow members like @NYCO. It really helped clear things up.

    The tape is to prevent scratching from mounting and remounting the rack to check fitment over and over. But don't be an idiot like me and leave tape on your roof for weeks at a time. It left it all gunky and was difficult to remove. Used some product called goo gone or something from the local hardware store. With some elbow grease it eventually came off.


    Bob(NYCO) recommended to start from the rear mounting holes and work your way forward. A good reference point for the first rear hole would be the spot weld/depressed spot in the drain channel about 2 3/8" forward of the weather stripping clamp on my truck. I went a little behind that at about 2 1/8" from the clamp. Used a spring loaded punch to mark the location


    I'd recommend dropping/removing the headliner while doing this to clean out all the metal shavings from drilling and also to see where you are drilling into. There is all sorts of stuff right under where you'll be drilling like the side curtain airbags and you don't want to mess that stuff up. You can see the first hole drilled though


    Placed the first nutsert into the drilled hole. You will use the supplied nutsert tool to install and tighten the nutsert into the hole. You will also use some sort of silicon sealant of your liking


    Sometimes when you start a project and have work the next day you just need to pull an all-nighter and hammer away at it till you finish.


    More holes drilled and nutsert install tool used. Getting there.


    Making a mess


    The next morning. Mostly done here...


    This next part is my attempt at making the install look as clean as possible. Some simply remove the weather stripping completely and others have cut the stripping into smaller sections and glued them into the channel. I wanted the rack spacers/risers to fit snugly through the weather stripping for the most finished look. What I did was center the spacers onto the nutserts they'd be resting on then used tape to keep them in place to mark their location.


    Next slide in the weather stripping in from the rear into the channel and under the tape. I used the largest punch form that Amazon leather punch set to fit through the spots made with the masking tape then pushed into the rubber to mark area to be punched out. This method is easy and takes out any guess work or measuring where the spacers will go.


    Remove the stripping and punch out the marked spots.


    The spacers now fit through snugly


    All done and looking clean


    Apply generous amounts of silicon anywhere you think water will enter


    I put the bolts in to hold it all in place for about 24 hours while things dried/cured


    Mounted, and mall crawling


    Rattle canned the bolts with spray on bedliner to match the powder coat of the rack. Liked that look better than the shiny bolts


    With the bolts painted. Looks better to me. Also with some cheap LED flood lights I'll be running from Amazon. I wanted some ally/camp setup lights up there and they fit the bill perfectly. Just had to drill tiny holes to mount them. I'll be doing two on each side controlled by Left and Right overhead switches.


    So that's it for the rack install. I'll put up more updates on it as I get photos uploaded. One of the reasons I wanted this rack was to be able to mount my solar panel up there to charge my dual battery setup and still carry extra crap if needed. Mainly a kayak and surfboards but also camping and off-road gear as needed. It's really one of the best looking racks out there. Thanks to Zach for the product and to NYCO for the help. Now that it's mounted though, I'd probably have moved it back another .25" to have the wind deflector line up closer to the front windshield. There is a little bit more wind noise, but that is to be expected. Overall I am satisfied.

    As always, if any of you have questions or are local and would like some help installing one or need to use the leather hole punch for your weather stripping, just let me know and I'll do what I can to help.

    Nate
     
    Last edited: Jan 7, 2016
  4. Jan 7, 2016 at 3:26 AM
    #324
    Acerwin

    Acerwin The unNORM NORM

    Joined:
    Nov 20, 2014
    Member:
    #142732
    Messages:
    32,629
    Gender:
    Male
    First Name:
    Andrew
    South Carolina
    Vehicle:
    Toyota Tundra
    Damn you're making me want one now
     
    Nate87[QUOTED][OP] likes this.
  5. Jan 7, 2016 at 4:24 AM
    #325
    jztacoma

    jztacoma Trust me I’m an Engineer

    Joined:
    Sep 13, 2013
    Member:
    #112426
    Messages:
    2,336
    Gender:
    Male
    First Name:
    John
    Upstate NY
    Vehicle:
    2021 Tacoma TRD Offroad
    Semi Stockish
    Damn thats a clean install... Nicely done Nate truck is looking good
     
  6. Jan 7, 2016 at 5:20 AM
    #326
    NYCO

    NYCO go explore...

    Joined:
    Jul 27, 2010
    Member:
    #40842
    Messages:
    19,121
    Gender:
    Male
    First Name:
    bOb
    Colorado
    Vehicle:
    Blue Betty - '06 TRD OR
    dents & scratches
    great job :thumbsup:

    really like the idea of the leather punch to get those holes in the stripping!

    how will you run the wires for your side rack lights you think?
     
    Nate87[QUOTED][OP] and Sje1124 like this.
  7. Jan 7, 2016 at 6:38 AM
    #327
    Shmellmopwho

    Shmellmopwho Well-Known Member Vendor

    Joined:
    Apr 10, 2014
    Member:
    #127399
    Messages:
    11,663
    Gender:
    Male
    First Name:
    Ryan
    Lomita CA
    Vehicle:
    2013 White DCLB TRD sport
    Bunch of stuff
    Awesome with the Prinsu. Looks so awesome on your truck man!!
     
  8. Jan 7, 2016 at 8:28 AM
    #328
    Crom

    Crom Super-Deluxe Member

    Joined:
    Jun 22, 2009
    Member:
    #18782
    Messages:
    9,618
    Gender:
    Male
    First Name:
    Nick
    San Diego, CA
    Vehicle:
    2009 4x4 DCSB Camp Supreme
    Millions
    Very good Nate! Great writeup, pics. :)
     
  9. Jan 7, 2016 at 10:23 AM
    #329
    TacoSTIG

    TacoSTIG Untamed Member

    Joined:
    Jun 22, 2014
    Member:
    #132473
    Messages:
    1,141
    Gender:
    Male
    First Name:
    Jeremy
    WA, Issaquah
    Vehicle:
    2005 AC, TRD OR
    Perfection. :bowdown:
     
  10. Jan 7, 2016 at 10:52 AM
    #330
    Nate87

    Nate87 [OP] Well-Known Member

    Joined:
    May 7, 2013
    Member:
    #103748
    Messages:
    751
    Gender:
    Male
    First Name:
    Nate
    CONUS
    Vehicle:
    2013 AC TRD OR
    If you have a need for throwing stuff up there, I'd say do it!
    Thanks man :cheers:
    Thanks again for the help! The wires will be ran down the rear in the weather stripping channel and into/under the weather stripping of the rear window. From there, down between the bed and cab and into a hole in the rear cab bulkhead to that rear switch/relay panel I have.
    Thanks dude! Just wish the access cab came pre drilled like the double cabs.
    Just following your lead:thumbsup:
    Far from it! haha. Just a little progress at a time
     
  11. Jan 7, 2016 at 6:25 PM
    #331
    jztacoma

    jztacoma Trust me I’m an Engineer

    Joined:
    Sep 13, 2013
    Member:
    #112426
    Messages:
    2,336
    Gender:
    Male
    First Name:
    John
    Upstate NY
    Vehicle:
    2021 Tacoma TRD Offroad
    Semi Stockish
    So I will more then likely be copying your dog floor set up in the back seat and and the soft topper since the fiancée is talking me into a dog
     
    Nate87[OP] likes this.
  12. Jan 8, 2016 at 3:27 AM
    #332
    Nate87

    Nate87 [OP] Well-Known Member

    Joined:
    May 7, 2013
    Member:
    #103748
    Messages:
    751
    Gender:
    Male
    First Name:
    Nate
    CONUS
    Vehicle:
    2013 AC TRD OR
    Sweet! What kind of dog are you getting? Got any photos?
     
  13. Jan 8, 2016 at 3:57 AM
    #333
    jztacoma

    jztacoma Trust me I’m an Engineer

    Joined:
    Sep 13, 2013
    Member:
    #112426
    Messages:
    2,336
    Gender:
    Male
    First Name:
    John
    Upstate NY
    Vehicle:
    2021 Tacoma TRD Offroad
    Semi Stockish
    So we are looking at either rescuing a Black Lab or a Black Flat Hair Retriever. No pics yet need to dog prof the apartment and get a few things ready. Hopefully be able to agree on something end of the month.

    Works out cause I've been struggling what to do with the backseat since no one likes it back there and road trips its actually hard to fit shit back there
     
  14. Jan 8, 2016 at 6:26 AM
    #334
    ChandlerDOOM

    ChandlerDOOM International tent trafficker

    Joined:
    Nov 4, 2013
    Member:
    #115943
    Messages:
    3,838
    Gender:
    Male
    First Name:
    Chandler
    STL
    Vehicle:
    Truck
    37s yo
    :drool: Loving the flood light on the side, may have to steal that one
     
  15. Jan 9, 2016 at 12:02 AM
    #335
    Nate87

    Nate87 [OP] Well-Known Member

    Joined:
    May 7, 2013
    Member:
    #103748
    Messages:
    751
    Gender:
    Male
    First Name:
    Nate
    CONUS
    Vehicle:
    2013 AC TRD OR
    The platform is really good for the dogs but also for stacking gear and thing up and making use of the space back there. I just took out the back seats. Like you said, no one wants to sit back there anyway.
    They were the only ones that fit the bill of what I was looking for. Low profile and flush. Didn't want to stick some pods up there and draw to much attention to them. These are little more low key.

    This is only with one on the side. I've since put two on each side


    Jim Bob likes this.
  16. Jan 9, 2016 at 12:25 AM
    #336
    Basikbiker

    Basikbiker Well-Known Member

    Joined:
    Sep 21, 2013
    Member:
    #112968
    Messages:
    3,963
    Gender:
    Male
    First Name:
    Trav
    Vehicle:
    09 AccCab 4x4 spaceship
    My doors are the only stock things left besides the headlights
    U need to go wheel that nice truck of yours
     
  17. Jan 9, 2016 at 12:41 AM
    #337
    Nate87

    Nate87 [OP] Well-Known Member

    Joined:
    May 7, 2013
    Member:
    #103748
    Messages:
    751
    Gender:
    Male
    First Name:
    Nate
    CONUS
    Vehicle:
    2013 AC TRD OR
    :amen: I wish I could make it out as much as I want to go! It's really satisfying seeing what this thing can do. We try to go out every few weeks if everything is in working order, and sometimes when it's not! Honestly, the reality is most of the off pavement this thing sees are trails that take me to places I go to hike, camp and explore. So when we get to do trails like John Bull it's a blast! The under side takes a beating, but I do my best to keep the shiny side up and looking good. We'll be doing a snow wheeling trip this weekend(sunday) if anyone in SoCal wants to meet up to do 3N16 in Big Bear.
     
    Basikbiker[QUOTED] likes this.
  18. Jan 9, 2016 at 10:46 AM
    #338
    Iggy

    Iggy Vagabond Outdoors

    Joined:
    Feb 2, 2012
    Member:
    #71971
    Messages:
    4,016
    Gender:
    Male
    Northern CA
    Vehicle:
    09 4x4 Off-Road Access Cab
    Check out the build
    He never wheels his rig. I've only seen him at the mall :p.
     
    Nate87[OP] likes this.
  19. Jan 9, 2016 at 9:35 PM
    #339
    ragincajun35

    ragincajun35 Well-Known Member

    Joined:
    Jul 4, 2013
    Member:
    #107595
    Messages:
    3,001
    Gender:
    Male
    First Name:
    Spencer
    Louisiana
    Vehicle:
    2015 DCSB MG TRD Offroad
    See Builds....
  20. Jan 12, 2016 at 9:31 PM
    #340
    Nate87

    Nate87 [OP] Well-Known Member

    Joined:
    May 7, 2013
    Member:
    #103748
    Messages:
    751
    Gender:
    Male
    First Name:
    Nate
    CONUS
    Vehicle:
    2013 AC TRD OR
    Visited some friends in Vegas and got a chance to do some hiking
    Red Rock Canyon


    Also went up Mt. Wilson


    Moving on...


    Finally getting around to updating this part. I wanted solar to keep my second AGM battery topped off which runs the ARB fridge I keep in the cab 95% of the time. On a recent camping trip the fridge ran for 5 days without turning truck on before hitting the safety minimum voltage cutoff limit for the single AGM battery. This will keep it going indefinitely. I know the roof rack isn't the most efficient location to mount it based on the amount of peak sun exposure but that's fine for my needs. One day I'd like to go with the group 31 Diehard Platinum with Pelfrey mount up front. I'll eventually tie in the flexible 62W solar panel for times when camp is set up and won't be starting the truck for a few days.

    Inside the box is a Renogy 100W solar panel that's going up on the rack.


    Plastidipped the under side black and rattle canned the edges with the same spray on bedliner I've been using. Again, keeping things subdued and not draw attention to it all.


    Just mocking up for now. More details to follow.
     

Products Discussed in

To Top