1. Welcome to Tacoma World!

    You are currently viewing as a guest! To get full-access, you need to register for a FREE account.

    As a registered member, you’ll be able to:
    • Participate in all Tacoma discussion topics
    • Communicate privately with other Tacoma owners from around the world
    • Post your own photos in our Members Gallery
    • Access all special features of the site

wiring in switches and how to

Discussion in 'Lighting' started by 3378jakesr5, Dec 31, 2015.

  1. Dec 31, 2015 at 10:53 AM
    #1
    3378jakesr5

    3378jakesr5 [OP] AOF, trucks, guns, repeat....

    Joined:
    Oct 25, 2014
    Member:
    #141018
    Messages:
    13,860
    Gender:
    Male
    First Name:
    jake
    littleton colorado
    Vehicle:
    2006 DCLB silver taco. Soild axle swapped, Bumpers, armor, expo..... Money pit. Yata yata yata
    Better to ask what I have not done.
    im starting this thread to help some people with wiring in switches questions. please feel free to post any wiring tips or anything that might help others that dont know how to start wiring in something.

    as for wiring the switches if you order from otrawwa that are just simple on off switches have five poles on the back

    here is a diagram for the switch


    8 and 7 on the switch are the top of the switch and are the grounds for the lights in the switch these can be jumpered together on that switch and with all the other switches that you would have. i have the switches on my dash wired this way and as well on the overhead.


    6 on the diagram is for the power to the LEDs in the switch this can be jumpered to other number 6s on other switches as well. i wired mine to a relay and connected it to the power to my lights on my dash so that my switches can dim with the rest. ( being leds they take lesser power to run then others on your dash so your dash could be to dark for you before the switches are the brightness you want. this can be fixed with a resistor. This resistor will take some power from the LEDs and make them dim a little faster with the rest of the dash.


    2 is your power supply to your accessory this can be wired directly to the battery for the accessory to operate even when the truck is off. or you can wire it to a relay and connect to a wire that is only powered when the truck is on.

    (ill explain the relay in a little bit.)


    3 is your accessory and will be wired either to a relay or directly to your accessory. If wiring directly to the accessory you just hook this up to the positive on your accessory and put ground on your accessory to the frame or run a wire to a negative on a blue sea buss or to your battery and your set.


    Now to the relay


    here is a picture of a relay to look at and just to reiterate 86 will be the single wire number 3 coming from your switch. 85 will go to a ground either on your block or to the frame or buss. 30 will be coming from your fuse block for that accessory and your fuse block will need proper fuse. 87 will be going to the positive on your accessory. then again the ground on your accessory will not need anything special just needs to be grounded.

    side note. 87a works back words of 87 so when the switch is turned off if 87a is used the accessory will be on and when the switch is turned on the accessory will be switched off.

    an example would be the high and low beams when turned on*. when the high beam switch is turned off the low beams are on (87a) when you switch the high beams on the the low beams switch off and the high beams turn on (87).

    when hooking up the fuse block i wire mine directly to the battery and used 4 awg wire to do so. this will make all accessories able to turn on even when the truck is turned off. if you have accessories that you want to turn off with the truck you can do another relay and have 86 be a tap into a wire that is only hot when the truck is on.

    Here are some pictures of looms I have done. image.jpgThis one has the 4 on off switches and a transmission temp gauge for it.
    image.jpg Mine for my truck. Has 4 on offs in the center and the outside two got wired for the heated seats. image.jpg
    Here is a picture of the ground wires (poles 7 and 8) jumpered together. image.jpgAnd installed in the plugs

    image.jpg And with all the other wires all in (minus one I ran out of colors).
     
    Last edited: Jan 3, 2016
    emelianenkov, JimboAnz and Pirhett like this.
  2. Dec 31, 2015 at 11:07 AM
    #2
    rogs6266

    rogs6266 Well-Known Member

    Joined:
    Nov 24, 2013
    Member:
    #117180
    Messages:
    768
    Gender:
    Male
    First Name:
    Ryan
    Alliance, OHIO
    Vehicle:
    '13 TRD Sport 4X4 DCLB MGM
    SOS weld on sliders, SOS bed rack, SOS front aluminum winch bumper with center and head light hoops, Stealth 6 wheels wrapped in goodyear duratracs, 285-70/17 Beer opener in bed, Thule roof rack on factory rack, Tool box, bed mat, K&N cai, flowmaster side out duals, and tailgate extender, Fog light anytime mod, no mud flaps mod Weathertech full set, Wet okoles front and rears, full OME 886 suspension lift with Dakars in rear, smittybilt X20 comp 10 winch, factor 55 yellow pro link,
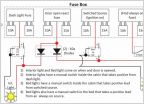
    Here are some diagrams of wiring schematics that i have found.

    downloadfile.gif JKWiring_v2.jpg JKWiringDraft.jpg
     
    Pirhett and 3378jakesr5[OP] like this.
  3. Dec 31, 2015 at 2:59 PM
    #3
    Pirhett

    Pirhett Instagram @pirhett_ship

    Joined:
    Jan 29, 2015
    Member:
    #147498
    Messages:
    5,219
    Gender:
    Male
    First Name:
    Rhett
    San Diego
    Vehicle:
    2014 TRD Sport 4x4 DCLB MGM
    Stock...
    You rock man! Glad you made this to help others who lack wiring skills like me:cheers:
     
    3378jakesr5[OP] likes this.
  4. Dec 31, 2015 at 3:02 PM
    #4
    Pirhett

    Pirhett Instagram @pirhett_ship

    Joined:
    Jan 29, 2015
    Member:
    #147498
    Messages:
    5,219
    Gender:
    Male
    First Name:
    Rhett
    San Diego
    Vehicle:
    2014 TRD Sport 4x4 DCLB MGM
    Stock...
    Am I reading it wrong or does the last pic show the relays inside the car?
     
  5. Jan 1, 2016 at 10:25 AM
    #5
    stbear

    stbear Well-Known Member

    Joined:
    Dec 2, 2014
    Member:
    #143541
    Messages:
    2,041
    Gender:
    Male
    SE PA
    Vehicle:
    2015 DCSB TRD Sport MGM
    Thanks for this thread.
     
  6. Jan 1, 2016 at 10:26 AM
    #6
    3378jakesr5

    3378jakesr5 [OP] AOF, trucks, guns, repeat....

    Joined:
    Oct 25, 2014
    Member:
    #141018
    Messages:
    13,860
    Gender:
    Male
    First Name:
    jake
    littleton colorado
    Vehicle:
    2006 DCLB silver taco. Soild axle swapped, Bumpers, armor, expo..... Money pit. Yata yata yata
    Better to ask what I have not done.
    No problem I'll be adding more and pictures later. Hoping to do more then just this switch.
     
  7. Jan 3, 2016 at 9:38 PM
    #7
    3378jakesr5

    3378jakesr5 [OP] AOF, trucks, guns, repeat....

    Joined:
    Oct 25, 2014
    Member:
    #141018
    Messages:
    13,860
    Gender:
    Male
    First Name:
    jake
    littleton colorado
    Vehicle:
    2006 DCLB silver taco. Soild axle swapped, Bumpers, armor, expo..... Money pit. Yata yata yata
    Better to ask what I have not done.
    I updated the first post with pictures
     
    scottalot likes this.
  8. Jan 4, 2016 at 7:12 AM
    #8
    Pirhett

    Pirhett Instagram @pirhett_ship

    Joined:
    Jan 29, 2015
    Member:
    #147498
    Messages:
    5,219
    Gender:
    Male
    First Name:
    Rhett
    San Diego
    Vehicle:
    2014 TRD Sport 4x4 DCLB MGM
    Stock...
    Hey Jake in your first pic what is the weird shaped thing with a red cap for? Its right next to the end of the switchbacks
     
  9. Jan 4, 2016 at 7:24 AM
    #9
    3378jakesr5

    3378jakesr5 [OP] AOF, trucks, guns, repeat....

    Joined:
    Oct 25, 2014
    Member:
    #141018
    Messages:
    13,860
    Gender:
    Male
    First Name:
    jake
    littleton colorado
    Vehicle:
    2006 DCLB silver taco. Soild axle swapped, Bumpers, armor, expo..... Money pit. Yata yata yata
    Better to ask what I have not done.
    That is the red bulb that goes in the back of the temp gauge. It's wired in the same as the switches to be lit up when the switches are lit up.
     
  10. Jan 4, 2016 at 10:41 AM
    #10
    Doug.McKee

    Doug.McKee Well-Known Member

    Joined:
    Jan 25, 2013
    Member:
    #96094
    Messages:
    92
    Gender:
    Male
    First Name:
    Doug
    Grovetown GA
    Vehicle:
    13' DCSB Magnetic Gray 4X4
    Body: Bushwacker fender flares CMC Body mount mod Custom dual exhaust Magnaflow muffler Debadged Predator steps Backup camera Extang trifecta tonneau cover Customcargrill's mesh grill with raptor letters from B.A.M.F. Rear differential breather mod Tacoma Bed mat ECGS clamshell bushing replacement for needle bearing Rigid series fog lights (SAE Approved) Rigid Dually lights ICON UCA's Interior: Rugged Ridge front and rear floor liners Line-X door sill protectors TRD shift knob Black Katskin leather seats Recovery: ARB snatch straps Hi-Lift Jack Armor: Pelfrybilt front plate bumper
    I had a question in regards to how or if I could use these switches with Rigid Lights. They supply three wires that are similar to the one in the picture (bottom) but are smaller and will not fit those connections.
    The one with eight connections was purchased from CBI when I got the ditch light brackets. It is a three position switch with the same size connections as the bottom one. Didn't really come with any instructions and I am not a wiring guru by any means.


    This is what rigid supplied me and I would like to use something more clean instead of having to drill holes through blank slots.
     
    Last edited: Jan 4, 2016
  11. Jan 4, 2016 at 10:58 AM
    #11
    3378jakesr5

    3378jakesr5 [OP] AOF, trucks, guns, repeat....

    Joined:
    Oct 25, 2014
    Member:
    #141018
    Messages:
    13,860
    Gender:
    Male
    First Name:
    jake
    littleton colorado
    Vehicle:
    2006 DCLB silver taco. Soild axle swapped, Bumpers, armor, expo..... Money pit. Yata yata yata
    Better to ask what I have not done.
    The rocker switch you got from cbi looks like it's this style.

    http://www.otrattw.com/wiring/VMD.pdf

    Quick question does it flip one direction and and stay there and then the other way and it does not stay there.
     
  12. Jan 4, 2016 at 11:04 AM
    #12
    Doug.McKee

    Doug.McKee Well-Known Member

    Joined:
    Jan 25, 2013
    Member:
    #96094
    Messages:
    92
    Gender:
    Male
    First Name:
    Doug
    Grovetown GA
    Vehicle:
    13' DCSB Magnetic Gray 4X4
    Body: Bushwacker fender flares CMC Body mount mod Custom dual exhaust Magnaflow muffler Debadged Predator steps Backup camera Extang trifecta tonneau cover Customcargrill's mesh grill with raptor letters from B.A.M.F. Rear differential breather mod Tacoma Bed mat ECGS clamshell bushing replacement for needle bearing Rigid series fog lights (SAE Approved) Rigid Dually lights ICON UCA's Interior: Rugged Ridge front and rear floor liners Line-X door sill protectors TRD shift knob Black Katskin leather seats Recovery: ARB snatch straps Hi-Lift Jack Armor: Pelfrybilt front plate bumper
    It flips up from the middle position and stays there. You can also do the same thing in the down position. The wiring diagram looks like it fits. So are rigid's wiring proprietary towards their toggle switches. I just didnt understand why they are smaller.
     
  13. Jan 4, 2016 at 11:07 AM
    #13
    3378jakesr5

    3378jakesr5 [OP] AOF, trucks, guns, repeat....

    Joined:
    Oct 25, 2014
    Member:
    #141018
    Messages:
    13,860
    Gender:
    Male
    First Name:
    jake
    littleton colorado
    Vehicle:
    2006 DCLB silver taco. Soild axle swapped, Bumpers, armor, expo..... Money pit. Yata yata yata
    Better to ask what I have not done.
    There is nothing special to their wiring. Black is ground and the red is power from battery and red with black stripe is positive to the light.
     
  14. Jan 4, 2016 at 11:07 AM
    #14
    3378jakesr5

    3378jakesr5 [OP] AOF, trucks, guns, repeat....

    Joined:
    Oct 25, 2014
    Member:
    #141018
    Messages:
    13,860
    Gender:
    Male
    First Name:
    jake
    littleton colorado
    Vehicle:
    2006 DCLB silver taco. Soild axle swapped, Bumpers, armor, expo..... Money pit. Yata yata yata
    Better to ask what I have not done.
  15. Jan 4, 2016 at 11:57 AM
    #15
    Doug.McKee

    Doug.McKee Well-Known Member

    Joined:
    Jan 25, 2013
    Member:
    #96094
    Messages:
    92
    Gender:
    Male
    First Name:
    Doug
    Grovetown GA
    Vehicle:
    13' DCSB Magnetic Gray 4X4
    Body: Bushwacker fender flares CMC Body mount mod Custom dual exhaust Magnaflow muffler Debadged Predator steps Backup camera Extang trifecta tonneau cover Customcargrill's mesh grill with raptor letters from B.A.M.F. Rear differential breather mod Tacoma Bed mat ECGS clamshell bushing replacement for needle bearing Rigid series fog lights (SAE Approved) Rigid Dually lights ICON UCA's Interior: Rugged Ridge front and rear floor liners Line-X door sill protectors TRD shift knob Black Katskin leather seats Recovery: ARB snatch straps Hi-Lift Jack Armor: Pelfrybilt front plate bumper

    I get that part but I was looking at the size of their connections and I thought that they were too small to go on those prongs. I put the supplied toggle next the ones above and it is a noticeable size difference.
     
  16. Jan 4, 2016 at 12:03 PM
    #16
    3378jakesr5

    3378jakesr5 [OP] AOF, trucks, guns, repeat....

    Joined:
    Oct 25, 2014
    Member:
    #141018
    Messages:
    13,860
    Gender:
    Male
    First Name:
    jake
    littleton colorado
    Vehicle:
    2006 DCLB silver taco. Soild axle swapped, Bumpers, armor, expo..... Money pit. Yata yata yata
    Better to ask what I have not done.
    Ohh ok I'm on the same page now. Go to the hard wear store and get some female spade connectors. Those are the right ones.
     
  17. Jan 19, 2016 at 10:08 PM
    #17
    Whitecloud

    Whitecloud Cloudy-fabricator of things

    Joined:
    Feb 24, 2010
    Member:
    #32031
    Messages:
    4,422
    Gender:
    Male
    First Name:
    Johnathan
    Albuquerque, New Mexico
    Vehicle:
    Superwhite 06 DCLB
    ICON Extended travel Coilovers, Custom leaf pack, custom sliders and F&R bumpers, 295 75 17 Toyo Open Country MT's, On-Board air with F+R connectors, On-Board water with quick disconnect shower.Trimmed fenders and body mount chop. LOTS of wiring, dual battery setup, Solar charging system, with some random lights spread around here and there.
    Good looking thread. Thanks for putting it up. It was only cause of threads all over the info net that I was able to do mine the way I did. Here are some of the ones that I did....

    For my @Iggy. switch panel

    For my center console
     
    3378jakesr5[OP] likes this.
  18. Jan 19, 2016 at 10:23 PM
    #18
    Josh828

    Josh828 Well-Known Member

    Joined:
    Dec 17, 2014
    Member:
    #144501
    Messages:
    1,213
    Gender:
    Male
    First Name:
    Josh
    Avery NC
    Vehicle:
    14 White TRD Off road, Mid travel mountain truck
    FOX 2.5 extended travel, Fox 2.0 rears, LR UCA, XSPX rims, some light bars, and switches
    Man this makes me realize how bad of a hack job my wiring is... But great idea I remember when I did mine I was so confused at first!
     
    3378jakesr5[OP] likes this.
  19. Jan 19, 2016 at 10:34 PM
    #19
    Whitecloud

    Whitecloud Cloudy-fabricator of things

    Joined:
    Feb 24, 2010
    Member:
    #32031
    Messages:
    4,422
    Gender:
    Male
    First Name:
    Johnathan
    Albuquerque, New Mexico
    Vehicle:
    Superwhite 06 DCLB
    ICON Extended travel Coilovers, Custom leaf pack, custom sliders and F&R bumpers, 295 75 17 Toyo Open Country MT's, On-Board air with F+R connectors, On-Board water with quick disconnect shower.Trimmed fenders and body mount chop. LOTS of wiring, dual battery setup, Solar charging system, with some random lights spread around here and there.
    The fact that you did it yourself is awesome. And as long as you haven't burnt down your truck you did good. (I almost burnt down mine.........:spy:)
     
    3378jakesr5[OP] likes this.
  20. Jan 19, 2016 at 10:40 PM
    #20
    Josh828

    Josh828 Well-Known Member

    Joined:
    Dec 17, 2014
    Member:
    #144501
    Messages:
    1,213
    Gender:
    Male
    First Name:
    Josh
    Avery NC
    Vehicle:
    14 White TRD Off road, Mid travel mountain truck
    FOX 2.5 extended travel, Fox 2.0 rears, LR UCA, XSPX rims, some light bars, and switches
    I really didn't understand why when my fuse blew I couldn't just replace it with a bigger fuse and move on with life.... so it could have...
    Its funny I've actually changed my major to electrical engineering so now I don't really have any excuses for why wiring a truck to have some lights is so hard!
     
    3378jakesr5[OP] likes this.

Products Discussed in

To Top