

-
Welcome to Tacoma World!
You are currently viewing as a guest! To get full-access, you need to register for a FREE account.
As a registered member, you’ll be able to:- Participate in all Tacoma discussion topics
- Communicate privately with other Tacoma owners from around the world
- Post your own photos in our Members Gallery
- Access all special features of the site
 2.7 automatic transmission service Crush Washers
 Fortin remote start with alarm
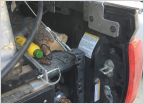 How do you know if a ground connection is right? And how to properly branch circuits?
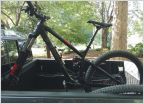 OEM Roof Rack for MTB
 Black lug nuts
Removing rear seats and back panel from 2016 Access Cab
Discussion in '3rd Gen. Tacomas (2016-2023)' started by kevin604, Jan 20, 2016.
Page 1 of 6
Page 1 of 6
