1. Welcome to Tacoma World!

    You are currently viewing as a guest! To get full-access, you need to register for a FREE account.

    As a registered member, you’ll be able to:
    • Participate in all Tacoma discussion topics
    • Communicate privately with other Tacoma owners from around the world
    • Post your own photos in our Members Gallery
    • Access all special features of the site
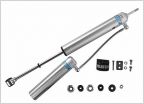
How to do an Alignment at Home

Discussion in 'Suspension' started by jberry813, Dec 7, 2012.

  1. Oct 2, 2015 at 4:08 PM
    #121
    LiphtedOne

    LiphtedOne Member

    Joined:
    Aug 25, 2015
    Member:
    #162667
    Messages:
    7
    Phoenix, Arizona
    Vehicle:
    2002 TDR
    Brush Guard Fender Rancho Shocks & Struts Dakar Leaf Springs & Emu Shocks
    Sub'd

    Thanks for this, Jason.
     
  2. Oct 2, 2015 at 9:50 PM
    #122
    alphabravo

    alphabravo Well-Known Member

    Joined:
    Jan 6, 2014
    Member:
    #120082
    Messages:
    1,734
    Gender:
    Male
    First Name:
    Christopher
    Canada via FL
    Vehicle:
    2003 Tacoma TRD
    Supercharger AntiDark Hood Light Redline Tuning Hood Struts Morimoto Projectors Grey Wire Mod Tundra 13WL Brake Conversion EBC ED Pads and GD Rotors Mean Green Starter DC Power 250A Alternator Odyssey PC2150 Battery, Artec Cage ADS shocks Total Chaos UCA ComeUp Winch, Factor 55 Splicer Relentless bumpers OTRATTW Switches, Bussman 15304-2-2-4 RTMR, Paranoid Fabrication switch brackets Jensen JHD3630BT Morimoto XB LED Fogs Deaver Custom Springs Ivan Stewart TRD Wheels, Pro Series TRD Wheels
    There's an adjustment on the UCA?
     
    LiphtedOne likes this.
  3. Oct 19, 2015 at 7:15 PM
    #123
    alphabravo

    alphabravo Well-Known Member

    Joined:
    Jan 6, 2014
    Member:
    #120082
    Messages:
    1,734
    Gender:
    Male
    First Name:
    Christopher
    Canada via FL
    Vehicle:
    2003 Tacoma TRD
    Supercharger AntiDark Hood Light Redline Tuning Hood Struts Morimoto Projectors Grey Wire Mod Tundra 13WL Brake Conversion EBC ED Pads and GD Rotors Mean Green Starter DC Power 250A Alternator Odyssey PC2150 Battery, Artec Cage ADS shocks Total Chaos UCA ComeUp Winch, Factor 55 Splicer Relentless bumpers OTRATTW Switches, Bussman 15304-2-2-4 RTMR, Paranoid Fabrication switch brackets Jensen JHD3630BT Morimoto XB LED Fogs Deaver Custom Springs Ivan Stewart TRD Wheels, Pro Series TRD Wheels
    Any ideas on how to check the rear alignment? I'm just installing springs/shackles/bushings and u-bolts. I know there are no dedicated adjustments but perhaps the axle can be squared up before everything is tightened down. I'm just trying to think of some point/line on the frame that I could measure to some point on each end of the axle.
     
  4. Oct 20, 2015 at 7:02 AM
    #124
    Krazie Sj

    Krazie Sj Resident Jackass

    Joined:
    Oct 9, 2008
    Member:
    #9849
    Messages:
    13,771
    Gender:
    Male
    First Name:
    Power Serge
    LV-426 (Acheron)
    Vehicle:
    07 TRD Off Road 4x4
    Borla Catback Exhaust, Snorkel, 33s on either 16's or 18's, ARB Bumper, All Pro LT w/Walker Evan Shocks front and back, All Pro expedition leaf pack, 10,000lb Superwinch, Intake Manifold Spacer, Bed Rack with ARB RTT, Rotopack and Hi Lift mounted, Husky Liner mats and an air freshener from 1995.
    The only way you can monkey with the rear axle is by placing the axle in different pegs. And that's very very hard to do wrong. Don't worry about squaring the rear axle.
     
  5. Oct 20, 2015 at 9:13 AM
    #125
    jberry813

    jberry813 [OP] Professional Fluffer Moderator

    Joined:
    Jan 21, 2011
    Member:
    #49636
    Messages:
    28,471
    Gender:
    Male
    First Name:
    Jason
    Lake Tahoe
    Vehicle:
    2012 DCSB Sport
    ...too much shit to list.
    That's not entirely true. Yes, the leaf spring centering pins center the axle front/rear and left/right. However, if you tighten up the ubolts with the leaf springs loaded (truck weight resting on jackstands off the axle instead of springs/axle floating and truck weight resting on jackstands off the frame), you can actually offset the axle left/right if one spring is loaded more than the other and then torque down the u-bolts. This is particularly easy with tacomas because of the ever famous taco lean. This results in the whole truck dogleg. U-bolts should always be tightened with the springs unloaded.

    You can check for an offset axle by building a string box.
     
    alphabravo[QUOTED] likes this.
  6. Oct 20, 2015 at 10:12 AM
    #126
    Krazie Sj

    Krazie Sj Resident Jackass

    Joined:
    Oct 9, 2008
    Member:
    #9849
    Messages:
    13,771
    Gender:
    Male
    First Name:
    Power Serge
    LV-426 (Acheron)
    Vehicle:
    07 TRD Off Road 4x4
    Borla Catback Exhaust, Snorkel, 33s on either 16's or 18's, ARB Bumper, All Pro LT w/Walker Evan Shocks front and back, All Pro expedition leaf pack, 10,000lb Superwinch, Intake Manifold Spacer, Bed Rack with ARB RTT, Rotopack and Hi Lift mounted, Husky Liner mats and an air freshener from 1995.
    Learn something new every day!
     
  7. Nov 7, 2015 at 5:59 PM
    #127
    dakotasyota

    dakotasyota Just a Fringe of the Ging in your Minge

    Joined:
    Jun 11, 2013
    Member:
    #106099
    Messages:
    7,938
    Gender:
    Male
    First Name:
    Dakota
    Ellensburg, WA
    Vehicle:
    06 Access Cab, Manual, V6, 4x4, TRD Off-Road
    Total Chaos +2 LT w/ 2.5 x 8 Kings, 700 lb coils, Chevy 63s, BAMF Shock relocation, 12" King Smoothies, Locker Anytime Mod, 5% Tint All Around, 4xInnovations full skids, Custom Made Rock Sliders, 4xInnovations HC Rear Bumper w/ Tire Carrier, SOS Original Plate 2 Front Bumper, 130 w KC Slimlites, Homertaco Raptor Grill, Bestop Supertop, Smittybilt 9500 lb winch, Flowmaster 40 series, JVC deck w/ 12" Rockford Fosgate T1 in custom box, and lots more!!
    GAhh pictars no worky :(
     
  8. Nov 7, 2015 at 11:28 PM
    #128
    alphabravo

    alphabravo Well-Known Member

    Joined:
    Jan 6, 2014
    Member:
    #120082
    Messages:
    1,734
    Gender:
    Male
    First Name:
    Christopher
    Canada via FL
    Vehicle:
    2003 Tacoma TRD
    Supercharger AntiDark Hood Light Redline Tuning Hood Struts Morimoto Projectors Grey Wire Mod Tundra 13WL Brake Conversion EBC ED Pads and GD Rotors Mean Green Starter DC Power 250A Alternator Odyssey PC2150 Battery, Artec Cage ADS shocks Total Chaos UCA ComeUp Winch, Factor 55 Splicer Relentless bumpers OTRATTW Switches, Bussman 15304-2-2-4 RTMR, Paranoid Fabrication switch brackets Jensen JHD3630BT Morimoto XB LED Fogs Deaver Custom Springs Ivan Stewart TRD Wheels, Pro Series TRD Wheels
    Last time I had the leaves off I didn't pay any attention to level or square or what wheel had load etc, and my springs were corkscrewed a bit when I went to put the shackle bolts in.

    So today after I finished adding a leaf I made sure that the rear of the truck frame was level and on jack stands. Then I put the axle on jack stands and leveled it as well. Then I snugged the main spring bolt, shackles, and U bolts. Then I tightened the U bolts gradually/sequentially until everything was tight. Then tightened everything else.

    Short story, everything went together straight and square. Lesson learned.

    I will try the string box later when I get the front finished. I am really curious how the rear is aligned now.
     
  9. Nov 11, 2015 at 5:04 AM
    #129
    esse10

    esse10 Well-Known Member

    Joined:
    Dec 6, 2009
    Member:
    #27076
    Messages:
    356
    Gender:
    Male
    Texas
    Vehicle:
    05prerunner SR5 DBLCAB
    Has anybody actually done this at home and actually work? I mean do you do adjustments just enough to get the vehicle to the alignment shop? How do you do adjustments on the LCA Cams when the weight of the vehicle is on the tires and if you lift the vehicle the wheel/tire move or come down a little?? anybody know the steps to adjust the LCA cams?
     
  10. Nov 11, 2015 at 5:22 AM
    #130
    ckeene9

    ckeene9 Well-Known Member

    Joined:
    Sep 20, 2012
    Member:
    #87325
    Messages:
    10,868
    Gender:
    Male
    Chesterfield, VA
    Vehicle:
    '12 DCSB Supercharged 4x4 TRD Sport
    See Build Thread
    Works great. Follow the steps and be meticulous with your work. Adjust the cams with weight on wheels.
     
  11. Nov 11, 2015 at 6:29 PM
    #131
    alphabravo

    alphabravo Well-Known Member

    Joined:
    Jan 6, 2014
    Member:
    #120082
    Messages:
    1,734
    Gender:
    Male
    First Name:
    Christopher
    Canada via FL
    Vehicle:
    2003 Tacoma TRD
    Supercharger AntiDark Hood Light Redline Tuning Hood Struts Morimoto Projectors Grey Wire Mod Tundra 13WL Brake Conversion EBC ED Pads and GD Rotors Mean Green Starter DC Power 250A Alternator Odyssey PC2150 Battery, Artec Cage ADS shocks Total Chaos UCA ComeUp Winch, Factor 55 Splicer Relentless bumpers OTRATTW Switches, Bussman 15304-2-2-4 RTMR, Paranoid Fabrication switch brackets Jensen JHD3630BT Morimoto XB LED Fogs Deaver Custom Springs Ivan Stewart TRD Wheels, Pro Series TRD Wheels
    The OP describes using a pair of floor tiles under each wheel to lower the friction while adjusting the cams. Also I think it helps if you have a level place to work.
     
  12. Nov 11, 2015 at 6:33 PM
    #132
    jberry813

    jberry813 [OP] Professional Fluffer Moderator

    Joined:
    Jan 21, 2011
    Member:
    #49636
    Messages:
    28,471
    Gender:
    Male
    First Name:
    Jason
    Lake Tahoe
    Vehicle:
    2012 DCSB Sport
    ...too much shit to list.
    Parking on top of two sheets of paper under each tire will do the job. Friction isn't that complicated.
     
  13. Nov 12, 2015 at 2:42 PM
    #133
    esse10

    esse10 Well-Known Member

    Joined:
    Dec 6, 2009
    Member:
    #27076
    Messages:
    356
    Gender:
    Male
    Texas
    Vehicle:
    05prerunner SR5 DBLCAB
    Okay I know I read this DIY thread about a year ago. I guess I'm gonna have to go read those steps again. all the pictures are gone though. Anybody have the steps on how to adjust these cams on the picture? I mean what do each correspond to what adjustment?

    conrolarmadjustment.jpg
     
  14. Nov 12, 2015 at 5:03 PM
    #134
    jberry813

    jberry813 [OP] Professional Fluffer Moderator

    Joined:
    Jan 21, 2011
    Member:
    #49636
    Messages:
    28,471
    Gender:
    Male
    First Name:
    Jason
    Lake Tahoe
    Vehicle:
    2012 DCSB Sport
    ...too much shit to list.
    What do you mean pictures are gone? My PB account bandwidth was exceeded, but it reset.
    Regardless, to answer your question...read the first post:

     
  15. Nov 14, 2015 at 9:18 PM
    #135
    bjmoose

    bjmoose Bullwinkle J. Moose

    Joined:
    Aug 31, 2010
    Member:
    #42529
    Messages:
    6,009
    Gender:
    Male
    First Name:
    Steve
    San Jose CA
    Vehicle:
    '11 Std Cab 4x4 5sp
    OME suspension, ARB Air Lockers, CBI/Relentless/Pelfrey armor, HAM radio
    This worked out great!

    Instead of using paint on the tire, I stuck a layer of painters masking tape around each tire. Just seemed neater.

    Also, the +/- on that HF gauge is 0.2 - so there's no point in trying to fine tune any adjustment closer than that.

    And I found that when measuring caster, I got exactly 20 degrees of tire left/right with exactly one full turn of the steering wheel. So after the first measurement, I relied on that fact rather than reblocking and remeasuring with a wood sheet and pencil line on the garage floor.

    Props for the instructions. Couldn't have done it without 'em.
     
    Last edited: Nov 14, 2015
  16. Jan 30, 2016 at 1:01 PM
    #136
    gray223

    gray223 Well-Known Member

    Joined:
    Nov 6, 2013
    Member:
    #116062
    Messages:
    3,438
    Gender:
    Male
    SE Missouri
    Vehicle:
    2014 Tundra Limited
    I'm sure it's been talked about on here, did a search and couldn't fine anything though. But what's the recommended alignment numbers for a lifted 1st gen?
     
  17. Feb 1, 2016 at 12:45 PM
    #137
    gray223

    gray223 Well-Known Member

    Joined:
    Nov 6, 2013
    Member:
    #116062
    Messages:
    3,438
    Gender:
    Male
    SE Missouri
    Vehicle:
    2014 Tundra Limited
    Looked though the whole thread and I guess you want:

    Toe-0
    camber-0
    castor-2.5+

    :notsure:
     
  18. Feb 1, 2016 at 1:43 PM
    #138
    alphabravo

    alphabravo Well-Known Member

    Joined:
    Jan 6, 2014
    Member:
    #120082
    Messages:
    1,734
    Gender:
    Male
    First Name:
    Christopher
    Canada via FL
    Vehicle:
    2003 Tacoma TRD
    Supercharger AntiDark Hood Light Redline Tuning Hood Struts Morimoto Projectors Grey Wire Mod Tundra 13WL Brake Conversion EBC ED Pads and GD Rotors Mean Green Starter DC Power 250A Alternator Odyssey PC2150 Battery, Artec Cage ADS shocks Total Chaos UCA ComeUp Winch, Factor 55 Splicer Relentless bumpers OTRATTW Switches, Bussman 15304-2-2-4 RTMR, Paranoid Fabrication switch brackets Jensen JHD3630BT Morimoto XB LED Fogs Deaver Custom Springs Ivan Stewart TRD Wheels, Pro Series TRD Wheels
    That's pretty much what I remember from the thread as well. You might benefit from a tiny bit of toe as per the OEM spec which I don't remember off hand.
     
  19. Feb 1, 2016 at 4:21 PM
    #139
    gray223

    gray223 Well-Known Member

    Joined:
    Nov 6, 2013
    Member:
    #116062
    Messages:
    3,438
    Gender:
    Male
    SE Missouri
    Vehicle:
    2014 Tundra Limited
    I think it's was like 1/16" toe in
     
  20. Feb 2, 2016 at 10:05 AM
    #140
    JUJtacoma2010

    JUJtacoma2010 Well-Known Member

    Joined:
    Feb 4, 2010
    Member:
    #30703
    Messages:
    345
    Gender:
    Male
    Fresno
    Vehicle:
    Tacoma 2010 Dbl Cab. OFF Road Package
    are you able to post any pictures on fixing an "off-center steering wheel" please.
     

Products Discussed in

To Top