

-
Welcome to Tacoma World!
You are currently viewing as a guest! To get full-access, you need to register for a FREE account.
As a registered member, you’ll be able to:- Participate in all Tacoma discussion topics
- Communicate privately with other Tacoma owners from around the world
- Post your own photos in our Members Gallery
- Access all special features of the site
 I love my Taco, but....
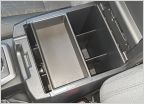 Center console tray for the Gen3 - single or double
 Which baofeng to order?
 Where to find color matching shackles?
 Upgrade sound system keeping stock head unit
 Where is everyone mounting their front camera on PRO Grills WITH TSS?
Request: Picture inside the headlights??
Discussion in '3rd Gen. Tacomas (2016-2023)' started by MESO, Feb 13, 2016.


