1. Welcome to Tacoma World!

    You are currently viewing as a guest! To get full-access, you need to register for a FREE account.

    As a registered member, you’ll be able to:
    • Participate in all Tacoma discussion topics
    • Communicate privately with other Tacoma owners from around the world
    • Post your own photos in our Members Gallery
    • Access all special features of the site
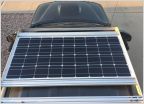
OEM Roof Rack Install

Discussion in '2nd Gen. Tacomas (2005-2015)' started by YumaTRD, Dec 4, 2010.

  1. Jul 21, 2016 at 6:03 AM
    #101
    IdRatherBNTheSanJuans

    IdRatherBNTheSanJuans Well-Known Member

    Joined:
    Jun 29, 2016
    Member:
    #190869
    Messages:
    130
    Gender:
    Male
    First Name:
    Coe
    Vehicle:
    05 TRD Sport 4x4 DCLB
    Kings. JBAs. AllPro standards. Mastercraft CXT 255/85r16s
    When installing a new roof rack.

    Sorry for not clarifying!
     
  2. Jul 21, 2016 at 6:11 AM
    #102
    Jbeiker

    Jbeiker Well-Known Member

    Joined:
    Jun 5, 2016
    Member:
    #188783
    Messages:
    427
    Gender:
    Male
    Vehicle:
    2016 Trd Sport
    When you go to install the new rack you will have to either remove that tape entirely or at the very least puncture the tape to expose the threads for installation. I just punctured and then cut the holes out specifically. Originally I just installed without any sort of silicone but after I got done I worried too much of potential leaks so went to my local auto shops and grabbed some avs silicone, put a good portion around all the holes where potential leaks could take place and reinstalled. At this point I am pretty confident it shouldn't leak.
     
  3. Jul 21, 2016 at 6:13 AM
    #103
    IdRatherBNTheSanJuans

    IdRatherBNTheSanJuans Well-Known Member

    Joined:
    Jun 29, 2016
    Member:
    #190869
    Messages:
    130
    Gender:
    Male
    First Name:
    Coe
    Vehicle:
    05 TRD Sport 4x4 DCLB
    Kings. JBAs. AllPro standards. Mastercraft CXT 255/85r16s
    That's exactly what I did-so, I hope it works!
    Thanks!
     
  4. Jul 21, 2016 at 6:51 AM
    #104
    Jbeiker

    Jbeiker Well-Known Member

    Joined:
    Jun 5, 2016
    Member:
    #188783
    Messages:
    427
    Gender:
    Male
    Vehicle:
    2016 Trd Sport
    Yea the little foam/rubber gaskets they gave are 'supposed' to keep the water out but I didn't want to take the chance either...
     
  5. Jul 21, 2016 at 3:00 PM
    #105
    allur4

    allur4 Well-Known Member

    Joined:
    Jul 26, 2015
    Member:
    #160344
    Messages:
    106
    Gender:
    Male
    North Carolina
    What can you do if the holes don't line up? I have 3 bolts left that wont go in. Please help.
     
  6. Jul 21, 2016 at 3:52 PM
    #106
    Jbeiker

    Jbeiker Well-Known Member

    Joined:
    Jun 5, 2016
    Member:
    #188783
    Messages:
    427
    Gender:
    Male
    Vehicle:
    2016 Trd Sport
    Which ones? Pics would help.
     
  7. Jul 21, 2016 at 4:03 PM
    #107
    allur4

    allur4 Well-Known Member

    Joined:
    Jul 26, 2015
    Member:
    #160344
    Messages:
    106
    Gender:
    Male
    North Carolina
    The three long bolts on each side that go directly into the roof with green colored tips.

    20160721_190237.jpg
     
  8. Jul 21, 2016 at 4:23 PM
    #108
    Jbeiker

    Jbeiker Well-Known Member

    Joined:
    Jun 5, 2016
    Member:
    #188783
    Messages:
    427
    Gender:
    Male
    Vehicle:
    2016 Trd Sport
    Are these the back or the bolts closer to the front
     
  9. Jul 21, 2016 at 4:27 PM
    #109
    allur4

    allur4 Well-Known Member

    Joined:
    Jul 26, 2015
    Member:
    #160344
    Messages:
    106
    Gender:
    Male
    North Carolina
    The rear, the ones that don't line up are one on the rear drivers side and two on the rear passenger side.
     
  10. Jul 21, 2016 at 5:06 PM
    #110
    Jbeiker

    Jbeiker Well-Known Member

    Joined:
    Jun 5, 2016
    Member:
    #188783
    Messages:
    427
    Gender:
    Male
    Vehicle:
    2016 Trd Sport
    I had to loosen the fronts and pull on the back of the rack while pushing the bolts down to hit the holes properly but I ran into the exact same thing just took some finesse.
     
  11. Jul 21, 2016 at 5:21 PM
    #111
    allur4

    allur4 Well-Known Member

    Joined:
    Jul 26, 2015
    Member:
    #160344
    Messages:
    106
    Gender:
    Male
    North Carolina
    I'll give it a try. Thanks
     
  12. Jul 21, 2016 at 6:28 PM
    #112
    IdRatherBNTheSanJuans

    IdRatherBNTheSanJuans Well-Known Member

    Joined:
    Jun 29, 2016
    Member:
    #190869
    Messages:
    130
    Gender:
    Male
    First Name:
    Coe
    Vehicle:
    05 TRD Sport 4x4 DCLB
    Kings. JBAs. AllPro standards. Mastercraft CXT 255/85r16s
    I recommend not tightening any of them until they are all started. I would then put the other side on, make sure the cross bars plug in fine, then tighten everything up.
     
  13. Jul 21, 2016 at 6:37 PM
    #113
    allur4

    allur4 Well-Known Member

    Joined:
    Jul 26, 2015
    Member:
    #160344
    Messages:
    106
    Gender:
    Male
    North Carolina
    Thanks for the advice guys. I really don't want to take it to a shop.
     
  14. Jul 21, 2016 at 6:37 PM
    #114
    Jbeiker

    Jbeiker Well-Known Member

    Joined:
    Jun 5, 2016
    Member:
    #188783
    Messages:
    427
    Gender:
    Male
    Vehicle:
    2016 Trd Sport
    Did you end up getting it done?
     
  15. Jul 21, 2016 at 6:47 PM
    #115
    allur4

    allur4 Well-Known Member

    Joined:
    Jul 26, 2015
    Member:
    #160344
    Messages:
    106
    Gender:
    Male
    North Carolina
    I plan on working on it tomorrow. I'll let you know how it goes.
     
  16. Jul 21, 2016 at 6:55 PM
    #116
    allur4

    allur4 Well-Known Member

    Joined:
    Jul 26, 2015
    Member:
    #160344
    Messages:
    106
    Gender:
    Male
    North Carolina
    Should I unscrew the smaller bolts holding the bracket together?
     
  17. Jul 21, 2016 at 7:00 PM
    #117
    Jbeiker

    Jbeiker Well-Known Member

    Joined:
    Jun 5, 2016
    Member:
    #188783
    Messages:
    427
    Gender:
    Male
    Vehicle:
    2016 Trd Sport
    I would loosen them all a bit until you can get them all started and then start tightening.
     
  18. Jul 22, 2016 at 2:35 AM
    #118
    Chappa

    Chappa Well-Known Member

    Joined:
    Apr 16, 2016
    Member:
    #184475
    Messages:
    78
    Philadelphia
    Vehicle:
    2015 DCSB TRD OR
    I just installed mine Sunday. Had the same problem with holes not lining up. First holes that didn't line up were the drivers side bracket. Ended up having to make one of the holes in the bracket bigger. They are very unforgiving threads, if they don't line up perfect they won't go in or you'll cross thread either the hole or the bolt.

    Finally worked, but in the process of of lining up the final holes (from your pic), the front clip popped out. Now the drivers side has the infamous "gap" up front. I'll need to get a new clip and re-do it, maybe this weekend. But terrified to unscrew it, and risk cross threading starting all over.
     
  19. Jul 22, 2016 at 5:04 AM
    #119
    Jbeiker

    Jbeiker Well-Known Member

    Joined:
    Jun 5, 2016
    Member:
    #188783
    Messages:
    427
    Gender:
    Male
    Vehicle:
    2016 Trd Sport
    How big was your 'gap' do you have pics? I have a couple very small ones but not sure they are really of concern...interested to know how your gaps looked.
     
  20. Jul 22, 2016 at 2:33 PM
    #120
    allur4

    allur4 Well-Known Member

    Joined:
    Jul 26, 2015
    Member:
    #160344
    Messages:
    106
    Gender:
    Male
    North Carolina
    Got it done, thanks guys. It was a bitch tho. I was really discouraged the first time. After pulling and pushing the base several times, finally lined up the holes enough to get the screws going.
     

Products Discussed in

To Top