-
Welcome to Tacoma World!
You are currently viewing as a guest! To get full-access, you need to register for a FREE account.
As a registered member, you’ll be able to:- Participate in all Tacoma discussion topics
- Communicate privately with other Tacoma owners from around the world
- Post your own photos in our Members Gallery
- Access all special features of the site
 2015 Super white off-road build
 Build that lacks building
 Nudavinci's (Taco_Outlaw) 2013 DCSB Taco Build, Adventures and BS
 Inesshell bs and lazy af build
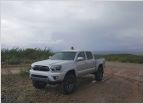 Azzwethinkweiz's 2013 noob Tacoma Build
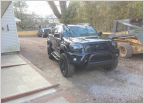 My Build So Far (Supercharger ICON 3" Lift)..Black is the new Black
Dick's Dank Yank Wank Tank
Discussion in '2nd Gen. Builds (2005-2015)' started by scocar, Oct 11, 2015.
Page 66 of 415
Page 66 of 415
Products Discussed in