1. Welcome to Tacoma World!

    You are currently viewing as a guest! To get full-access, you need to register for a FREE account.

    As a registered member, you’ll be able to:
    • Participate in all Tacoma discussion topics
    • Communicate privately with other Tacoma owners from around the world
    • Post your own photos in our Members Gallery
    • Access all special features of the site

Transfer case crack

Discussion in '1st Gen. Tacomas (1995-2004)' started by Sceotter, Jan 24, 2018.

  1. Jan 24, 2018 at 3:22 PM
    #21
    Sceotter

    Sceotter [OP] Member

    Joined:
    Jan 24, 2018
    Member:
    #242252
    Messages:
    12
    First Name:
    Steven
    Sacramento, CA
    Vehicle:
    1995 Tacoma 2.7 4x4
    I did reuse the crush washer the first time. I have a new crush washer and drain plug now and it’s still leaking. That was my first thought was I need a new washer but after I put that on it was still leaking and then I noticed the crack.
     
  2. Jan 24, 2018 at 3:26 PM
    #22
    teamhypoxia

    teamhypoxia MichelinMan

    Joined:
    Aug 21, 2012
    Member:
    #85247
    Messages:
    9,692
    Gender:
    Male
    Colorado
    Vehicle:
    '12 DCSB TRD OR
    I've heard that as an argument against reusing crush washers.
    A motorcycle mechanic friend told me that he'd seen a lot of cracked aluminum engine cases from the oil drain plug. The crush washer gets deformed into the hole to seal things up good. Next time you use it, that force makes it deform further cracking the case. He said if you insist on reusing it, at least flip it around the second time. (Kind of like turning your underwear inside out to get another day out of them :D)
     
    Speedytech7 and cruxofthebisquit like this.
  3. Jan 24, 2018 at 3:31 PM
    #23
    cruxofthebisquit

    cruxofthebisquit Well-Known Member

    Joined:
    Jun 26, 2009
    Member:
    #18936
    Messages:
    5,307
    Gender:
    Male
    First Name:
    John
    Orange Texas
    Vehicle:
    2000 TRD
    OME and worth every penny.
    That's why they have 2 sides.
     
  4. Jan 24, 2018 at 6:10 PM
    #24
    rzgkane

    rzgkane Well-Known Member

    Joined:
    Oct 1, 2012
    Member:
    #88082
    Messages:
    705
    Gender:
    Male
    Huntington Beach, CA
    Vehicle:
    2019 Tacoma TDR Sport 4WD DCLB - Cement - Tech and Premium
    4Runner Trail wheels and Toyo Open Country ATII tires 265-70-17. Cosmetic stuff like Pro grille and OffRoad black bumper trim, vinyl delete on side, added hood graphic, OEM tube steps.
    The old aircraft method! I like it.
     
  5. Jan 24, 2018 at 7:23 PM
    #25
    btu44

    btu44 Well-Known Member

    Joined:
    Sep 7, 2016
    Member:
    #196732
    Messages:
    329
    Gender:
    Male
    Long Beach area, Ca
    Vehicle:
    04 Tacoma Double Cab, 4WD, TRD Off-Road
    SC with 7th injector. ICON 2.5 shocks and coil overs, SPC UCA, EMU Dakar rear springs. FrontRunner bed rack. ICOM IC7100 amateur transceiver
    I would say welding is the only way. The oil immersion and high tension force once the bolt is tightened, JB Weld IMO would only slow the leak.
     
  6. Jan 24, 2018 at 7:26 PM
    #26
    95 taco

    95 taco Battle Born

    Joined:
    May 3, 2012
    Member:
    #78175
    Messages:
    17,533
    Vehicle:
    2003 4x4 TRD SR5 auto
    OME 883 front, OMD 3.5" rear, Relentless front bumper, smittybilt 9.5K winch
    We used belzona on the block of our D3, crazy expensive but damn that stuff sets up like steel.
     
  7. Jan 24, 2018 at 8:18 PM
    #27
    Sceotter

    Sceotter [OP] Member

    Joined:
    Jan 24, 2018
    Member:
    #242252
    Messages:
    12
    First Name:
    Steven
    Sacramento, CA
    Vehicle:
    1995 Tacoma 2.7 4x4
    Thank you for the link to Belzona on eBay. Looks like the vendor is located in Fresno which isn’t too far from me. I’m ordering it tonight
     
    This site contains affiliate links for which the site may be compensated.
    #27
  8. Jan 25, 2018 at 10:16 PM
    #28
    Sceotter

    Sceotter [OP] Member

    Joined:
    Jan 24, 2018
    Member:
    #242252
    Messages:
    12
    First Name:
    Steven
    Sacramento, CA
    Vehicle:
    1995 Tacoma 2.7 4x4
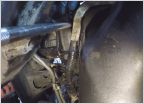
    This is where I’m at. I drilled a little on the inner part of the drain hole too where the crack was. It looked like the crack didn’t travel through any of the threads. I tried to drill a hole straight through but the angle is bad so I kinda just dug a trench. Now I’m just waiting on the Belzona, should be at my door on Monday. I have brake cleaner and acetone to clean it when it’s time. Would it be a bad idea to just completely seal the plug with Belzona and when it’s time to change the oil again I could just suck it out through the fill hole??

    E252B190-E6AF-404E-9867-0C013AA4E692.jpg
     
  9. Jan 25, 2018 at 10:18 PM
    #29
    Speedytech7

    Speedytech7 Toyota Cult Ombudsman

    Joined:
    Feb 20, 2014
    Member:
    #123587
    Messages:
    57,415
    Gender:
    Male
    3435 E Trent Ave, Spokane, WA 99202
    Vehicle:
    96 Turbo Taco V6 405WHP & 482lbft
    It's less Tacoma and more mod
    I think after the Belzona it'll be fine to use. If you're worried about it you can buy a rubber seal instead of the aluminum crush washers and those take less pressure to seal.
     
    Sceotter[QUOTED][OP] likes this.
  10. Jan 26, 2018 at 8:13 AM
    #30
    OneWheelPeel

    OneWheelPeel Well-Known Member

    Joined:
    May 19, 2016
    Member:
    #187371
    Messages:
    2,312
    Phoenix, AZ
    Wow that looks pretty good and clean. I cant imagine you having any further issues after the Belzona
     
  11. Jan 26, 2018 at 9:48 AM
    #31
    cruxofthebisquit

    cruxofthebisquit Well-Known Member

    Joined:
    Jun 26, 2009
    Member:
    #18936
    Messages:
    5,307
    Gender:
    Male
    First Name:
    John
    Orange Texas
    Vehicle:
    2000 TRD
    OME and worth every penny.
    Looks like you got a nice channel for more grab. Couple things.

    1) From duct tape (I think I used that on the block repair and it didn't just melt) or whatever (plastic milk jug, tin) make a stick on dam to keep the filler from just running down and dripping off, you want to keep as much material up there where it counts. Do this before hand as you're buying quick set up epoxy, When it goes hot and reacts, it's too late to start another part of the project.
    2) Looks like your going to 'turn the corner up onto the outer face where the crush seal is going to seat, that's fine and it looked like it needed it. A file should get it back to normal after curing.
    3) Are you sure with all the brushing, smearing of metal on the part of the case FARTHEST from the threads, you haven't hid some of the crack, like the end of it? I thought it appeared longer. That's where the drill hole would keep it from spreading further into the case. If you don't wan't to drill another hole, (I'm not sure I would either) make sure to get epoxy pulled out onto the casing as far as you can, as thick as you can. (It won't be much, as it tends to run 'til it gets hot, then you won't move it any more)
    4) Use popsicle sticks for mixing and applying, I don't know if I mentioned it yet.......this stuff gets HOT! You won't be touching it with your fingers. Rather, DON"T TOUCH IT WITH FINGERS! If it's on your fingers when it reacts, it's going to burn. Like really, really burn and it's epoxy so you're not wiping it off easily.
    5) Remember #4. like fight club.
     
  12. Jan 26, 2018 at 9:55 AM
    #32
    cruxofthebisquit

    cruxofthebisquit Well-Known Member

    Joined:
    Jun 26, 2009
    Member:
    #18936
    Messages:
    5,307
    Gender:
    Male
    First Name:
    John
    Orange Texas
    Vehicle:
    2000 TRD
    OME and worth every penny.
  13. Jan 26, 2018 at 10:08 AM
    #33
    cruxofthebisquit

    cruxofthebisquit Well-Known Member

    Joined:
    Jun 26, 2009
    Member:
    #18936
    Messages:
    5,307
    Gender:
    Male
    First Name:
    John
    Orange Texas
    Vehicle:
    2000 TRD
    OME and worth every penny.
    You may think about this. Put another hole and dimple with a 1/8th bit along crack or grind out a channel between the 2 holes. with a dremel.

    Do all this and dress the face where the washer goes well, and I guarantee you'll never have a problem here again.

    On the other hand my guarantee from 1500 miles away isn't worth much I realize.

    However I've used this stuff a LOT. It's bad ass. It's the best. We use it in refineries and they don't scrimp.

    Are you going to fire the whole batch? (Only way to KNOW it's mixed perfect) or try to half it?

    I've played with it some trying to slow down reaction time yet still get good results......it's tricky. Sometimes it never cured. Too much hardener does the same, contrary to what was expected.

    Edit: Normal stuff gives you about 15 minutes. I expect this to be about 5. Directions will be more specific exactly IF you mix the whole batch, you'll KNOW your time limitation
     
  14. Jan 26, 2018 at 4:40 PM
    #34
    Sceotter

    Sceotter [OP] Member

    Joined:
    Jan 24, 2018
    Member:
    #242252
    Messages:
    12
    First Name:
    Steven
    Sacramento, CA
    Vehicle:
    1995 Tacoma 2.7 4x4
    This is where the crack stopped

    B0D5285D-A606-458D-A977-673FBF656FBC.jpg
     
  15. Jan 26, 2018 at 4:43 PM
    #35
    Sceotter

    Sceotter [OP] Member

    Joined:
    Jan 24, 2018
    Member:
    #242252
    Messages:
    12
    First Name:
    Steven
    Sacramento, CA
    Vehicle:
    1995 Tacoma 2.7 4x4

    Thank you for the advice. I was going to apply with a small acid brush first to reach inside the channel and then build up with a popsicle stick. Also I was going to just mix a small amount of it but I guess I’ll do the whole package
     

Products Discussed in

To Top