1. Welcome to Tacoma World!

    You are currently viewing as a guest! To get full-access, you need to register for a FREE account.

    As a registered member, you’ll be able to:
    • Participate in all Tacoma discussion topics
    • Communicate privately with other Tacoma owners from around the world
    • Post your own photos in our Members Gallery
    • Access all special features of the site

Audio system for 2017 double cab

Discussion in 'Audio & Video' started by fathomitout, Dec 27, 2017.

  1. Jan 18, 2018 at 11:59 AM
    #61
    CoastieRon

    CoastieRon Hammocking Fool

    Joined:
    Jan 1, 2018
    Member:
    #239946
    Messages:
    2,432
    Gender:
    Male
    First Name:
    Ron
    Nashua
    Vehicle:
    Lil' Silver
    Too much.
    I would imagine crutchfield might have something? I think the part number was posted somewhere in the thread. Someone else is doing it for me because it's a bit outside my knowledge base.
     
  2. Jan 18, 2018 at 9:48 PM
    #62
    DavidM310

    DavidM310 Well-Known Member

    Joined:
    Jun 6, 2017
    Member:
    #220899
    Messages:
    493
    Gender:
    Male
    Temple, Texas
    Vehicle:
    2017 Tacoma/2015 4Runner/2015 IS250
    If you look at the picture I posted with the 2 speed wires, they are soldered together. You will make the connection at the rear of the Head Unit and run both speedwires together to your amp. The speedwire that is connected to the rear of the HU will be the input side
    of the amp. The speedwire that connects to factory harness will go to the output side of the amp.
     
  3. Jan 18, 2018 at 9:50 PM
    #63
    DavidM310

    DavidM310 Well-Known Member

    Joined:
    Jun 6, 2017
    Member:
    #220899
    Messages:
    493
    Gender:
    Male
    Temple, Texas
    Vehicle:
    2017 Tacoma/2015 4Runner/2015 IS250
    Post #52 has the adapters you need plus the 9 conductor speedwire I used. You will need 2 of these. For the amp output, you will have to solder RCA ends to the speedwire like in post #22.
     
  4. Jan 18, 2018 at 10:02 PM
    #64
    DavidM310

    DavidM310 Well-Known Member

    Joined:
    Jun 6, 2017
    Member:
    #220899
    Messages:
    493
    Gender:
    Male
    Temple, Texas
    Vehicle:
    2017 Tacoma/2015 4Runner/2015 IS250
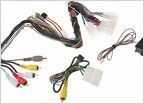
    The 2 connectors on the left will plug in to the head unit. The speedwire on the left will connect to an LOC/DSP/EQ or Speaker level inputs in an amp. The harness on the right will connect to the stock harness. The speedwire on the right will connect to the amp output side. The white/grey wires are for front speakers and the green/purple are for rear speakers. The blue wire is the signal/power wire.

    5601BE9E-4516-46D1-B8D7-CD7927960BA7.jpg
     
    ToyoDrew likes this.
  5. Jan 19, 2018 at 11:02 AM
    #65
    ToyoDrew

    ToyoDrew Well-Known Member

    Joined:
    Sep 14, 2010
    Member:
    #43262
    Messages:
    1,378
    Gender:
    Male
    Texas
    Vehicle:
    17 Inferno TRD-OR DCSB 4x4 (SOLD)
    OVTune, Hertz spkrs & JBL MS-8 DSP, Turn-as-Tail mod, LEDs everywhere, MESOJDM Turn Signal, Bakflip Revolver X2, Pop-n-Lock, Yakima roof rack, & many minor mods
    Yes, those wires go directly from one harness to the other (and not into the speedwire). I don't remember off-hand, but those should be 12V constant (red), 12V ACC (yellow), ground (which is black, not brown), and dimmer (orange). Also note the blue wire going from the smaller harnesses...that is need to make the side buttons work (the touch buttons on each side of the screen [Audio/Home/Apps/next track/etc...]).

    Also, I believe they are tapping the 12v ACC wire that is going between those harnesses and connecting it to the blue "remote turn-on" wire within the speed wire that goes to the amp or DSP (the speedwire on the left).
     
  6. Jan 21, 2018 at 8:01 AM
    #66
    Butterpea

    Butterpea Member

    Joined:
    Dec 13, 2017
    Member:
    #238404
    Messages:
    23
    Gender:
    Male
    First Name:
    Eric
    DFW, TX
    Vehicle:
    2017 Off Road - Quicksand
    Ok maybe I need to start a new thread for this, but you guys seem knowledgeable so I'll ask here first.

    Using the methods you guys described, I'm planning to run speedwire from the factory head unit to 4 channel amp and the back up to retain the factory wiring. What confuses me is the factory tweeter?

    Where is the high pass filtering done for the factory tweeter? Is it done at all? I believe it is wired in series with the front door speaker, but that means I'll have no control over the frequencies between the tweeter and the door speakers. Do you guys know of a solution to this? Maybe I'll have to go with components and run my own wire.
     
  7. Jan 21, 2018 at 12:42 PM
    #67
    ToyoDrew

    ToyoDrew Well-Known Member

    Joined:
    Sep 14, 2010
    Member:
    #43262
    Messages:
    1,378
    Gender:
    Male
    Texas
    Vehicle:
    17 Inferno TRD-OR DCSB 4x4 (SOLD)
    OVTune, Hertz spkrs & JBL MS-8 DSP, Turn-as-Tail mod, LEDs everywhere, MESOJDM Turn Signal, Bakflip Revolver X2, Pop-n-Lock, Yakima roof rack, & many minor mods
    Yes, the tweeter has a HPF (cap) on it and the front woofer is wired in series to that tweeter.

    You can still use the stock wiring, you just have to get a little creative. If you are going with a passive component set, you will likely have to put the crossover in the dash/kickpanel area anyway. So run a little extra wiring from the factory wiring at the tweeter, to the crossover, then out to the speakers.

    It will be a few short and easy runs in the dash/kickpanels area.

    Now, if you plan on having an active 2 or 3-way component set up front, it's best to run your own wires directly from the amp to the speakers.
     
  8. Jan 21, 2018 at 3:34 PM
    #68
    Butterpea

    Butterpea Member

    Joined:
    Dec 13, 2017
    Member:
    #238404
    Messages:
    23
    Gender:
    Male
    First Name:
    Eric
    DFW, TX
    Vehicle:
    2017 Off Road - Quicksand
    Hey thanks a lot for the help. I like the idea of running from the factory tweeter wiring into the crossover then to the front speaker.

    Thanks again.
     
    ToyoDrew[QUOTED] likes this.
  9. Jan 24, 2018 at 6:22 AM
    #69
    Butterpea

    Butterpea Member

    Joined:
    Dec 13, 2017
    Member:
    #238404
    Messages:
    23
    Gender:
    Male
    First Name:
    Eric
    DFW, TX
    Vehicle:
    2017 Off Road - Quicksand
    This gets me everytime I do car audio, but maybe you can shoot me a quick answer. If my equalizer requires a "12v Power" I should be connecting it to the 12V CONSTANT? This always confuses me since I don't want the equalizer to have power all the time draining my battery. But then you said to tap the yellow 12V ACC for Remote Turn-On. Is that correct?

    For Equalizer:
    12V POWER = 12V CONSTANT
    Remote Turn-On = 12V ACC
     
  10. Jan 24, 2018 at 6:46 AM
    #70
    DavidM310

    DavidM310 Well-Known Member

    Joined:
    Jun 6, 2017
    Member:
    #220899
    Messages:
    493
    Gender:
    Male
    Temple, Texas
    Vehicle:
    2017 Tacoma/2015 4Runner/2015 IS250
    What size AWG does your equalizer require? The blue wire on the Speedwire is the Remote Turn On. What I did is I ran power/ground cable to Amp and I used the blue wire as my Remote Turn On. For my equalizer it only required something small like 18 AWG. I just ran power/ground/remote turn on from the equalizer with 18 AWG straight into the amp’s power/ground/remote turn on slots.
     
  11. Jan 24, 2018 at 8:11 AM
    #71
    Butterpea

    Butterpea Member

    Joined:
    Dec 13, 2017
    Member:
    #238404
    Messages:
    23
    Gender:
    Male
    First Name:
    Eric
    DFW, TX
    Vehicle:
    2017 Off Road - Quicksand
    I'll be explicit so I clearly explain my problem, I don't mean to be patronizing or anything; I certainly am not an expert.

    My equalizer requires three things: 12V Power, Remote Turn-On, & Ground.

    For the 12V Power and Remote Turn-On, I'll need to run one wire for each from the harness to the equalizer:

    For 12V Power I'll run a separate wire alongside the Speedwire to the equalizer, but I'm not sure which wire to tap in the harness, red or yellow?
    For the Remote Turn-On, I'm using the blue wire in the Speedwire going to the equalizer, but I don't know which of the harness wires to tap and connect to the blue wire in the Speedwire, red or yellow?
     
  12. Jan 24, 2018 at 11:58 AM
    #72
    ToyoDrew

    ToyoDrew Well-Known Member

    Joined:
    Sep 14, 2010
    Member:
    #43262
    Messages:
    1,378
    Gender:
    Male
    Texas
    Vehicle:
    17 Inferno TRD-OR DCSB 4x4 (SOLD)
    OVTune, Hertz spkrs & JBL MS-8 DSP, Turn-as-Tail mod, LEDs everywhere, MESOJDM Turn Signal, Bakflip Revolver X2, Pop-n-Lock, Yakima roof rack, & many minor mods

    Other's should chime in too, but I didn't tap into the red (constant 12v) with the speedwire. It goes directly to the stereo HU and that's it. You should be running power directly to the amps from the battery.

    The 12V power can come from either the ACC or the constant/direct to battery. It just depends where you are tapping into the 12V circuit and how much power that circuit can handle. For example, running a radio off the ACC can be done, but to run an amp, you'll definitely need thicker gauge wire that is directly connected to the battery (with a bigger fuse in-line).

    Generally, with OEM headunits like ours that do not have a dedicated remote turn-on output, it's best practice to wire your amps/DSPs directly to constant 12V Constant and use the the 12v ACC line for the remote turn-on. This means that you will need to tap into the yellow 12V ACC wire with the blue wire in the speedwire and then use that blue speedwire to go to the "remote in" on your equalizer and your amp(s). It's a low current draw, so you can daisy chain it.

    Now, a dedicated remote turn-on output (which aftermarket HU's usually have) is nice because the HU can delay when the amps/DSPs are turned on to prevent the speakers from popping. Plus it will turn off the amps when you turn off the audio (regardless if the truck is on or not). So it gives you more control of your system and is nice to have...but it's not needed to make a system work.

    I'm not sure what your equalizer's power ratings are, but it probably doesn't draw much power and can probably tie into the red 12V Constant for power (meaning, you do not need to run a separate/thicker gauge wire like you will have to do for the amps). However, like I said before, it's best to run a separate wire for the 12v Constant...especially if you are adding amps as well.

    Hope that helps
     
  13. Jan 24, 2018 at 12:16 PM
    #73
    Butterpea

    Butterpea Member

    Joined:
    Dec 13, 2017
    Member:
    #238404
    Messages:
    23
    Gender:
    Male
    First Name:
    Eric
    DFW, TX
    Vehicle:
    2017 Off Road - Quicksand

    Thanks for the info. That really clears everything up and I should be able to fix it without blowing up the thread with more questions!

    Just to confirm for others that I'm not completely ignorant, I'm only talking about about powering my equalizer with the 12V constant from the head unit. The equalizer does not draw much power at all. I have a dedicated power cable from the battery powering my amps the correct way.
     
  14. Jan 24, 2018 at 9:35 PM
    #74
    DavidM310

    DavidM310 Well-Known Member

    Joined:
    Jun 6, 2017
    Member:
    #220899
    Messages:
    493
    Gender:
    Male
    Temple, Texas
    Vehicle:
    2017 Tacoma/2015 4Runner/2015 IS250
    Which Amp/EQ did you go with?
     
  15. Jan 25, 2018 at 7:01 AM
    #75
    Butterpea

    Butterpea Member

    Joined:
    Dec 13, 2017
    Member:
    #238404
    Messages:
    23
    Gender:
    Male
    First Name:
    Eric
    DFW, TX
    Vehicle:
    2017 Off Road - Quicksand
    I have one 4 channel running the front and rear door speakers, which is a Kenwood Exceleon XR400-4, 75W RMS per channel. For the Equalizer I'm using a Clarion EQS-755 7 Band. I also have a Mono block amp to drive my subwoofer, but that's of embarrassingly low quality and due to be upgraded so I won't even mention it.

    BTW, your tips and ToyoDrew's tips helped a lot. I got everything hooked up nicely yesterday power-wise. I have to troubleshoot why my speakers aren't playing lol, but at least my electronics power on and off as they should.

    Oh yeah, for anyone reading this thread in the future that is confused as I was, this is how my 2017 TRD Off-Road was wired:

    The YELLOW WIRE behind the head unit is 12V CONSTANT. I used this for the 12V Power for my equalizer, which was a red wire on my Clarion EQS-755.
    The RED WIRE behind the head unit is 12V ACC, I used this for my Remote Turn On for my equalizer and amps. It was a blue wire on my Clarion EQS-755. I daisy chained from one to the next.

    The discussion above implies the wires are the other way around, but this is how mine was.
     
    ToyoDrew likes this.
  16. Jan 25, 2018 at 5:21 PM
    #76
    DavidM310

    DavidM310 Well-Known Member

    Joined:
    Jun 6, 2017
    Member:
    #220899
    Messages:
    493
    Gender:
    Male
    Temple, Texas
    Vehicle:
    2017 Tacoma/2015 4Runner/2015 IS250
    Glad it worked out.

    I went with a budget setup. Kicker CS 6x9 Components up front and Kicker CS 6.75” Coaxials in the rear doors. Used a Pioneer 5 Channel Amp to power the 4 door speakers and a subwoofer. The subwoofer is a Kicker CompC 10” in a vented thin truck style box. 16g wiring to speakers and 12g to subwoofer. I originally had speaker inputs from Head unit/speedwire attached to the Pioneer amp. Running this setup does not allow for the use of the sub as a stand alone. I also went with the Clarion EQS755. This allowed me to run the subwoofer as a stand alone versus being tied in with the door speakers.

    I wired the head unit/Speedwire to the Clarion EQS755 under the driver seat. The Clarion EQS755 uses only the front speaker inputs versus the amp uses front and rear speakers. If anyone will use this setup you can buy a 5 conductor speedwire versus the 9 conductor speedwire I posted earlier in this thread. The 5 conductor has a pos/neg for front left and front right plus a remote turn on wire. Since I already had the 9 conductor speed wire I just snipped and taped up the rear right/left pos/neg wires. My amp is also under the driver seat with 4g wiring to battery and ground. The remote turn on from the speedwire is attached to the Clarion and then I have the Clarion power/ground connected with the power/ground from the amp. I have Front, Rear and SW RCA cables on the output of the Clarion EQS755 to the input of the amplifier. The HPF/LPF on the amp are turned off, and I have the LPF on the Clarion set at 90hz for the sub. The RCA cables are 1.5’ long.

    Will be going with a Mr.Marv SW box and possible the CompC 12” from Kicker.

    I have the amp running at 75watts RMS x 4 at 4ohms for the door speakers and the Sub at 350watts RMS at 4ohms. The 12” CompC SW has a recommended RMS of 300. Should make a good pair.

    The amp also came with a SW control
    knob I think from 0db to 18db. I have the Clarion and SW control knob velcroed under the seat out of sight but within reach.

    7BDC20B3-F1BC-4ED4-9AA2-74CDD8F5CB93.jpg
     
    ToyoDrew likes this.
  17. Jan 26, 2018 at 11:38 AM
    #77
    Butterpea

    Butterpea Member

    Joined:
    Dec 13, 2017
    Member:
    #238404
    Messages:
    23
    Gender:
    Male
    First Name:
    Eric
    DFW, TX
    Vehicle:
    2017 Off Road - Quicksand
    Awesome, man. We have very similar setups. Where did you ground your amp under the driver's seat? Are you getting any whine or buzzing in your speakers? I have mine under the passenger seat and I don't think my ground is sufficient.
     
  18. Jan 26, 2018 at 12:24 PM
    #78
    DavidM310

    DavidM310 Well-Known Member

    Joined:
    Jun 6, 2017
    Member:
    #220899
    Messages:
    493
    Gender:
    Male
    Temple, Texas
    Vehicle:
    2017 Tacoma/2015 4Runner/2015 IS250
    No whine or buzzing. I have the usual little bit of static noise even with radio turned off or 0 volume. I have had this in 2 previous other vehicles with audio equipment so I think this is normal. I grounded the amp to the ground for the driver seat. I sanded a small circular area around the hole down to metal to make for a better ground.

    Being able to adjust from 50hz to 16khz on the Clarion is awesome. Makes it easy to reduce ear piercing highs.
     
  19. Jan 26, 2018 at 1:53 PM
    #79
    Butterpea

    Butterpea Member

    Joined:
    Dec 13, 2017
    Member:
    #238404
    Messages:
    23
    Gender:
    Male
    First Name:
    Eric
    DFW, TX
    Vehicle:
    2017 Off Road - Quicksand
    Do you mean one of the 4 bolts where the seat is bolted down? If not, do you think you could describe or take a picture of where you grounded it? My buzzing is definitely from my ground, because I grounded on one of the 4 seat bolts without the seat in, and then the buzzing was worse when I grounded it with the seat bolted in as well.
     
  20. Jan 26, 2018 at 2:15 PM
    #80
    DavidM310

    DavidM310 Well-Known Member

    Joined:
    Jun 6, 2017
    Member:
    #220899
    Messages:
    493
    Gender:
    Male
    Temple, Texas
    Vehicle:
    2017 Tacoma/2015 4Runner/2015 IS250
    If you remove the driver door sill and raise the carpet up, you will see a 10mm bolt that is grounding a wire. The bolt is at the 12 oclock position of the hole in the carpet if you are sitting in the driver seat.
     
To Top