1. Welcome to Tacoma World!

    You are currently viewing as a guest! To get full-access, you need to register for a FREE account.

    As a registered member, you’ll be able to:
    • Participate in all Tacoma discussion topics
    • Communicate privately with other Tacoma owners from around the world
    • Post your own photos in our Members Gallery
    • Access all special features of the site
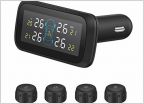
Access Cab Dog Platform UDPATE (pics)

Discussion in '2nd Gen. Tacomas (2005-2015)' started by BSP4x4, Jan 31, 2010.

  1. Jul 7, 2018 at 11:25 PM
    #261
    OldNeumanntapr

    OldNeumanntapr Well-Known Member

    Joined:
    May 24, 2015
    Member:
    #155896
    Messages:
    182
    Gender:
    Male
    Santa Maria, CA
    Vehicle:
    2011 Grey V6 PreRunner Access Cab TRD
    Grey will go well with silver. Good luck. I’m half way through the carpet installation. I did the top and the front tonight. I think I used too much of the spray because it’s almost gone. I wanted to make sure it was going to hold but I hardly have any left. I bought a staple gun today at Harbor Freight. That helped a lot!!! Pull the carpet tight and staple underneath to frame members.

    I layed out the carpet in the garage with the good side down and then positioned the platform on top of it. I market the perimeter of the platform with masking tape and then rolled it back so I could apply the spray adhesive to both wood and underside of carpet. After waiting about three minutes for it to get tacky I rolled the platform back and lined it up with the tape lines.
    I stood on the underside of the platform and then put weights on it to apply pressure while the adhesive set up. Then I sprayed the front side, the one that goes against the back of the seats, and stretched the carpet over and stapled it down to the underside of the speaker boxes and platform frame. Going to finish it tomorrow.
    I have to trim out the speaker openings and cut in the access panel for the jack. Then I can install the hinges and put the speakers in.

    Hopefully I can make a pleasing looking cut to fold in the side panels. Hope I have enough adhesive left for the side panels. This has been a huge project but I’m happy that I could complete it.
     
  2. Jul 8, 2018 at 11:39 AM
    #262
    Skynet Surfer

    Skynet Surfer Well-Known Member

    Joined:
    Nov 17, 2016
    Member:
    #202630
    Messages:
    289
    Gender:
    Male
    First Name:
    Dis
    Vehicle:
    15 DC v6 SR
    Hood struts Weathertech floor mats Roll n lock bed cover With custom Yakima rack over the bed Poploc tail gate Bed mat Retrofit source led fog lights Hitch and or 4 pin wiring Or just random small crap!
    Been thinking about this for my Double cab for a long time. As well maybe some fold up metal legs for ez storage.
     
  3. Jul 8, 2018 at 11:53 AM
    #263
    Greenbean

    Greenbean B.S. Goodwrench

    Joined:
    Aug 8, 2012
    Member:
    #84332
    Messages:
    3,253
    Gender:
    Male
    First Name:
    Zack
    Western NC
    Vehicle:
    2015 AC 2.7L 5-spd 4x4 Utility Package
    There is a guy who built an Overland type rig in his DC, behind the pass front seat he has a full size fridge on slides! It is BOSS!


    Edit: found it!

    DoorDing's 2012 Tacoma
     
    Skynet Surfer[QUOTED] likes this.
  4. Jul 8, 2018 at 9:56 PM
    #264
    OldNeumanntapr

    OldNeumanntapr Well-Known Member

    Joined:
    May 24, 2015
    Member:
    #155896
    Messages:
    182
    Gender:
    Male
    Santa Maria, CA
    Vehicle:
    2011 Grey V6 PreRunner Access Cab TRD
    My platform project is complete! It was a lot of work (Three full days) but now that it’s done I’m pleased with the results. The doxies are going to be surprised the next time they ride in the truck. They will have a lot more room now.

    Heres some pics showing the carpet installation. I also built a small shelf to go over the subwoofer which is held up by 2.5" corner brackets that are mounted to the top of the back of the sub box and the bottom of the shelf. I also lined the shelf with some of the excess carpet. (The sub box was originally positioned to fire downward. That's why I had bolted the angled 2x2 blocks to the front. It didn't sound as good that way so I turned it upright. The blocks now serve to protect the speaker.)
    I utilized one of the stock jump seat mounts to bolt down the subwoofer with a back strap made out of a corner bracket with one of the holes enlarged so the seat bolt could go through.

    (I nailed a scrap piece of plywood over the back of the access hatch for the jack that made the carpet easier to lay. Once the 3M Super 90 dried I used my utility knife and cut out the hatch, and also installed the hinges.)

    The opening for the transmission tunnel was purposely made extra wide so I could reach inside on either side to get to those areas. Seemed like a good place to hide valuables, or small stuff.

    I did everything myself, but I have to say my carpet skills need improvement! Fortunately there is no glaring mistakes. The rear speakers really do add a lot to the sound. I had to fine tune the JL Audio 4 channel amp to get the level correct. Rear fills should not call attention to themselves over and above the front sound stage, but add to filling out the sound to make a nice blend. It does that well.IMG_0647.jpgIMG_0648.jpgIMG_0651.jpgIMG_0656.jpgIMG_0666.jpgIMG_0667.jpg
     
    Last edited: Jul 8, 2018
    Greenbean and Mxmili like this.
  5. Jul 9, 2018 at 4:58 AM
    #265
    Mxmili

    Mxmili Well-Known Member

    Joined:
    Apr 21, 2018
    Member:
    #251193
    Messages:
    87
    Gender:
    Male
    First Name:
    Max
    Philadelphia
    Vehicle:
    2011 base 4x4 2.7l
    Bilstein 5100s at 0 Ome 883
    Looks good man! The only way you can use too much spray adhesive is if it soaks through the carpet, IMO load that shit on! Just make sure you give it ample time to tack up.
     
  6. Jul 9, 2018 at 6:46 AM
    #266
    Greenbean

    Greenbean B.S. Goodwrench

    Joined:
    Aug 8, 2012
    Member:
    #84332
    Messages:
    3,253
    Gender:
    Male
    First Name:
    Zack
    Western NC
    Vehicle:
    2015 AC 2.7L 5-spd 4x4 Utility Package
    Looks killer man!

    I just found out I don't have to work OT tonight so I'll be home with time to hopefully mark my drill holes and try and get the board situated up!

    I removed my two bed cubby doors and found out the board won't sit flat on the "shelf" of the cubby area.

    My first "goal" is to get it secured and some make-shift legs on to get it level and decide if I want to notch the front center to allow me to reach back and under for smaller items...
     
  7. Jul 9, 2018 at 7:09 AM
    #267
    OldNeumanntapr

    OldNeumanntapr Well-Known Member

    Joined:
    May 24, 2015
    Member:
    #155896
    Messages:
    182
    Gender:
    Male
    Santa Maria, CA
    Vehicle:
    2011 Grey V6 PreRunner Access Cab TRD
    Thanks. I used the whole can. Just barely had enough.

    I must have stared at the pics of yours that you posted for hours. I even showed them to the people at Home Depot and said, 'This is what I want to build.'

    I couldn't go with the side opening hatch because of the speakers. There wasn't enough clearance and I didn't want to make the top to thin on the edge. Plus, I thought that if I did it might cause vibration from the speakers.

    Yours looks to be a little wider than mine (My top was 19.5") but I wanted to be able to extend my seats back as far as possible.

    Thanks again for all the tips. I'm happy with the results.

    ONT-
     
    Last edited: Jul 9, 2018
    Mxmili[QUOTED] likes this.
  8. Jul 9, 2018 at 7:12 AM
    #268
    OldNeumanntapr

    OldNeumanntapr Well-Known Member

    Joined:
    May 24, 2015
    Member:
    #155896
    Messages:
    182
    Gender:
    Male
    Santa Maria, CA
    Vehicle:
    2011 Grey V6 PreRunner Access Cab TRD

    Good luck. I made cardboard templates for mine that helped a lot, especially the bolt holes. Push down hard on the cardboard and it will indent the bolt holes. Then, simply transfer to the plywood.
     
    llamasmurf and Greenbean[QUOTED] like this.
  9. Jul 9, 2018 at 7:12 AM
    #269
    llamasmurf

    llamasmurf Herpa Derp

    Joined:
    Mar 1, 2016
    Member:
    #179866
    Messages:
    5,177
    Gender:
    Male
    First Name:
    Wes
    Northern Ontario
    Vehicle:
    '15 Matte Black TRD AC
    FJ t-case with twin sticks, UTE bed, some other things :D
    Got my idea's from this thread. Have not put carpet on it yet, but its going to get used 1st before I decide if I want to or not.


    theolee and Greenbean like this.
  10. Jul 9, 2018 at 7:13 AM
    #270
    Greenbean

    Greenbean B.S. Goodwrench

    Joined:
    Aug 8, 2012
    Member:
    #84332
    Messages:
    3,253
    Gender:
    Male
    First Name:
    Zack
    Western NC
    Vehicle:
    2015 AC 2.7L 5-spd 4x4 Utility Package
    Did you use 3/4" MDF???

    Looks solid!
     
  11. Jul 9, 2018 at 7:19 AM
    #271
    llamasmurf

    llamasmurf Herpa Derp

    Joined:
    Mar 1, 2016
    Member:
    #179866
    Messages:
    5,177
    Gender:
    Male
    First Name:
    Wes
    Northern Ontario
    Vehicle:
    '15 Matte Black TRD AC
    FJ t-case with twin sticks, UTE bed, some other things :D
    Yea cardboard templates are what made mine all possible. I made one of the fridge, and the shelf. To ensure it would all work before I bought anything.

    Of course mine is for the dogs, the fridge just gets in there every once and while.
     
  12. Jul 9, 2018 at 7:38 AM
    #272
    Greenbean

    Greenbean B.S. Goodwrench

    Joined:
    Aug 8, 2012
    Member:
    #84332
    Messages:
    3,253
    Gender:
    Male
    First Name:
    Zack
    Western NC
    Vehicle:
    2015 AC 2.7L 5-spd 4x4 Utility Package
    My end goal is to complete a complete "Utility package" and install the factory rubber/vinyl flooring however I will have some holes exposed and the flat base for the rear will cover up those.

    I wanted to try and use 80/20 product to build my perimeter but quickly realized it was going to be to costly.
     
  13. Jul 9, 2018 at 6:19 PM
    #273
    Greenbean

    Greenbean B.S. Goodwrench

    Joined:
    Aug 8, 2012
    Member:
    #84332
    Messages:
    3,253
    Gender:
    Male
    First Name:
    Zack
    Western NC
    Vehicle:
    2015 AC 2.7L 5-spd 4x4 Utility Package
    So I ended up getting my two holes drilled and installed slightly longer bolts to secure it.

    Couple things:

    When snuggled down the platform slants downward, I’m not sure how I’ll adress this once I cut my legs out.

    Because if the back seat delete I’m dealing with a slightly different arrangement.

    I could remove the entire metal piece you see that has all the bolts in it and start there.

    Which I just may do this weekend.

    Anyways, pics are for comments or ideas.

    74283ACC-4964-46A2-BC6A-E703DDC66599.jpg
    5637CCCB-4283-48E5-A62F-1FAD05573E73.jpg
    DCD2A334-C7A9-468F-8F15-72547EF8CC37.jpg
     
  14. Jul 9, 2018 at 6:21 PM
    #274
    Greenbean

    Greenbean B.S. Goodwrench

    Joined:
    Aug 8, 2012
    Member:
    #84332
    Messages:
    3,253
    Gender:
    Male
    First Name:
    Zack
    Western NC
    Vehicle:
    2015 AC 2.7L 5-spd 4x4 Utility Package
    Can I ask why the extra board running the width of the cab back there?

    You may have given me an idea...
     
    llamasmurf[QUOTED] likes this.
  15. Jul 9, 2018 at 6:25 PM
    #275
    Greenbean

    Greenbean B.S. Goodwrench

    Joined:
    Aug 8, 2012
    Member:
    #84332
    Messages:
    3,253
    Gender:
    Male
    First Name:
    Zack
    Western NC
    Vehicle:
    2015 AC 2.7L 5-spd 4x4 Utility Package
    Hey brother we have the same trucks, sort of!

    Can I ask to see more pics of that rear 2x4, your is a very simple and good looking design.

    Does it just sit back there with gravity’s help?
     
  16. Jul 9, 2018 at 8:02 PM
    #276
    Mxmili

    Mxmili Well-Known Member

    Joined:
    Apr 21, 2018
    Member:
    #251193
    Messages:
    87
    Gender:
    Male
    First Name:
    Max
    Philadelphia
    Vehicle:
    2011 base 4x4 2.7l
    Bilstein 5100s at 0 Ome 883
    It’s actually an awesome product called FX(?) I get it from my local plywood supplier, Fessenden Hall. It’s a plywood core with a 1/16” mdf veneer on both sides, I use it for painted cabinets cause it’s smooth and consistent like mdf but holds screws like plywood. I wanted to use 1/2” but I had this extra sheet of 3/4” laying around.
     
  17. Jul 9, 2018 at 8:45 PM
    #277
    Mxmili

    Mxmili Well-Known Member

    Joined:
    Apr 21, 2018
    Member:
    #251193
    Messages:
    87
    Gender:
    Male
    First Name:
    Max
    Philadelphia
    Vehicle:
    2011 base 4x4 2.7l
    Bilstein 5100s at 0 Ome 883
    Ha, flattered! And stoked cause I’ve gotten so much inspiration from this site. Feels good to give back. I have also gone to depot with a picture in hand looking for advice on many occasions.

    I think I went as close to the back of the center console as I could, it’s so low that I can still get the seats pretty far back, not sure if it’s the full extension or not, but plenty for my 6’2” frame. I think I have 24” at its widest in the center, 21/22” at the sides. Roma(pup) is so happy about it, she lays down right away, used to be she’d stand the whole time or get up at every bump, I feel bad I didn’t upgrade sooner. The cushion helps a lot.

    Would love to shove some speakers in there or a small woofer, getting my truck to bounce is on my list. Upgraded the door speakers but haven’t jumped on a headunit yet due to city life. One day...
     
  18. Jul 9, 2018 at 8:48 PM
    #278
    Mxmili

    Mxmili Well-Known Member

    Joined:
    Apr 21, 2018
    Member:
    #251193
    Messages:
    87
    Gender:
    Male
    First Name:
    Max
    Philadelphia
    Vehicle:
    2011 base 4x4 2.7l
    Bilstein 5100s at 0 Ome 883
    Can you just shim underneath the platform with plywood strips to remove the slant? I know I had to shim in a few spots due to an uneven surface.
    The utility package looks sweet.
     
    Greenbean[QUOTED] likes this.
  19. Jul 9, 2018 at 9:22 PM
    #279
    OldNeumanntapr

    OldNeumanntapr Well-Known Member

    Joined:
    May 24, 2015
    Member:
    #155896
    Messages:
    182
    Gender:
    Male
    Santa Maria, CA
    Vehicle:
    2011 Grey V6 PreRunner Access Cab TRD
    Looks like you used the seat belt bolt locations. I bolted mine down to the holes that were from the jump seats. You’ll notice there are two holes in each of the far corners. I used one of these in each side, because I wanted to leave the seat belts to connect the dog harnesses. Are you going to use 2x4 legs or build side and front panels out of plywood ?
     
    Greenbean[QUOTED] likes this.
  20. Jul 9, 2018 at 10:28 PM
    #280
    OldNeumanntapr

    OldNeumanntapr Well-Known Member

    Joined:
    May 24, 2015
    Member:
    #155896
    Messages:
    182
    Gender:
    Male
    Santa Maria, CA
    Vehicle:
    2011 Grey V6 PreRunner Access Cab TRD
    The rear speakers really add a nice blend. Before I had kind of a ‘hole in the middle’ effect because of the front mids and tweeters and the rear subwoofer were separated. Now it’s like there is sound evenly spread throughout the truck. I crossed the 6x9s over at 75k with a 16db slope. Started off with them at full range but they didn’t sound as good to me.

    Did you have your cushion custom made? It looks really nice. I’m just going to put the dog bed on the passenger side and have it cover up that speaker. I figure the dogs wouldn’t appreciate high end car audio like I do.

    I should probably repost some of my pics on the Tacoma car audio threads.
     

Products Discussed in

To Top