

-
Welcome to Tacoma World!
You are currently viewing as a guest! To get full-access, you need to register for a FREE account.
As a registered member, you’ll be able to:- Participate in all Tacoma discussion topics
- Communicate privately with other Tacoma owners from around the world
- Post your own photos in our Members Gallery
- Access all special features of the site
Quick Links: Toyota Tacoma 2005-2015 Heater-Air Vent Outlet Grilles Headlights 2012-2015 Silver Satoshi Grill (Homer's) and Rocky Mounts Bike Mounts FS - 2005-2015 CalTrend Front Row Seat Covers - MicroSuede - Beige - (TY452-06SA) SOOOLD - 2005-2015 CalTrend 60/40 Rear Seat Cover - I Can't Believe It's Not Leather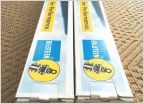 For Sale: Rear Bilstein (24-186728) 5100 Series Shock Absorbers
Anytime Rear Camera Mod for 2nd Gen Tacomas
Discussion in '2nd Gen Tacoma Parts Marketplace (2005-2015)' started by Logistics91, Feb 24, 2018.
Page 23 of 29
Page 23 of 29

