

-
Welcome to Tacoma World!
You are currently viewing as a guest! To get full-access, you need to register for a FREE account.
As a registered member, you’ll be able to:- Participate in all Tacoma discussion topics
- Communicate privately with other Tacoma owners from around the world
- Post your own photos in our Members Gallery
- Access all special features of the site
Quick Links: All Things 2017 Tacoma TRD Pro: Known Issues, Tips, Tricks and Mods
  What’s the price of OEM Toyota oil?
 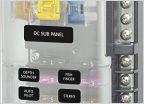 Where to connect 12a always on wire under hood - anywhere else but the Battery post ??
  Scooped Hood - Hood Struts
  Can I make my 2017 passenger side floor board like a 2018 with the floor mat tabs?
  Heated seats and seat covers
Hardwire Installing a Dual(Front + Rear) Dash Cam - 3rd Gen Tacoma
Discussion in '3rd Gen. Tacomas (2016-2023)' started by SomethingNew71, Apr 1, 2018.


