1. Welcome to Tacoma World!

    You are currently viewing as a guest! To get full-access, you need to register for a FREE account.

    As a registered member, you’ll be able to:
    • Participate in all Tacoma discussion topics
    • Communicate privately with other Tacoma owners from around the world
    • Post your own photos in our Members Gallery
    • Access all special features of the site
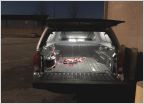
Auxbeam 32” Straight and 42” Curved 5D Series Cree Combo Light Bar Installation And Review

Discussion in 'Lighting' started by RobP62, Nov 25, 2018.

  1. Nov 25, 2018 at 1:01 AM
    #1
    RobP62

    RobP62 [OP] NVR20LD

    Joined:
    Jun 4, 2017
    Member:
    #220718
    Messages:
    41,519
    Gender:
    Male
    First Name:
    Rob
    Street, Md.
    Vehicle:
    TTC Member #0125
    Welcome to my review and installation of the Auxbeam 32" Straight and 42" Curved 5D Series Cree Combo Light Bars. I will come back and post more pics and even some videos from time to time.

    This review will be about the two following Auxbeam Light Bars, the installation, and the brackets and mounts for them.

    32” 180W 5D-SERIES CREE COMBO STRAIGHT LED LIGHT BAR (PROJECTOR LENS)

    SKU # ZD000093

    https://www.auxbeam.com/5d-series-combo-projector-lens-cree-led-light-bar

    42” 240W 5D-SERIES CREE COMBO CURVED LED LIGHT BAR (PROJECTOR LENS)

    SKU # ZD000250

    https://www.auxbeam.com/5d-series-combo-projector-lens-cree-led-light-bar

    Contact:
    Chris Zhu at Auxbeam
    chris@auxbeam.com
    www.auxbeam.com

    First things first. I want to apologize to Chris at Auxbeam. I really took too long to get this out. I also want to apologize to @rlx02 . He was nice enough to endorse me for this task and I am positive he was disappointed as well. I’ve included a link below to his review of the Auxebean 32” light bar he installed out of consideration to Auxbeam and to @rlx02 .

    I know most people could whip out a mod like this in a weekend but unfortunately I wasn’t able to for a lot of reasons beyond my control. I haven’t even had the chance to legitimately use them off road, except for the photos below. I have used them on road (when there wasn’t any other vehicles on the road with me) when I know the deer are feeding. To be honest, I wanted to wait to be 100% sure I could provide the best review possible.

    Another thing that caused a major delay was that I went back and forth on the mounting locations and brackets. More about all that later below and the installation.

    I'll cut right to the chase and look at output.

    First, I tested behind my house on the wooded lane that runs back to the farm. This shot is of the fog lights and low beams only for reference. Not bad.

    low_fogs.jpg

    This next shot is the low beams and high beams. The fogs turn off by default. Things are definitely more visible.

    low_high.jpg

    Next is the Lows, Highs and 32" Bumper Mounted Auxbeam. Notice how the light bar illuminates the sides of the woods there on the left really well.

    low_high_32_inch.jpg
    (note, if you only had a 32" on the bumper I think you could adjust it higher for more throw but as you will see in the photo, I don't have to)

    Next is the Lows, Highs, 32" Auxbeam Bumper Mounted Light Bar and the 42" Auxbeam Roof Mounted Light Bar (these photos are only resized, not retouched)

    low_high_32_42.jpg

    The freaking lights are incredible in confined spaces. I got out of the truck and checked the surroundings. It was like daylight.

    I have no doubt that if you had either of these light bars mounted on your truck and went wheeling at night you would not have any trouble seeing where you were going. If you had them both mounted on the truck, and were with other people, you had better be the lead truck! Together they are insanely bright and illuminate every part of the trail.

    I wanted to see how they would do out in the open. The only non-private place near me is a youth multi-use athletic field. For reference here is a birds eye view with the dimensions of the area. I stayed in the parking lot.

    test_area.jpg

    As you can see in the following pics the lights had no problem illuminating the area. In the first series of shots I'm sitting right at the edge of the field and there is a rather wide and deep drainage ditch that is directly in front of me about 15' away. Also, the parking lot is elevated about 10' - 15' higher than the field. I think this is good because it sort of represents what it would be like cresting a hill/drop on a trail.

    First for reference again, this time, just the low beams. I wanted to remove the Fog Lights from the equation. Not everyone has them. Pay special attention to the foreground to the left and the lack of illumination, especially farther way.

    field_lows.jpg

    Now let's look at the Low Beams with just the 32" Auxbeam Bumper Mounted Light Bar. Again, pay special attention to the left foreground. The spread is impressive for a a straight bar. In retrospect, I wish I had gone with the 32" Curved bar.

    field_lows_32.jpg

    Now the Low Beams and High Beams, again, no Fog Lights. Not bad, you can just barely make out those trees 1,000' away. You can see the 1st base line fence of the field farthest away there to the right of the white lacrosse goal. It's better.

    field_lows_highs.jpg

    Next is the Lows, Highs, 32" Auxbeam Bumper Mounted Light Bar and the 42" Auxbeam Roof Mounted Light Bar (again, these photos are only resized, not retouched). If you look close at the trees at the far edge of the field, again, 1,000' away you can now actually make out where the limbs and branches begin and not just the trunks. There is also a structure (not sure what it is but it could be another fence) on the far left. I shot this one from outside the truck.

    field_lows_highs_32_42.jpg

    Here are some more shots from outside the truck so you can see how these illuminate the foreground really well. This first one is just the 42" Auxbeam Roof Mounted Light Bar, alone, no other lights. There is clearly a 40' - 50' swath of light in front of the truck.

    field_42_outside_ditch.jpg

    Here's another of the same shot only looking towards the left.

    field_42_outside_ditch_left.jpg

    These nest shots shows looking over the edge of a drop, which could keep you out of trouble.

    over_the_edge.jpg

    over_the_edge_02.jpg


    So those are the output pics and you can see for yourself these light bars offer an incredible amount of light. The cost in my book makes them an excellent choice for the money. Do I recommend them? Yes, absolutely! They are heavy, well built and the construction is top notch. They arrived well packed and protected and all the parts were there. I have nothing to compare them to personally but these light bars are the real deal. I checked out all the LEDs and they are all uniform and the lens was crystal clear.

    There is one Con but I can live with it. The roof mounted light bar is a little noisy. It reverberates at medium speeds and is louder at higher speeds obviously. I learned this is common to light bars mounted on the roof. I think it would help if I had a better mounting system and it wasn't just sticking out like that. Eventually I am going to get a Prinsu with the deflector and mount it to that. I think that would help immensely. Some will say the shots that the hood is illuminated is also a Con. I have heard this said before. I don't have a problem at all. Yes, the hood is illuminated but it doesn't invade the cab. It has no effect on my eyes. Others may not like it. They make a light bar shield that attaches to light bars and eliminates it. Mounting it farther back on a Prinsu or another roof rack with a deflector would also eliminate it. Again, I think if you are off road and moving slow and concentrating on the path in front of you that is not going to be an issue. My guess is, white, tan, silver or even red will illuminate, and darker colors will not as much. Again, it doesn't bother me at all. You could be very different in this regard though. Again, if you are in the market for light bars, and you want to keep some green in your pocket, look at Auxbeam products. Definitely look at either of these two light bars, or both. :thumbsup:

    I do use them all the time up here in the country to help me see if deer are moving close to the road. It really lights up their eyes. This is just the two light bars. I turned my truck lights off. Look at the sign and guardrail reflectors over 300 yards away. Yikes.

    32_42_on_road.jpg
    In Maryland, off road light use on road is illegal which is why I don't have any other shots than this right now. I sat at the end of my driveway, turned off all my lights, then turned on both light bars and when I was sure no one was coming I pulled out and took the pic. It's ridicules how bright they are. There are some gravel roads up near me that I know aren't used at night and I plan to get some video on those.

    Here's what oncoming traffic will see and you can see why their use is illegal on road.

    head_on.jpg


    Here’s is the review @rlx02 did as well on the 32” Auxbeam Light Bar.

    https://www.tacomaworld.com/threads/auxbeam-32-180w-5d-led-light-bar-review-bumper-mounted.534542/

    Now the installation.......

    These light bars are not plug-n-play and you will have to wire the switches to the lights, you will have to penetrate the firewall grommet to get into the cab and you will have to run the wires from the light bars to the included harness, which come complete with fuses and relays. I used weatherproof quick disconnect automotive style connectors at each light in the event I wanted to remove them for whatever reason. I soldered, and shrink wrapped everything. I got real anal and wire loomed everything as well. I installed the roof light and did the wiring for both light bars all in one day. This was my first time doing something like this and the install looks like a pro did it so I am proud I pulled this off.

    For the 32" Auxbeam Light Bar I used the N-Fab O.R. Pre-Runner Light Bar

    https://n-fab.com/or-pre-runner-light-bar/2017/toyota/tacoma

    I bought it from 4Wheel Parts. Installation was straight forward but I had to contact N-Fab to have them send the light bar L shaped brackets that attach the light bar to the mounting system. They shipped them free and apparently they are use to these requests.

    Here are a couple shots of that process. Naturally you have to remove the grill. I also had to cut the lower grill to allow the mounting brackets to attach to the bumper support points. Once installed though the Light Bar Mounting System is rock solid. I am not a fan of the fitment of some of the drilled holes and plan on making tweaks to them. I think the light bar is crooked and it causes the light pattern to be off a little to the left. It's clearly not mounted straight. But it's so close I decided to deal with it for now.

    nfab_01.jpg

    nfab_02.jpg

    32_inch_front_view_02.jpg

    This took me the better part of the day to install. It was all new to me so I struggled a little with the brackets. I like the results though. I am very happy with it and how the Light Bar performs here.

    I'd like to shout out to @smugly for the inspiration for the N-Fab Light Bar Mounting System I decided to use for the 32” Light Bar.

    His thread is here:

    https://www.tacomaworld.com/threads/n-fab-light-bar-corrected-mounting-procedure-t1630or.526170/

    The roof Light Bar was about the same skill level and amount of time. There are various bracket you can buy but believe me when I say you do not have to spend a lot of money. Here is what I have:

    https://www.amazon.com/gp/product/B01LPR5VQO/ref=oh_aui_detailpage_o08_s00?ie=UTF8&psc=1

    These are heavy brackets that came with the rivets needed to attach them to the OEM roof rack. I am glad I had the Harbor Freight Heavy Duty rivet gun though.

    drilling_oem_rack.jpg

    HF_hd_rivet_gun.jpg

    gap_space.jpg

    attached_01.jpg

    final_fit.jpg

    All the mounting hardware that comes with the light bars is SS and it even comes with an allen wrench to install it. I suggest you use Loc Tite on the bolts.

    Here are some of the wiring shots.

    My first ever solder!

    my_first_solder.jpg

    The connector completed.

    wiring_connector_01.jpg

    I ran the wire for the roof mounted light bar under the trim at the cowl from the engine bay and right between the windshield trim and the A pillar. I just used some car wash to lube it up (because I knew that would not harm the paint) and I used a automotive trim removal tool to push it in the groove. It's completely hidden except at the top.

    wire_route_cowl.jpg


    trim_tool_01.jpg


    trim_tool_02.jpg


    wire_hidden.jpg


    Here is the grommet I went through. I searched for a better spot but this was it. I used an exacto knife to punch a slit in it and then I used a flexible automotive retrieval tool. My wiring fish tape was just too stout and too big. This worked perfectly. If I had had some coat hanger that would have worked too.

    wiring_entry.jpg

    flexible_grabber.jpg

    Here's the flexible grabber from the inside of the cab:

    flexible_grabber_02.jpg

    Then to get the wiring into the cab, I had to take the quick disconnect apart on the harness. I used a straight wiring pick to gently release the wire connectors from the plastic housing. I had seen this done before. I just had to make a note of how they went back together.

    switch_disect.jpg

    Then I tested my connections and wiring to be sure I didn't have any shorts and the switches were wired correctly.

    switches_illuminated.jpg

    Once I had the switch connectors dissected, I could tape them to the flexible tool and pull them into the cab. Then I reassembled the connectors and tested everything. You can see how the included switches have Red Power indicator light and a Green On light. Nice touch.

    I used wire management clips to mount the switches (which have double sided tape on the backs of them) to where I though they would be easily accessible.

    switches_temp_mount.jpg

    Ultimately I am buying a OEM switch to go into this panel and will throw both light bars onto that one switch. I feel like I will never want to use one light bar without the other. At least that has been my experience so far.

    So now you see how I managed to mount two light bars for what I think is the ultimate illumination package. There is no way anyone can buy and mount these light bars and say they are not sufficient. Again, for the money, for the quality and construction, you will be hard pressed to find anything better. I like Auxbeam. I like how they look on my truck!!!:thumbsup:

    32_42_front_view_01.jpg

    32_42_front_view_02.jpg

    Thanks for taking the time to read through my review and the installation process.
    Rob

    Edit/Update - Nov. 23, 2018

    My 42" light bar has developed a crack in the lens near the end. I am not sure if this is a stress crack from vibrations or from an impact. Most of my driving in on the road, and some of that is on the highway. I want to believe it is a impact issue.

    Edit/Update - Nov. 27, 2018

    I contacted Auxbeam and they are sending me a new light bar. I asked for a straight version this time in preparation for a different roof rack and mount. The Auxbeam customer service is unbelievable!!!!!!!

    Edit/Update - Dec. 22, 2018

    The new light bar arrived as promised. Incredible customer service on Auxbeam's part. I will not buy light bars or pods from any one else in the future!

    Edit/Update - Jan. 6, 2019

    Installed the new 42" straight light bar and just had time for some tests on the back road at my house. I need to make some adjustment tweaks and then I can post some photos. Holy cow these light bars are so freakin' bright!!!!! The prices are simply incredible for all you get!!!

    Auxbeam for the Win!!!!!!!!
     
    Last edited: Jan 8, 2019
    AR15xAR10, lynyrd3, Parker315 and 8 others like this.
  2. Nov 25, 2018 at 1:31 AM
    #2
    ovrlndkull

    ovrlndkull STUKASFK - HC4LIFE

    Joined:
    Jan 7, 2017
    Member:
    #206806
    Messages:
    37,791
    Gender:
    Male
    First Name:
    Skip
    Burlington, NC
    Vehicle:
    2005 DCLB Silver
    63s, XD Machete, Beat not Babied
    Nice Rob, one question what is that screen where your switches are mounted.
     
    MattCowsmasher and RobP62[OP] like this.
  3. Nov 25, 2018 at 1:40 AM
    #3
    RobP62

    RobP62 [OP] NVR20LD

    Joined:
    Jun 4, 2017
    Member:
    #220718
    Messages:
    41,519
    Gender:
    Male
    First Name:
    Rob
    Street, Md.
    Vehicle:
    TTC Member #0125
    I know! When I looked at it I had to look twice too Skip. It's not a screen, it's a cubby. It just looks grey like a LED screen in that pic. I plan on putting my Tekonsha P3 brake controller in there.
     
  4. Nov 25, 2018 at 1:43 AM
    #4
    ovrlndkull

    ovrlndkull STUKASFK - HC4LIFE

    Joined:
    Jan 7, 2017
    Member:
    #206806
    Messages:
    37,791
    Gender:
    Male
    First Name:
    Skip
    Burlington, NC
    Vehicle:
    2005 DCLB Silver
    63s, XD Machete, Beat not Babied
    Coulda fooled me. I thought you did some slick install of one of those scan gauges or something like that. Tekonsha makes some sweet brake controllers that would be an awesome spot for it. I need to get one bad. Haul too much to have no controller.
     
  5. Nov 25, 2018 at 1:46 AM
    #5
    RobP62

    RobP62 [OP] NVR20LD

    Joined:
    Jun 4, 2017
    Member:
    #220718
    Messages:
    41,519
    Gender:
    Male
    First Name:
    Rob
    Street, Md.
    Vehicle:
    TTC Member #0125
    Yea, they really are nice. A lot of guys like & use them.
     
  6. Nov 25, 2018 at 2:07 AM
    #6
    MattCowsmasher

    MattCowsmasher ( -_・)ᡕᠵ᠊ᡃ່࡚ࠢ࠘⸝່ࠡࠣ᠊߯᠆ࠣ࠘ᡁࠣ࠘᠊᠊ࠢ࠘

    Joined:
    Apr 7, 2017
    Member:
    #215629
    Messages:
    48,680
    Gender:
    Male
    Temple, Tx
    Vehicle:
    2015 sporty dcsb 4wd
    Lifted, armored, lumenz w/ switches, positraked, long legged, big tars, debadged with a hood skewp
    Homerun Rob great job on everything:D those lights are crazy bright.
     
    RobP62[OP] likes this.
  7. Nov 25, 2018 at 2:13 AM
    #7
    RobP62

    RobP62 [OP] NVR20LD

    Joined:
    Jun 4, 2017
    Member:
    #220718
    Messages:
    41,519
    Gender:
    Male
    First Name:
    Rob
    Street, Md.
    Vehicle:
    TTC Member #0125
    Thanks Matt :fistbump: I can't wait to actually need them off road.
     
  8. Nov 25, 2018 at 2:33 AM
    #8
    lynyrd3

    lynyrd3 STRENGTH DETERMINATION MERCILESS FOREVER

    Joined:
    Apr 9, 2008
    Member:
    #5848
    Messages:
    33,257
    Gender:
    Male
    First Name:
    Bill
    East Central Upstate NY
    Vehicle:
    2008 SR5 AC SUPER WHITE V6 4x4 AT / 2020 RAV4 XLE
    Bilstein 6112s top setting ,Total Chaos UCAs ,1/4" top plate spacer driver side ,SS extended brake lines ,Old Man Emu Medium Duty Dakar leaf springs with AAL,OME carrier bearing shim , Bilstein 5125s for 2-3” of lift in rear ,Timbren SES bump stops , SS extended brake lines rear , Toytec dif drop , Hayden high performance transmission fluid cooler,aFe pro dry air filter .Baja amber driving combo ditch lights , Devil horns by Andres ,Weathertecs floor protector, American Racing wheels Baja 17x8,4.5 BS , 285/70 Falken Wildpeaks AT/3W .Body Armor rear bumper . Extra D rings in bed ,Blue sea fuse block and 100amp breaker ,HomerTaco custom grill in Super White , TRD radiator cap ,Birddawg Industries rear view mirror riser bracket ,Coverking NeoSupreme Mossy Oak seat covers , Paranoid Fabrications fuse /relay holder Painted pinch weld.Shorty antenna ,HVAC knob mod ,LED dome and map lights , Tri Fold bed cover ,UltraGauge ,Morimoto XB LED fog lights ,Energy Suspension poly body bushings and sway bar bushings ! Geartech Customs splash guards ,Salex center console organizer . Mobtown tailgate cap ,tailgate anti theft mod .X-Mat sound deadening/insulation cab floor . Mobtown weld on rock sliders 0* with kickout Raptor lined . ,NEW frame courtesy of Toyota !
    Awesome lights , truck looks great Rob :thumbsup:
     
    RobP62[QUOTED][OP] likes this.
  9. Nov 25, 2018 at 3:08 AM
    #9
    Rob Daman

    Rob Daman The Taco Formerly Known as Hard Shell Taco

    Joined:
    Mar 3, 2017
    Member:
    #212255
    Messages:
    5,840
    First Name:
    Rob
    So Cal
    Vehicle:
    17 OR 6MT
    a lot
    good job. :thumbsup:
     
    RobP62[OP] likes this.
  10. Nov 25, 2018 at 4:08 AM
    #10
    ovrlndkull

    ovrlndkull STUKASFK - HC4LIFE

    Joined:
    Jan 7, 2017
    Member:
    #206806
    Messages:
    37,791
    Gender:
    Male
    First Name:
    Skip
    Burlington, NC
    Vehicle:
    2005 DCLB Silver
    63s, XD Machete, Beat not Babied
    :spy:
     
    RobP62[OP] likes this.
  11. Nov 25, 2018 at 4:54 AM
    #11
    Jckdnls

    Jckdnls Roads less explored

    Joined:
    Apr 27, 2017
    Member:
    #217530
    Messages:
    3,626
    Gender:
    Male
    First Name:
    John
    Spicer, mn
    Vehicle:
    93 3.0 v6 sr5 5spd 08 ac or 6sp
    Dakar torsion bars
    Nice job rob.
    Noticed in one of youtr pictures it looks like you are missing a pedal though. Still on the fence between rigid n these.
     
    RobP62[OP] likes this.
  12. Nov 25, 2018 at 5:44 AM
    #12
    Justanotherhemi

    Justanotherhemi Space Cowboy/Ninja

    Joined:
    Dec 7, 2016
    Member:
    #204297
    Messages:
    14,670
    First Name:
    Rick James
    Area 52 (because area 51 was full)
    Vehicle:
    Intelligent Life Exists
    Super clean installation buddy!

    The review is very through and the light output is amazing.

    You did great Roberto. Nice addition to the Taco.
     
    BravesRunner and RobP62[OP] like this.
  13. Nov 25, 2018 at 6:00 AM
    #13
    Slow Internet

    Slow Internet 56k Modem FTW!

    Joined:
    Apr 27, 2017
    Member:
    #217518
    Messages:
    6,704
    Gender:
    Male
    First Name:
    Slow...
    Vehicle:
    1992 Dial Up Modem...
    Wiper Blades
    Will curved light bars fit on prinsu racks? All I have ever seen used is straight. Would be awesome if they worked with the deflector.


    Great write up, Rob. Easy to follow along and picture proof of each point.
     
  14. Nov 25, 2018 at 9:09 AM
    #14
    RobP62

    RobP62 [OP] NVR20LD

    Joined:
    Jun 4, 2017
    Member:
    #220718
    Messages:
    41,519
    Gender:
    Male
    First Name:
    Rob
    Street, Md.
    Vehicle:
    TTC Member #0125
    Thank you Bill! Appreciate it.
     
    lynyrd3[QUOTED] likes this.
  15. Nov 25, 2018 at 9:10 AM
    #15
    RobP62

    RobP62 [OP] NVR20LD

    Joined:
    Jun 4, 2017
    Member:
    #220718
    Messages:
    41,519
    Gender:
    Male
    First Name:
    Rob
    Street, Md.
    Vehicle:
    TTC Member #0125
    Thanks Rob, I have great mentors on here :thumbsup:
     
    Rob Daman[QUOTED] and lynyrd3 like this.
  16. Nov 25, 2018 at 9:12 AM
    #16
    RobP62

    RobP62 [OP] NVR20LD

    Joined:
    Jun 4, 2017
    Member:
    #220718
    Messages:
    41,519
    Gender:
    Male
    First Name:
    Rob
    Street, Md.
    Vehicle:
    TTC Member #0125
    Thanks John, however, if you're doing it right, you only need one pedal.
    :mudding:

    Double check the prices of both before choosing. I think you'll find the Auxbeam lights are considerably lower.
     
    lynyrd3 likes this.
  17. Nov 25, 2018 at 9:17 AM
    #17
    RobP62

    RobP62 [OP] NVR20LD

    Joined:
    Jun 4, 2017
    Member:
    #220718
    Messages:
    41,519
    Gender:
    Male
    First Name:
    Rob
    Street, Md.
    Vehicle:
    TTC Member #0125
    Thank you Jaime. The pictures are good but don't do the lights justice in person. I'm going to pull my DSLR out and get some real photos. But yea, both light bars turn night into day. :cool:
     
  18. Nov 25, 2018 at 9:43 AM
    #18
    RobP62

    RobP62 [OP] NVR20LD

    Joined:
    Jun 4, 2017
    Member:
    #220718
    Messages:
    41,519
    Gender:
    Male
    First Name:
    Rob
    Street, Md.
    Vehicle:
    TTC Member #0125
    Thanks Brother! I appreciate your post. I especially appreciate the questions as they will help me and others make more sound decisions.

    I sent Prinsu a email asking them precisely if a 42" curved light bar would work with a deflector. I said I understood it would not be a perfect fit but just wanted to confirm it was possible. I'll post their response when I receive and add it to this post.

    In the meantime I did a quick search and found these photos.

    Prinsu_lightbar_01.jpg

    In the photo above you can see with the Prinsu supplied light bar brackets, they push the straight light bar away from the deflector and there is actually a large gap. I think my curved light bar would likely still be behind the deflector using these brackets. Or at the very least, even with it in the middle.

    I found these pics too.

    lightbar2.jpg

    lightbar3.jpg

    IMG_1455.jpg

    These three photos above show how the standard light bar included brackets (these come with the Auxbeam light bars) can be attached to one of the Prinsu cross bars. Then the cross bar can be mounted to the side rails at virtually any point along the side rails fore/aft to provide a custom fit. This is likely how I would do it. Or I could also remove the brackets attached to my OEM roof rack and use those.

    Finally, here is an option that is possible.

    chux 1.jpg

    This might not be as aerodynamic/quiet as the light bar behind the deflector. However (besides it saying Thule) this is a very clean look that frees up more room on the rack. With the extra length of a double cab it's not as critical though, but we all know, more is more.

    Thanks again! I like being made to think :thumbsup:
     
    Justanotherhemi likes this.
  19. Nov 25, 2018 at 10:59 AM
    #19
    BravesRunner

    BravesRunner “Exploration is curiosity put into action”

    Joined:
    Jan 19, 2017
    Member:
    #208063
    Messages:
    4,807
    Gender:
    Male
    First Name:
    Adam
    SC
    Vehicle:
    2021 GMC Sierra 1500 Denali
    Grandpa steps//Tri-fold Tonneau bed cover
    Think I’ll be going Auxbeam when I pick up my two 7” bars to install in my grill.

    Good job Rob! Great and thorough review!
     
    RobP62[OP] likes this.
  20. Nov 25, 2018 at 11:11 AM
    #20
    RobP62

    RobP62 [OP] NVR20LD

    Joined:
    Jun 4, 2017
    Member:
    #220718
    Messages:
    41,519
    Gender:
    Male
    First Name:
    Rob
    Street, Md.
    Vehicle:
    TTC Member #0125
    Thanks Adam. I doubt very much you'll be disappointed. I saw your plans how your going to mount them and I personally think flanking the Toyota emblem would look the best but as someone else posted, lower would allow an easier install. I'd try the upper position if possible to allow more throw.

    Make sure to get wiring harness from Auxbeam. It makes Installation easier if you're not set up for aftermarket electrical components. The fuze and relay are built in. All you do is connect the light bars to the harness and then connect the harness to the battery terminals. Those wires even have the C style spade connectors.

    :thumbsup:
     
    BravesRunner[QUOTED] likes this.

Products Discussed in

To Top