1. Welcome to Tacoma World!

    You are currently viewing as a guest! To get full-access, you need to register for a FREE account.

    As a registered member, you’ll be able to:
    • Participate in all Tacoma discussion topics
    • Communicate privately with other Tacoma owners from around the world
    • Post your own photos in our Members Gallery
    • Access all special features of the site

IFS to 1 ton Truggy

Discussion in '1st Gen. Builds (1995-2004)' started by esxcli, May 2, 2019.

  1. May 2, 2019 at 2:44 PM
    #1
    esxcli

    esxcli [OP] Keyboard Warrior

    Joined:
    Jun 25, 2018
    Member:
    #257452
    Messages:
    1,040
    Gender:
    Male
    First Name:
    Sean
    Reno NV
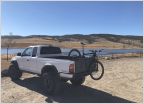
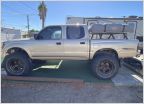
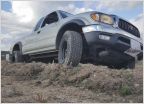
    ***Update: just kidding down below, I'm going with 1 ton axles, 40s & truggy partial rear tube chassis. Tired of IFS and 33s ***
    PXL_20210109_193718060.jpg

    As I said back in 2018 on my intro post, I inherited a 97 Tacoma with 230k and spotty maintenance records. My aunt used it as her ranch truck, when she died, she left me this. I ordered the RuSerle license plates because it was her middle name and I didn't want a plate that said "Jill."

    I was planning on doing just normal person truck stuff, but apparently plans change. Had to do some recovery this winter of a brand new ZR2 on busted ass old 31" BFG A/Ts. I nearly got stuck a couple of times, and the open rear end, lack of height, and general wimpy off-road nature of the Taco really hit home. So, Immagonnagobigger.

    I have read just about every damn 1st Gen build thread on this site. I really enjoyed a few in particular by PcBuilder, Lumpski and Blackdawg.

    I'll admit, my first thought was to do an SAS and build another crawler... but I like actually driving the truck, and I don't think my wife wants a repeat of my YJ build (because it was broken more often than not).

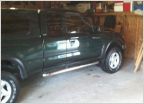
    However, I hopped on doing the maintenance thing, timing belt, waterpump, etc. Changed all fluids, and now it's time to upgrade. But... yeah, this thread is worthless without pictures.

    Last summer:

    Swapped out the tired old seat with seats out of an 07 WRX

    Picked up some fenders off CL

    Did the timing belt et al:

    NEW MEATS (OME 3 in not pictured yet):

    Also pulled the factory bed liner and placed it far away from the truck:

    Next:
    Find E-Locker and install
    UCAs (Prolly Total Chaos)
    Armor all around (gonna fab everything except for the front) *I gotta guy whos better at fabbing than I am. :D
     
    Last edited: Feb 17, 2021
  2. May 2, 2019 at 3:14 PM
    #2
    xtremewlr

    xtremewlr Well-Known Member

    Joined:
    Oct 25, 2018
    Member:
    #270626
    Messages:
    8,310
    Gender:
    Male
    First Name:
    Todd
    Tucson, AZ
    Vehicle:
    2003 4Runner V8 Limited
    4th gen T4R with a few mods
    Damn, there was a lot of crap under that plastic bedliner! Hopefully the bed is still in decent shape?
     
  3. May 2, 2019 at 10:19 PM
    #3
    esxcli

    esxcli [OP] Keyboard Warrior

    Joined:
    Jun 25, 2018
    Member:
    #257452
    Messages:
    1,040
    Gender:
    Male
    First Name:
    Sean
    Reno NV
    Yeah, a little surface rust where the liner rubbed. After the OME install tomorrow, the fenders, trimming and other little crap, I'll hit it with rust prevention primer, then do the roll on bed liner and forget about it until I decide what I want to do with the bed.

    I like the bedsides option, but not sure if it's worth the trouble.

    Lol, one problem at a time I suppose. XD
     
    xtremewlr[QUOTED] likes this.
  4. May 3, 2019 at 9:28 PM
    #4
    esxcli

    esxcli [OP] Keyboard Warrior

    Joined:
    Jun 25, 2018
    Member:
    #257452
    Messages:
    1,040
    Gender:
    Male
    First Name:
    Sean
    Reno NV
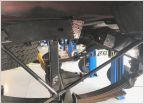
    Got the suspension in place... I'll get pics tomorrow, but these could very well be the stock shocks from 1997.

    Tomorrow, sanding and priming fenders. Then if I get lucky and nothing goes wrong, I'll hook up the sprayer and shoot some coats of white and a few coats of clear.

    Regardless, the labor intensive part is complete... Had to borrow the neighbor to get the damn lower coilover bolts slid into place. Nothing too bad, honestly, would been done earlier, but the golf course was calling my name.

    BTW, eff trying to get those poly shock bushings in. That sucked.

    Regardless, here's the progress from today's events:


    And my personalized plates came in! My aunt's name was Jill RuSerle Kortie. Seemed like a good name for the truck.

     
  5. May 4, 2019 at 7:57 PM
    #5
    esxcli

    esxcli [OP] Keyboard Warrior

    Joined:
    Jun 25, 2018
    Member:
    #257452
    Messages:
    1,040
    Gender:
    Male
    First Name:
    Sean
    Reno NV
    Fiberglass fenders need more filler and sanding, so I just trimmed the stock fenders until glass is ready.

    It's back together again for now.

    Sooooooo much rubbing at full turn, but nothing on the frame, all inner fender. Yay, no spacers needed.

    However, won't shift into 4x4. T-case engaged, but no front power. Time to go look for an actuator or fork I suppose.

    If anyone reads this, experienced input would be rad. :)

     
    Prayn4surf and xtremewlr like this.
  6. May 5, 2019 at 5:23 PM
    #6
    esxcli

    esxcli [OP] Keyboard Warrior

    Joined:
    Jun 25, 2018
    Member:
    #257452
    Messages:
    1,040
    Gender:
    Male
    First Name:
    Sean
    Reno NV
    Did the bed liner, tightened up the ubolts, front springs, and aligned. Caster is -1.2 until UCAs come in this week. Didn't do 4x4 troubleshooting, because I didn't want to crawl around under it all day. Too tired for that on a Sunday Funday.

     
  7. May 10, 2019 at 7:29 AM
    #7
    esxcli

    esxcli [OP] Keyboard Warrior

    Joined:
    Jun 25, 2018
    Member:
    #257452
    Messages:
    1,040
    Gender:
    Male
    First Name:
    Sean
    Reno NV
    Whelp, I'm an idiot.

    When I pulled the ADD to check for functionality, I didn't get it back on the shift collar obviously, because 4x4 isn't giving power to the front.

    Gawdammit!

    Ordered wheel bearings, upper control arms, lower ball joints and CV shafts, and a used actuator off ebay, so I'll just let it sit for awhile until I can drop the diff and do everything properly.

    That's what I get for trying to hurry.
     
    This site contains affiliate links for which the site may be compensated.
    #7
    POSTacoMike and scottalot like this.
  8. May 11, 2019 at 3:31 AM
    #8
    chrslefty

    chrslefty Well-Known Member

    Joined:
    Apr 20, 2012
    Member:
    #77258
    Messages:
    2,718
    Gender:
    Male
    First Name:
    chris
    Mesa az
    Vehicle:
    01 trd
    Stockish
    What size tire and rim are you using? Those are sticking out pretty far.
     
  9. May 11, 2019 at 6:42 AM
    #9
    esxcli

    esxcli [OP] Keyboard Warrior

    Joined:
    Jun 25, 2018
    Member:
    #257452
    Messages:
    1,040
    Gender:
    Male
    First Name:
    Sean
    Reno NV
    Yeah, did that to match the outside of the fiber fender. Which... BTW, I finally stuck back on today, gonna look to have them sprayed soon as well.

    As far as the wheels:
    • Wheel Size: 15x10
    • Bolt Pattern: 6 on 5.5
    • Backspace: 3.625
    • Offset: -47
    IMG_20190510_195700.jpg
     
    chrslefty[QUOTED] likes this.
  10. May 11, 2019 at 6:46 AM
    #10
    chrslefty

    chrslefty Well-Known Member

    Joined:
    Apr 20, 2012
    Member:
    #77258
    Messages:
    2,718
    Gender:
    Male
    First Name:
    chris
    Mesa az
    Vehicle:
    01 trd
    Stockish
    Nice what size tire?? How much trimming bashing in did you have to do?
    Thoes fenders are sweet 6"?
     
    esxcli[OP] likes this.
  11. May 11, 2019 at 6:46 AM
    #11
    esxcli

    esxcli [OP] Keyboard Warrior

    Joined:
    Jun 25, 2018
    Member:
    #257452
    Messages:
    1,040
    Gender:
    Male
    First Name:
    Sean
    Reno NV
    It's fun because it can be broken and I just drive my car. My Q50 is AWD and puts about 450 to the wheel... It's fun.

    But for some reason I dig driving the taco more right now.
     
  12. May 11, 2019 at 6:56 AM
    #12
    esxcli

    esxcli [OP] Keyboard Warrior

    Joined:
    Jun 25, 2018
    Member:
    #257452
    Messages:
    1,040
    Gender:
    Male
    First Name:
    Sean
    Reno NV
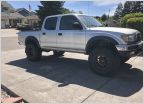
    33 12.5 ProComp MTs. They're beefy as hell. I've done some light cutting, and popped the inner fender with the sledge a bit. As soon as I get zero rubbing I'll line the inside and consider that bit done.

    These were a Craigslist find. 6" Hannemann fenders from guy I ended up knowing from running the Rubicon in my Jeep crawler days. He never even ended up drilling them for mount.
     
    chrslefty[QUOTED] likes this.
  13. May 11, 2019 at 6:59 AM
    #13
    esxcli

    esxcli [OP] Keyboard Warrior

    Joined:
    Jun 25, 2018
    Member:
    #257452
    Messages:
    1,040
    Gender:
    Male
    First Name:
    Sean
    Reno NV
    Until paint, this is how it sits. I am using the rock guard bumper mount to fab my front bumper. Also got some square stock to do the rear.

    Still waiting for parts to come in to drop the differential and fix the ADD while doing control arms, lower ball joints, bearings and half shafts. Wooooooo!IMG_20190510_161431.jpg
     
    Last edited: May 12, 2019
  14. May 11, 2019 at 9:19 PM
    #14
    esxcli

    esxcli [OP] Keyboard Warrior

    Joined:
    Jun 25, 2018
    Member:
    #257452
    Messages:
    1,040
    Gender:
    Male
    First Name:
    Sean
    Reno NV
    I am waiting on the damn half shafts, but everything else is here. I was going to reuse the hubs and just take them to buddy at machine shop for the new ones to press in... However, I live so close to Summit Racing and saw they had hubs in stock for 20% mother's day discount, I went and got them with inner and outer oil seals.

    As soon as these damn axles are here, I can make this front end like effin new again and worry more about welding up the rest of my bumper.

    Since I'm in a holding pattern, media player head unit and 8 in shallow sub came in. I was using a single 12" in a bandpass box, but it took up an entire seat. The stock head unit was nice in 2004, but was in desperate need of a replacement.

     
    Last edited: May 12, 2019
    lowtidejoe and chrslefty like this.
  15. May 11, 2019 at 11:10 PM
    #15
    lowtidejoe

    lowtidejoe Well-Known Member

    Joined:
    May 20, 2018
    Member:
    #254058
    Messages:
    114
    Gender:
    Male
    First Name:
    Joe
    Vehicle:
    2008 Tacoma TRD Sport
    Nice work so far
     
    esxcli[OP] likes this.
  16. May 13, 2019 at 1:28 PM
    #16
    esxcli

    esxcli [OP] Keyboard Warrior

    Joined:
    Jun 25, 2018
    Member:
    #257452
    Messages:
    1,040
    Gender:
    Male
    First Name:
    Sean
    Reno NV
    I had a bit of time for lunch.... orrrrrrr, run home and remove the knuckles and everything that requires a press to get in.

    Mission accomplished.

     
    Prayn4surf, chrslefty and xtremewlr like this.
  17. May 14, 2019 at 7:43 PM
    #17
    esxcli

    esxcli [OP] Keyboard Warrior

    Joined:
    Jun 25, 2018
    Member:
    #257452
    Messages:
    1,040
    Gender:
    Male
    First Name:
    Sean
    Reno NV
    Thanks to @Reh5108 for leading me down the right path of "fuck this part"

    IMG_20190514_175110~2.jpg

    I enjoy removing complexity from things... This allows me to do so. :)

    Seriously, fuck that vacuum actuator.
     
    Prayn4surf, Ritchie and Reh5108 like this.
  18. Jun 10, 2019 at 8:11 AM
    #18
    esxcli

    esxcli [OP] Keyboard Warrior

    Joined:
    Jun 25, 2018
    Member:
    #257452
    Messages:
    1,040
    Gender:
    Male
    First Name:
    Sean
    Reno NV
    Added a tool box from a repurposed security deposit box:


    Added a x8000i with in cab control:


    Added a spare tire carrier and gutted the rear of the bed for bumper fab:


    Took the boys wheelin and watched them run around to find rocks at the crystal mine:

     
    DavesTaco68, xtremewlr and R242 like this.
  19. Jun 13, 2019 at 9:31 AM
    #19
    esxcli

    esxcli [OP] Keyboard Warrior

    Joined:
    Jun 25, 2018
    Member:
    #257452
    Messages:
    1,040
    Gender:
    Male
    First Name:
    Sean
    Reno NV
    The rear passenger corner being smashed up and lack of protection in the rear was bugging me, so last week I had some brackets made up on the CNC at a local spot called MSM sheet metal. So, 1/4" brackets welded on to 2.5x3.5 stock... I didn't think about the 3.5 height... so I'll have to notch the outside bit, but, the plan is to wrap it around and taper it underneath the bedside.

     
  20. Jun 13, 2019 at 9:38 AM
    #20
    rngr

    rngr Aix sponsa

    Joined:
    Jan 13, 2015
    Member:
    #146258
    Messages:
    9,244
    Gender:
    Male
    Vehicle:
    01 SR5 4x4 2.7L
    Looking good!
     
    esxcli[OP] likes this.

Products Discussed in

To Top