1. Welcome to Tacoma World!

    You are currently viewing as a guest! To get full-access, you need to register for a FREE account.

    As a registered member, you’ll be able to:
    • Participate in all Tacoma discussion topics
    • Communicate privately with other Tacoma owners from around the world
    • Post your own photos in our Members Gallery
    • Access all special features of the site

1 Bored Clerk's Garage Built Camper

Discussion in 'Other Builds' started by 1 Bored Clerk, Oct 24, 2016.

  1. Oct 30, 2019 at 8:15 PM
    #1581
    Drainbung

    Drainbung Somedays you are the show....

    Joined:
    Sep 2, 2010
    Member:
    #42629
    Messages:
    9,290
    Gender:
    Male
    First Name:
    Bob
    Fallabama, NV
    Vehicle:
    10 DCLB
    TRD Fleshlight
    Bonus points for the NRS cam strap, don't leave home without them!
     
  2. Oct 30, 2019 at 8:26 PM
    #1582
    1 Bored Clerk

    1 Bored Clerk [OP] Well-Known Member

    Joined:
    Sep 18, 2013
    Member:
    #112786
    Messages:
    1,999
    Gender:
    Male
    Vancouver, WA
    Vehicle:
    '13 4x4 AC TRD OR
    I recently lost my ENTIRE collection of straps...one of the saddest days of my life. I still haven't recovered. The only reason these two straps weren't lost is because they were wrapped around this mattress.
     
    Drainbung[QUOTED] likes this.
  3. Oct 30, 2019 at 8:39 PM
    #1583
    Drainbung

    Drainbung Somedays you are the show....

    Joined:
    Sep 2, 2010
    Member:
    #42629
    Messages:
    9,290
    Gender:
    Male
    First Name:
    Bob
    Fallabama, NV
    Vehicle:
    10 DCLB
    TRD Fleshlight
    I have a rubbermaid container in the bed of the truck with all mine in it, and there's a note on the inside of the lid not to leave the straps on the bumper. Best straps EVER.
     
    Slashaar likes this.
  4. Oct 30, 2019 at 8:47 PM
    #1584
    1 Bored Clerk

    1 Bored Clerk [OP] Well-Known Member

    Joined:
    Sep 18, 2013
    Member:
    #112786
    Messages:
    1,999
    Gender:
    Male
    Vancouver, WA
    Vehicle:
    '13 4x4 AC TRD OR
    Ha! Love it!
     
    Drainbung[QUOTED] likes this.
  5. Nov 2, 2019 at 9:36 AM
    #1585
    1 Bored Clerk

    1 Bored Clerk [OP] Well-Known Member

    Joined:
    Sep 18, 2013
    Member:
    #112786
    Messages:
    1,999
    Gender:
    Male
    Vancouver, WA
    Vehicle:
    '13 4x4 AC TRD OR
    IMG_20191102_093218.jpg
    IMG_20191102_093225.jpg
    IMG_20191102_093229.jpg
    And so it begins...
     
    loyaltothetaco and Drainbung like this.
  6. Nov 2, 2019 at 5:29 PM
    #1586
    1 Bored Clerk

    1 Bored Clerk [OP] Well-Known Member

    Joined:
    Sep 18, 2013
    Member:
    #112786
    Messages:
    1,999
    Gender:
    Male
    Vancouver, WA
    Vehicle:
    '13 4x4 AC TRD OR
    Got a lot done today! A TON of it was "figuring" and "contemplating" and "planning" but I think it's working out.

    IMG_20191102_150351.jpg
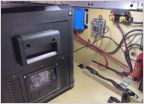
    Had to figure out how to get the Redarc battery sensor and a circuit breaker installed near the aux battery. Typical 10lbs of shit in a 5lb bag scenario. Ended up making a custom aluminum bracket that sandwiches under the battery tie down. The components themselves are a tight fit around the tie down so it's really solid.

    IMG_20191102_171339.jpg
    Here's what it looks like in a more advanced stage of wiring. Probably going to run a ground all the way around the engine bay to the ground point right by the starter battery instead of the one I have now. Its grounded very close to the battery to a small ground point used by another wire. Not sure which would be better but I'm leaning toward the factory ground location on the driver's side

    IMG_20191102_171346.jpg
    IMG_20191102_171353.jpg
    A power distribution post and three circuit breakers are mounted on the panel I had on the driver's side. I've changed the layout and components so many times this thing is just Swiss cheese now. Still going strong though!

    The left most breaker is for powering the Redarc Manager 30 from the starter battery. The middle circuit breaker is for the Redarc to charge the aux battery (is the line current from the charger? And the load post should go to the battery? Usually the line current is from the battery...not sure about this) and the farthest right breaker is for the aux fuse blocks.

    I think I'm doing this right but I'm not POSITIVE.

    Oh, I bought a regular ass Toyota battery today. The factory alternator isn't capable of keeping up properly with a big AGM battery so I'm going back to a factory set up. Ordered an OEM battery tray to replace the Pelfrey built group 31 tray and it's not the right one!! I was bummed because I was hoping to swap that out today as well. Now I have to order one and wait for it to show up sometime next week.
     
  7. Nov 2, 2019 at 5:45 PM
    #1587
    El Duderino

    El Duderino Obviously, you're not a golfer.

    Joined:
    Dec 29, 2015
    Member:
    #173469
    Messages:
    12,928
    Gender:
    Male
    First Name:
    Jeremy
    HI->PNW
    Vehicle:
    19 nautical blue SR5 premium 4x4
    Stuff, things, this, an ADS
    Just caught up from page 76. Glad to see all the small detail work coming together.
     
    1 Bored Clerk[OP] likes this.
  8. Nov 3, 2019 at 8:13 PM
    #1588
    1 Bored Clerk

    1 Bored Clerk [OP] Well-Known Member

    Joined:
    Sep 18, 2013
    Member:
    #112786
    Messages:
    1,999
    Gender:
    Male
    Vancouver, WA
    Vehicle:
    '13 4x4 AC TRD OR
    This is all sooo much work! Got a bunch done but it's stunning how many hours it can eat up.

    IMG_20191103_112740.jpg
    Here's a random shot of how I typically end up working. :rofl:

    IMG_20191103_113926.jpg
    This looks about right. Time for lunch!

    IMG_20191103_141226.jpg
    Engine bay almost all wired up. May have to pull the aux battery to run the cat 5 cable for the battery sensor. Bummer but not much work. Four fasteners and it's out. Still need to swap in the OEM sized battery and install a single cable.

    IMG_20191103_141233.jpg
    The bundle of cables running down the firewall are heat insulated since they run right past the cat.

    IMG_20191103_141239.jpg
    Circuit breaker central. Trying to protect all the wire I can!

    IMG_20191103_154429.jpg
    Built this little bracket to hold the aux fuse block that I decided to move into the cab. It'll be in a protected spot behind the fridge but still easily accessible enough...especially since I can slide the fridge right out.

    IMG_20191103_154437.jpg
    Here's a pic of the back. Basic aluminum pieces I had laying around. Didn't even have to buy fasteners! There was at least 15 minutes of rummaging to find matching hardware though! :thumbsup:

    IMG_20191103_160202.jpg
    I also had to relocate the 12v plug for the fridge. No biggie. Probably safer here anyway.

    There are a few dry days left in the forecast. I have a TON of paying work to do so I'm not sure if I'll be able to dump some of my overage hours to work on the truck but we'll see.

    Also, I NEED to clean that engine bay. It's disgusting!
     
    Last edited: Nov 3, 2019
    Slashaar, Drainbung, Pchop and 3 others like this.
  9. Nov 4, 2019 at 5:52 AM
    #1589
    Pchop

    Pchop Beavis Killer

    Joined:
    Sep 17, 2012
    Member:
    #87171
    Messages:
    15,851
    Gender:
    Male
    First Name:
    Rob I
    Stuart, FL
    Vehicle:
    '09 Tacoma TRD
    Hell yeah bro!!!!

    [​IMG]
     
    1 Bored Clerk[OP] likes this.
  10. Nov 4, 2019 at 9:29 AM
    #1590
    Trucko

    Trucko Well-Known Member

    Joined:
    Sep 22, 2013
    Member:
    #113030
    Messages:
    1,288
    Gender:
    Male
    First Name:
    Matt
    Summit County Colorado
    Vehicle:
    2005 Tacoma
    arb bull bar Smittybulit 9.5 winch topper shell with yakima basket piaa lights toytec boss coilovers Dakar leaf pack with boss shocks 28/75/16 bfg at ko2 Midland CB Home made trailer with CVT Mount Rainer tent and max coupler hitch
    nice job looking good. Can we get a few picture of the entire rig at different angles.
     
  11. Nov 4, 2019 at 9:48 AM
    #1591
    1 Bored Clerk

    1 Bored Clerk [OP] Well-Known Member

    Joined:
    Sep 18, 2013
    Member:
    #112786
    Messages:
    1,999
    Gender:
    Male
    Vancouver, WA
    Vehicle:
    '13 4x4 AC TRD OR
    There are some back a few pages but, yeah, I can't wait to have nothing to do but drive it around and take photos. Haha.
     
  12. Nov 4, 2019 at 10:58 AM
    #1592
    Pchop

    Pchop Beavis Killer

    Joined:
    Sep 17, 2012
    Member:
    #87171
    Messages:
    15,851
    Gender:
    Male
    First Name:
    Rob I
    Stuart, FL
    Vehicle:
    '09 Tacoma TRD
    :rofl:

    Never going to happen. Every trip you’ll be tinkering with it after, adding the latest new idea in the name of “convenience”.
     
  13. Nov 4, 2019 at 11:52 AM
    #1593
    1 Bored Clerk

    1 Bored Clerk [OP] Well-Known Member

    Joined:
    Sep 18, 2013
    Member:
    #112786
    Messages:
    1,999
    Gender:
    Male
    Vancouver, WA
    Vehicle:
    '13 4x4 AC TRD OR
    Get outta here with that truth!
     
    PNW/TRD Steve and Pchop[QUOTED] like this.
  14. Nov 4, 2019 at 12:50 PM
    #1594
    LC7

    LC7 Well-Known Member

    Joined:
    Mar 27, 2017
    Member:
    #214529
    Messages:
    458
    Gender:
    Male
    Far Nor Cal
    Vehicle:
    2011 MGM DCLB 4x4 4.0L
    5100's w/885's, SPC LR UCA, Deaver U402 stage 1 w/Fox 2.0 RR, 285/75r17 Toyo AT III load C on SCS F5, Dynabeads
  15. Nov 4, 2019 at 12:53 PM
    #1595
    Pchop

    Pchop Beavis Killer

    Joined:
    Sep 17, 2012
    Member:
    #87171
    Messages:
    15,851
    Gender:
    Male
    First Name:
    Rob I
    Stuart, FL
    Vehicle:
    '09 Tacoma TRD
  16. Nov 4, 2019 at 1:24 PM
    #1596
    1 Bored Clerk

    1 Bored Clerk [OP] Well-Known Member

    Joined:
    Sep 18, 2013
    Member:
    #112786
    Messages:
    1,999
    Gender:
    Male
    Vancouver, WA
    Vehicle:
    '13 4x4 AC TRD OR
  17. Nov 4, 2019 at 1:25 PM
    #1597
    1 Bored Clerk

    1 Bored Clerk [OP] Well-Known Member

    Joined:
    Sep 18, 2013
    Member:
    #112786
    Messages:
    1,999
    Gender:
    Male
    Vancouver, WA
    Vehicle:
    '13 4x4 AC TRD OR
    El Duderino likes this.
  18. Nov 5, 2019 at 6:18 PM
    #1598
    1 Bored Clerk

    1 Bored Clerk [OP] Well-Known Member

    Joined:
    Sep 18, 2013
    Member:
    #112786
    Messages:
    1,999
    Gender:
    Male
    Vancouver, WA
    Vehicle:
    '13 4x4 AC TRD OR
    Before:
    IMG_20191105_164641.jpg
    Group 31 AGM. This was 5-6 years old and was going strong (starting the truck anyway). But it was big. The positive cable was stretched tight and it was a but fussy to get the oil filter out.

    After:

    IMG_20191105_171223.jpg
    Everything fits like it was designed to...because it was! I'm going to make a new shorter cable from the positive terminal to the circuit breaker. This one is a bit longer than I'd like. Or I may leave it cuz I'm feeling lazy.

    Another thing off the list!
     
    Slashaar, Drainbung, POOLGUY and 2 others like this.
  19. Nov 5, 2019 at 6:35 PM
    #1599
    1 Bored Clerk

    1 Bored Clerk [OP] Well-Known Member

    Joined:
    Sep 18, 2013
    Member:
    #112786
    Messages:
    1,999
    Gender:
    Male
    Vancouver, WA
    Vehicle:
    '13 4x4 AC TRD OR
    Oh, if anyone has need for a Pelfrey built group 31 battery tray, let me know. I have one available. :D
     
  20. Nov 6, 2019 at 6:34 PM
    #1600
    1 Bored Clerk

    1 Bored Clerk [OP] Well-Known Member

    Joined:
    Sep 18, 2013
    Member:
    #112786
    Messages:
    1,999
    Gender:
    Male
    Vancouver, WA
    Vehicle:
    '13 4x4 AC TRD OR
    Doing what I can with the time I have.

    IMG_20191106_174410.jpg
    Per usual, a custom bracket was needed. Found the perfect piece of angle aluminum laying around. Put a few tools to work and ended up with this.

    IMG_20191106_174524.jpg
    It goes down in here somewhere. Thank goodness my dome light wasn't too bright. :rolleyes:

    IMG_20191106_175343.jpg
    Fussed mightily to get the fastener tight.

    IMG_20191106_182605_806.jpg
    Then some additional struggle went down. I had to cut the cable to length, strip it back, crimp on an end and heat shrink the junction.

    Nailed it!

    A couple of side notes:

    1. I try to only use adhesive lined heat shrink tube. Makes me feel good about life and seems to hold really well. Easy to get at boat supply places (west marine for me)
    2. I usually avoid ALL tools from harbor freight unless I plan to beat the crap out of them and use them all up in one big job. With that in mind, I bought some hydraulic crimpers from HF and they have been AWESOME! Totally recommend.

    IMG_20191106_181622.jpg
    Comes with many dies for various gauge wire. They are a little awkward to use but they work really well.

    IMG_20191106_181631.jpg
    Go forth and crimp all the things!
     
To Top