

-
Welcome to Tacoma World!
You are currently viewing as a guest! To get full-access, you need to register for a FREE account.
As a registered member, you’ll be able to:- Participate in all Tacoma discussion topics
- Communicate privately with other Tacoma owners from around the world
- Post your own photos in our Members Gallery
- Access all special features of the site
 Is there a way to turn off the seatbelt buzzer?
 Transfer Case Service
 Towing motorcycle
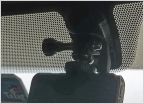 Go Pro Mount
 Transmission fluid type
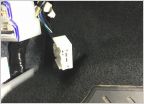 Headliner removal for cable keeping? (for GoPro power)
Anytimebackupcamera.com Install- Front and Rear Cameras
Discussion in '3rd Gen. Tacomas (2016-2023)' started by Papadave418, Sep 7, 2018.
Page 45 of 60
Page 45 of 60
Products Discussed in


