

-
Welcome to Tacoma World!
You are currently viewing as a guest! To get full-access, you need to register for a FREE account.
As a registered member, you’ll be able to:- Participate in all Tacoma discussion topics
- Communicate privately with other Tacoma owners from around the world
- Post your own photos in our Members Gallery
- Access all special features of the site
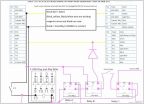 Custom Switch Wiring for Aftermarket Front & Rear Lockers
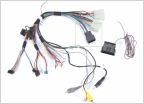 Connecting sub / splicing speaker wires
 Anyone replaced tensioner pulley on 3rd gen 3.5 liter?
 How To: Constantly powered under-dash switched circuit
 I Made Some Phone Cord Wire Clips
 Switch's dual battery setup
Front Runner product thread
Discussion in '3rd Gen. Tacomas (2016-2023)' started by GrilledCheese, Jul 10, 2020.
Page 2 of 3
Page 2 of 3


