

-
Welcome to Tacoma World!
You are currently viewing as a guest! To get full-access, you need to register for a FREE account.
As a registered member, you’ll be able to:- Participate in all Tacoma discussion topics
- Communicate privately with other Tacoma owners from around the world
- Post your own photos in our Members Gallery
- Access all special features of the site
 Fender bolt size ?
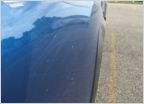 MGM Metallic Covered in Scratches
 Coms Setup & Location
 ???Sliding Rear Window Screen???
 Brand New Tacoma Developing 1000's of rust spots on body
 3rd gen USB re-route?
UCA Replacement Assistance Needed
Discussion in '3rd Gen. Tacomas (2016-2023)' started by Bertw192, Sep 21, 2019.


