

-
Welcome to Tacoma World!
You are currently viewing as a guest! To get full-access, you need to register for a FREE account.
As a registered member, you’ll be able to:- Participate in all Tacoma discussion topics
- Communicate privately with other Tacoma owners from around the world
- Post your own photos in our Members Gallery
- Access all special features of the site
 2014 Tacoma Oil Fiter for 4.0
 Which Lower Ball Joint?
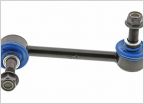 Mevotech MS86849 Sway Bar Links any good?
 GPS cd slot mounts?
 Best wax for black sand pearls?
 Haynes Manual now available
What Have You Done To Your 2nd Gen Tacoma Today?
Discussion in '2nd Gen. Tacomas (2005-2015)' started by kwalton, Feb 2, 2008.
Page 10934 of 12537
Page 10934 of 12537
Products Discussed in


