1. Welcome to Tacoma World!

    You are currently viewing as a guest! To get full-access, you need to register for a FREE account.

    As a registered member, you’ll be able to:
    • Participate in all Tacoma discussion topics
    • Communicate privately with other Tacoma owners from around the world
    • Post your own photos in our Members Gallery
    • Access all special features of the site

Long Travel BS Thread

Discussion in 'Long Travel Suspension' started by amaes, Aug 20, 2010.

  1. Mar 30, 2021 at 12:29 PM
    EatSleepTacos

    EatSleepTacos Well-Known Member

    Joined:
    Mar 24, 2015
    Member:
    #151688
    Messages:
    59,835
    Gender:
    Male
    First Name:
    Randy
    West Valley, AZ
    Vehicle:
    2017 4Runner
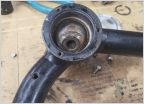
    Going back to the earlier talk about the right tool for cutting the shaft, I’ll admit I was wrong. I decided to practice on this one since it was already trash and it really wasn’t that difficult to cut close enough with an angle grinder. I just rotated the axle around and cut a bit on each side. Worked great. I guess my issue with the first one was that I didn't cut the stub close enough which is what made it a PITA.

    32EA8ABA-2CC8-4692-AF9D-3941B1F13444.jpg
     
    Last edited: Mar 30, 2021
  2. Mar 30, 2021 at 2:08 PM
    EatSleepTacos

    EatSleepTacos Well-Known Member

    Joined:
    Mar 24, 2015
    Member:
    #151688
    Messages:
    59,835
    Gender:
    Male
    First Name:
    Randy
    West Valley, AZ
    Vehicle:
    2017 4Runner
    Talk about a turn of events for luck. Found a dude with a pair of oem outers already separated from the axles because he went to manual hubs. $100 for the pair and I don’t need to muck around with separating them at all.

    7744E6D8-17F1-4BF8-9E0C-7EE7AD41637B.jpg
     
    Last edited: Mar 30, 2021
  3. Mar 30, 2021 at 9:16 PM
    yaaj2005

    yaaj2005 Well-Known Member

    Joined:
    Apr 9, 2015
    Member:
    #152846
    Messages:
    142
    Gender:
    Male
    First Name:
    Fang
    Sacrament, CA
    Vehicle:
    2014 Toyota Tacoma TRD

    Dam... welcome to the club... i did the same thing.... Hurt my heart seeing a you going thru the same thing....
     
    EatSleepTacos[QUOTED] likes this.
  4. Mar 30, 2021 at 9:50 PM
    snowsk8air2

    snowsk8air2 how hard can it be?

    Joined:
    Sep 16, 2011
    Member:
    #63607
    Messages:
    10,520
    Gender:
    Male
    First Name:
    Ryan
    Flagstaff, AZ
    Vehicle:
    Supercharged TX Pro
    2011 S/C and basic mods
    Truss coming together on the Tundra axle.

    E9074E09-AA96-4091-86EB-C0FA9054A935.jpg

    26452F19-3170-4D03-ABF5-07F4FE5B18B1.jpg
     
  5. Mar 31, 2021 at 6:24 AM
    EatSleepTacos

    EatSleepTacos Well-Known Member

    Joined:
    Mar 24, 2015
    Member:
    #151688
    Messages:
    59,835
    Gender:
    Male
    First Name:
    Randy
    West Valley, AZ
    Vehicle:
    2017 4Runner
    When putting the outer CV joints onto the LT axle shafts, what's a tried a true method? I was thinking of getting it started on the splines, threading an axle nut on so I don't booger the threads, and then whacking it with a hammer to pop it on. I'm curious to hear what has worked for others
     
  6. Mar 31, 2021 at 7:23 AM
    NcTaco27

    NcTaco27 Well-Known Member

    Joined:
    May 17, 2017
    Member:
    #219292
    Messages:
    664
    Gender:
    Male
    First Name:
    Brenton
    East Tennessee
    Vehicle:
    2015 TRD off-road taco
    Lt front/rear Jd fab…
    I just did what you just said with a pretty big dead blow. It goes on way easier then off lol.
     
    EatSleepTacos[QUOTED] likes this.
  7. Mar 31, 2021 at 7:27 AM
    EatSleepTacos

    EatSleepTacos Well-Known Member

    Joined:
    Mar 24, 2015
    Member:
    #151688
    Messages:
    59,835
    Gender:
    Male
    First Name:
    Randy
    West Valley, AZ
    Vehicle:
    2017 4Runner
    That's what I've heard lol thanks for confirming.
     
  8. Mar 31, 2021 at 8:52 AM
    DocME

    DocME Well-Known Member

    Joined:
    Aug 24, 2018
    Member:
    #263956
    Messages:
    1,583
    Gender:
    Male
    California
    Vehicle:
    '07 FJ Cruiser
    TRD S/C, UCON, 61# inj, 2.5 pulley, 7th inj, Roostfactor Y Pipe, URD exhaust, WAT Nomad Valve body, Dana 60, DK LT, JD FAB LCA mounts, custom roof rack...and way too many others.
    After ensuring that the snap ring is inside the star, I pick it up and drop it on the concrete to seat the snap ring. I also try and tug on it to make sure its in.
     
  9. Mar 31, 2021 at 8:53 AM
    EatSleepTacos

    EatSleepTacos Well-Known Member

    Joined:
    Mar 24, 2015
    Member:
    #151688
    Messages:
    59,835
    Gender:
    Male
    First Name:
    Randy
    West Valley, AZ
    Vehicle:
    2017 4Runner
    So you put the ring in the star vs on the shaft? Any particular reason?
     
  10. Mar 31, 2021 at 8:56 AM
    DocME

    DocME Well-Known Member

    Joined:
    Aug 24, 2018
    Member:
    #263956
    Messages:
    1,583
    Gender:
    Male
    California
    Vehicle:
    '07 FJ Cruiser
    TRD S/C, UCON, 61# inj, 2.5 pulley, 7th inj, Roostfactor Y Pipe, URD exhaust, WAT Nomad Valve body, Dana 60, DK LT, JD FAB LCA mounts, custom roof rack...and way too many others.
    No, I install the snap ring on the axle first but when I start the axle into the star, I make sure the ring goes in smoothly. I have sheared off a snap ring because it was slightly out of shape and I didn't pay enough attention to the snap ring starting into the start. I usually pre-grease the joint, so it can be hard to see the snap ring start into the star.
     
  11. Mar 31, 2021 at 8:59 AM
    EatSleepTacos

    EatSleepTacos Well-Known Member

    Joined:
    Mar 24, 2015
    Member:
    #151688
    Messages:
    59,835
    Gender:
    Male
    First Name:
    Randy
    West Valley, AZ
    Vehicle:
    2017 4Runner
    Ahhh I gotcha. Thank you for clarifying.
     
  12. Mar 31, 2021 at 12:43 PM
    tacotunner06

    tacotunner06 Well-Known Member

    Joined:
    Sep 2, 2017
    Member:
    #228857
    Messages:
    2,259
    Gender:
    Male
    First Name:
    Chris
    Edmonds, Washington
    Vehicle:
    2006 White Tacoma
    LS Swap with RSG Tranzilla, Custom hi clearance front bumper, Relentless: Slider's, bed rails, rear bumper, Prinsu with 40" BD s8. Dirt Designs 3.5 LT. Archive Garage rear towers/shackle flip/SUA. King Air bumps. King LT Coilovers in front. King 12x2.5 in rear. ARB rear air locker and twin compressor. SCS f5's with 33" Ridge Grapplers. 20" S8 mounted in bumper, squadron sport fog lights, squadron pro backup lights, LP6's bumper mounted.
    Yeah you gotta make sure the new snap ring is centered when it starts in the star. Took me a minute to figure out why I couldn’t get the shaft to start into the splines the first time I built an axle. Luckily I had a spare snap ring since I jacked the first one up.
     
    EatSleepTacos likes this.
  13. Apr 1, 2021 at 10:52 AM
    sicki

    sicki Well-Known Member

    Joined:
    Jun 13, 2015
    Member:
    #157339
    Messages:
    1,149
    Gender:
    Male
    is that an off the shelf rack or did the guy making your bumper build it. Looks good.
     
  14. Apr 1, 2021 at 11:12 AM
    TacoBoone

    TacoBoone Well-Known Member

    Joined:
    Jul 14, 2020
    Member:
    #334431
    Messages:
    417
    Gender:
    Male
    Ontario, CA
    Vehicle:
    2016 Toyota Tacoma TRD SPORT
    I guess you can say its an off the shelf, I bought it from SDHQ Motorsports !
     
    sicki[QUOTED] likes this.
  15. Apr 5, 2021 at 1:39 PM
    concentric_killa

    concentric_killa Well-Known Member

    Joined:
    May 26, 2016
    Member:
    #187951
    Messages:
    844
    Gender:
    Male
    Vehicle:
    2011 4x4 DBL Cab Taco
    +3.5 TC Long Travel DMZ Spring Under Nitro 4:56 Gears Custom Snorkel List Goes On..
  16. Apr 5, 2021 at 1:40 PM
    desertjunkie760

    desertjunkie760 @DesertJunkie760 (IG)

    Joined:
    Apr 11, 2016
    Member:
    #183963
    Messages:
    9,140
    Gender:
    Male
    First Name:
    Shane
    Vehicle:
    2011 MGM DCSB TRD Sport 4x4
    Check My Sig.
    Are you current spindles gusseted?
     
  17. Apr 5, 2021 at 1:45 PM
    concentric_killa

    concentric_killa Well-Known Member

    Joined:
    May 26, 2016
    Member:
    #187951
    Messages:
    844
    Gender:
    Male
    Vehicle:
    2011 4x4 DBL Cab Taco
    +3.5 TC Long Travel DMZ Spring Under Nitro 4:56 Gears Custom Snorkel List Goes On..
    Yes.

    I hit a hidden rock at about 20mph years ago, I figured I would upgrade. When my truck is aligned it drives fine, but I think it could be better.
     
    Arcticelf likes this.
  18. Apr 5, 2021 at 1:50 PM
    concentric_killa

    concentric_killa Well-Known Member

    Joined:
    May 26, 2016
    Member:
    #187951
    Messages:
    844
    Gender:
    Male
    Vehicle:
    2011 4x4 DBL Cab Taco
    +3.5 TC Long Travel DMZ Spring Under Nitro 4:56 Gears Custom Snorkel List Goes On..
    I wouldn't mind upgrading to the dirt designs kit, but I have other house things to buy before I would do that.
     
    tacotunner06 likes this.
  19. Apr 5, 2021 at 1:52 PM
    desertjunkie760

    desertjunkie760 @DesertJunkie760 (IG)

    Joined:
    Apr 11, 2016
    Member:
    #183963
    Messages:
    9,140
    Gender:
    Male
    First Name:
    Shane
    Vehicle:
    2011 MGM DCSB TRD Sport 4x4
    Check My Sig.
    What gusset kit do you currently have? You can buy a lot of gusseted spindles and replace them as needed for the $1500 the Camburg spindles cost...
     
    whatstcp likes this.
  20. Apr 5, 2021 at 2:02 PM
    concentric_killa

    concentric_killa Well-Known Member

    Joined:
    May 26, 2016
    Member:
    #187951
    Messages:
    844
    Gender:
    Male
    Vehicle:
    2011 4x4 DBL Cab Taco
    +3.5 TC Long Travel DMZ Spring Under Nitro 4:56 Gears Custom Snorkel List Goes On..
    Chaos gussets from 10 years ago. I have had the kit on for about 10 years. On my third set of uniballs and 2nd bushing set.

    I designed a set of 4x4 spindles similar to camburgs, and the fabrication quotes I was getting was around the camburg price. So this was an expected expense. The machining for the hubs was around $500 for the blocks, laser cutting /bending plate, and then my time for making a jig.

    I used an Xbox connect as a makeshift 3d scanner to at least get some of the geometry correct.
     
    whatstcp, Dalandser and sicki like this.

Products Discussed in

To Top