

-
Welcome to Tacoma World!
You are currently viewing as a guest! To get full-access, you need to register for a FREE account.
As a registered member, you’ll be able to:- Participate in all Tacoma discussion topics
- Communicate privately with other Tacoma owners from around the world
- Post your own photos in our Members Gallery
- Access all special features of the site
 Suspension and Mod Questions
 Seat covers? Help a newbie decid
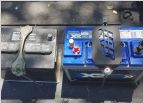 X2 Power/Northstar Group 31 AGM Battery install on CBI Tray (3rd gen, picture heavy)
 Techstream Cable
 Key fob Question
Footwell Lights That Don’t Suck
Discussion in '3rd Gen. Tacomas (2016-2023)' started by kmorgan3, Sep 2, 2021.
Page 53 of 79
Page 53 of 79
Products Discussed in


