

-
Welcome to Tacoma World!
You are currently viewing as a guest! To get full-access, you need to register for a FREE account.
As a registered member, you’ll be able to:- Participate in all Tacoma discussion topics
- Communicate privately with other Tacoma owners from around the world
- Post your own photos in our Members Gallery
- Access all special features of the site
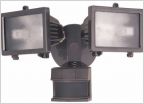 Outdoor Motion Sensing Security Light
 Thinking about buying a cordless 3/4" impact wrench
 Solved! - Identifying Plumbing Fittings for Water Tank for my Rig
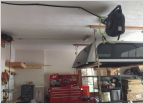 How Do You Store Your Cap/Topper?
 About Wood Finishes...
 Plumbing issue achieved. What gremlin cut my pipe?
Home Improvement Today?
Discussion in 'Garage / Workshop' started by Hotdog, Jul 28, 2008.
Page 1394 of 1807
Page 1394 of 1807
Products Discussed in


