1. Welcome to Tacoma World!

    You are currently viewing as a guest! To get full-access, you need to register for a FREE account.

    As a registered member, you’ll be able to:
    • Participate in all Tacoma discussion topics
    • Communicate privately with other Tacoma owners from around the world
    • Post your own photos in our Members Gallery
    • Access all special features of the site

Home Improvement Today?

Discussion in 'Garage / Workshop' started by Hotdog, Jul 28, 2008.

  1. Apr 7, 2024 at 8:37 AM
    308savage

    308savage Well-Known Member

    Joined:
    Mar 6, 2016
    Member:
    #180389
    Messages:
    4,939
    Gender:
    Male
    First Name:
    Adam
    East Tennessee
    Vehicle:
    2012 Tacoma TRD Sport DCSB
    Leveling kit, roll bar
    All these new safety features, half are crap, not needed, and prone to fail.
     
  2. Apr 7, 2024 at 12:11 PM
    SOSHeloPilot

    SOSHeloPilot My 1st Muscle Car

    Joined:
    Mar 31, 2009
    Member:
    #15422
    Messages:
    6,779
    Gender:
    Male
    S.E USA & S.E. Asia too
    Vehicle:
    2024 4Runner SR5
    Missing My Last Tacoma --- Had 11 Toyota trucks in the past and many other Toyota cars too.
    .

    FWIW ... I just finished an AO Smith (50 Gal. Premium Commercial Tank) repair and am VERY dissatisfied with AO Smith. Water heater was 3 years old with light use. I called AO Smith corporate repair number and this happened .... talked to them 4 times ... all nice ladies ... but ... they try to diagnose on phone ... then they tell me warranty is 6 years with NO labor :eek: ... and YOU HAVE TO PAY POSTAGE & SHIPPING COSTS on the repair parts :annoyed:(that I had almost beg for the parts :eek:) ... I paid for the delivery costs and was promised parts the next day ... over a week later, I get an email saying that a "DELIVER LABEL HAS BEEN PROCESSED" ... WTF :annoyed:... still no parts received to this day.

    DO THIS - TO MAKE YOUR LIFE EASIER (forget the warranty unless you have a serious problem like a cracked tank).... IF your heater breaks do this (or even before it breaks) ... go to the plumbing wholesale house and get a deep socket element wrench ($7.00) ... 2 -- 4500 watt commercial elements (or proper size) are about $11.00 each and top and bottom commercial thermostat are about $40.00 for both ... and for less than $65.00 bucks you can do a complete rebuild (if necessary) ... mine only needed a top element ... but I replaced both top & bottom ... now I keep 2 extra elements and top and bottom thermostats for emergencies. Was told by wholesale house that the bottom thermostat rarely goes out. Oh, After removing the old elements, clean the rusty black goop out of the tank element threads.

    JOB TIME --- Draining the tank = 30 minutes ... replacing BOTH elements = 30 minutes (with a good element socket wrench $ $7.00) ... refilling tank and purging ALL COLD & HOT outlets = 45 minutes. Don't forget to push the RED RESET BUTTON like I did :rolleyes:... thanks for that advice RustyGreen ... lol

    The elements that I got at the wholesale house were much higher quality than OEM.

    PS ... I was at Home Depot and their heaters had a longer warranty with PARTS & LABOR for 3 Years. They were either Rheem or Ruud.

    FWIW .... an "element socket wrench" is worth its weight in gold :thumbsup: and makes this job a piece of cake. :D

    EDIT ... I was told by a plumber and the supply house that draining your tank annually and replacing the elements every 3 or 4 years will pay for itself in water heating costs water heating recovery ... IF you buy the parts wholesale and IF ... You Can Do It Yourself.


    My last house had an AO Smith gas water heater that lasted over 30 years with 1 burner rebuild.

    .
     
    Last edited: Apr 7, 2024
  3. Apr 7, 2024 at 3:32 PM
    RustyGreen

    RustyGreen A breaker point guy in a Bluetooth world

    Joined:
    Aug 12, 2020
    Member:
    #337468
    Messages:
    14,577
    Gender:
    Male
    sleeping in a chair
    Vehicle:
    2017 AC 4x4 Sport 6M Inferno
    Pavement Princess
    While we are on water heaters:

    When I replaced my 30 gallon electric I removed the original plastic drain valve and replaced it with a
    copper pipe nipple, a brass full port ball valve and a male garden hose fitting. I keep a short length of hose tucked behind the heater and flush the sediment out into a pail every month or so.

    That full port valve will really move the water & sediment and it feels solid unlike those plastic drains.

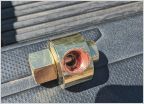
    This type fitting:

    fitting_clipped_rev_1.jpg

    I keep a cap on it when not in use just to prevent any misadventures.

    723159-600x600.jpg
     
  4. Apr 7, 2024 at 4:10 PM
    MGMDesertTaco

    MGMDesertTaco Come on, live a little...

    Joined:
    Jan 30, 2021
    Member:
    #354573
    Messages:
    10,439
    Gender:
    Male
    Have you considered installing an inline sediment filter before the water heater?
     
    RustyGreen[QUOTED] and Drainbung like this.
  5. Apr 7, 2024 at 4:17 PM
    RustyGreen

    RustyGreen A breaker point guy in a Bluetooth world

    Joined:
    Aug 12, 2020
    Member:
    #337468
    Messages:
    14,577
    Gender:
    Male
    sleeping in a chair
    Vehicle:
    2017 AC 4x4 Sport 6M Inferno
    Pavement Princess
    It isn't really sediment, minerals actually.
    There is a whole house filter on the incoming line.

    It is interesting, when I haven't flushed the heater in a while it will make more "perking" noises. Draining about 2 gallons of water might yield perhaps only a 1/4 cup of flakes but the perking noises will go away.
     
  6. Apr 7, 2024 at 6:09 PM
    308savage

    308savage Well-Known Member

    Joined:
    Mar 6, 2016
    Member:
    #180389
    Messages:
    4,939
    Gender:
    Male
    First Name:
    Adam
    East Tennessee
    Vehicle:
    2012 Tacoma TRD Sport DCSB
    Leveling kit, roll bar
    New vs old

    IMG_9088.jpg
     
    Clark27, Delta09, shakerhood and 7 others like this.
  7. Apr 7, 2024 at 6:17 PM
    FastEddy59

    FastEddy59 TTC #0061

    Joined:
    Jan 20, 2017
    Member:
    #208155
    Messages:
    27,141
    Gender:
    Male
    First Name:
    Eddie
    Smack, Dab in the middle of Winnipeg
    Vehicle:
    '13 Barc. Red Tacoma SR5 4X4
    Rigid 23004 Radiance light bar Cheap 3K 18W LED Fogs General AT-2's Pioneer AVH4200NEX w/ iDatalink JL XD5003V2 Focal 165KRX2's JL 10TW3 Arcticstart 803
    Pretty much the long & the short of it right there.
     
  8. Apr 7, 2024 at 6:27 PM
    308savage

    308savage Well-Known Member

    Joined:
    Mar 6, 2016
    Member:
    #180389
    Messages:
    4,939
    Gender:
    Male
    First Name:
    Adam
    East Tennessee
    Vehicle:
    2012 Tacoma TRD Sport DCSB
    Leveling kit, roll bar
    And so the future homeowner/next husband/whoever knows which one it is

    IMG_9091.jpg
     
    scocar, soundman98, TinoTaco and 11 others like this.
  9. Apr 8, 2024 at 5:22 PM
    308savage

    308savage Well-Known Member

    Joined:
    Mar 6, 2016
    Member:
    #180389
    Messages:
    4,939
    Gender:
    Male
    First Name:
    Adam
    East Tennessee
    Vehicle:
    2012 Tacoma TRD Sport DCSB
    Leveling kit, roll bar
    Is the anti siphon cap supposed to be tight or snug?
     
    wilcam47 likes this.
  10. Apr 8, 2024 at 6:07 PM
    Delta09

    Delta09 Requires Supervision

    Joined:
    Apr 29, 2019
    Member:
    #291677
    Messages:
    13,252
    Gender:
    Male
    First Name:
    Adam
    South Central PA
    Vehicle:
    2024 SR5 DCSB 4WD
    Mine was leaking and I gave it a gentle snug and it stopped :notsure:
     
    wilcam47 and 308savage[QUOTED] like this.
  11. Apr 9, 2024 at 9:42 AM
    kmorgan3

    kmorgan3 Redside Electric, LLC | VLEDS

    Joined:
    Aug 22, 2019
    Member:
    #302994
    Messages:
    1,952
    Gender:
    Male
    First Name:
    Kyle
    PNW
    Vehicle:
    2020 4Runner SR5 Premium | RAM 1500
    Alrighty I finished all the flooring, the drywall for the short step-down wall, the stairs themselves, the guard rail, and patched/re-textured/primed all the walls. Time to move on to the built-in. I picked up WAAAAAAY more material than I need for this thing but hopefully that just speeds the process a bit so I don't have to make trips to the hardwood dealer.

    I'm not a pro so maybe someone has seen this before. The goal is to make the left and right banks of cabinets the same size as each other (just for symmetry) but the walls flanking the pocket door aren't the same length. The wall on the right is 2 1/4" longer than the wall on the left.
    IMG_0918.HEIC.jpg

    What's the preferred way to deal with it? Make a 2 1/4" wider filler strip on the right side so the cabinet parts can all be constructed the same? There'd just be a wider infilled area here:
    Screen Shot 2024-03-06 at 1.27.16 PM.jpg

    Or construct the the right side wider so it takes up the difference? If I did it that way I'd be banking on 2 1/4" being unnoticeable but the infilled areas on each side would be the same. I'm thinking a big filler strip might be the answer... but maybe there's other opinions.
     
    shakerhood likes this.
  12. Apr 9, 2024 at 9:51 AM
    williams63

    williams63 Well-Known Member

    Joined:
    Feb 29, 2012
    Member:
    #73898
    Messages:
    6,373
    Gender:
    Male
    First Name:
    chili
    nh
    Vehicle:
    2011 dblcb
    boss-c/o, boss rear leafs
    Think I would make the one on the right a little bigger. That size with a door separating you probably won’t notice it.
     
    MGMDesertTaco likes this.
  13. Apr 9, 2024 at 10:00 AM
    CraigF

    CraigF Well-Known Member

    Joined:
    Jun 21, 2020
    Member:
    #332105
    Messages:
    1,819
    Gender:
    Male
    First Name:
    Craig
    Oak Grove, OR
    Vehicle:
    06 AC PR OR 4.0L
    none yet
    what are you doing for that light switch?
     
  14. Apr 9, 2024 at 10:13 AM
    T4R_hereforbearings

    T4R_hereforbearings Dale Doback, M.D.

    Joined:
    Feb 8, 2024
    Member:
    #443442
    Messages:
    1,096
    WA
    Vehicle:
    08 4Runner
    I’ve bolted some stuff to it *lists cool stuff here*
    Could you reframe the left side of the door? Making the door look a little smaller but centered..
     
  15. Apr 9, 2024 at 10:43 AM
    kmorgan3

    kmorgan3 Redside Electric, LLC | VLEDS

    Joined:
    Aug 22, 2019
    Member:
    #302994
    Messages:
    1,952
    Gender:
    Male
    First Name:
    Kyle
    PNW
    Vehicle:
    2020 4Runner SR5 Premium | RAM 1500
    I could do that but there isn't a ton of room to make the door smaller; it's at 2/6 at the moment because of the split-jamb and stopper to cover the edges of the door. Shrinking it more would put it around 2/4? So 28" wide. I assume that's walking the line of being too skinny, yeah?

    Thought long and hard about that one. It's part of a 3-way already so I'm going to delete it creatively: cut it out and cap the Romex inside another switch box on the other side of the wall in the laundry room. The Romex is long enough to not need a splice so it works out nicely. Then add a wireless Pico remote (10-year battery) that will be recessed into the decorative panel as you walk through the door. Master switch will be near the stairs on the other side of the room as part of a wireless three-way setup to control the room lighting. I'm also adding a second Pico remote to the decorative panel that will control the gallery lighting. The master switch for that one will be hidden in the lower cabinet next to those outlets you see.
     
  16. Apr 9, 2024 at 10:49 AM
    MGMDesertTaco

    MGMDesertTaco Come on, live a little...

    Joined:
    Jan 30, 2021
    Member:
    #354573
    Messages:
    10,439
    Gender:
    Male
    Agreed on just making the cabinets on the right side a little wider. If you're really ocd, you could reframe the door and move the outlet over, but I don't think it's worth the effort for 2 1/4".
     
  17. Apr 9, 2024 at 10:58 AM
    T4R_hereforbearings

    T4R_hereforbearings Dale Doback, M.D.

    Joined:
    Feb 8, 2024
    Member:
    #443442
    Messages:
    1,096
    WA
    Vehicle:
    08 4Runner
    I’ve bolted some stuff to it *lists cool stuff here*

    I guess would be preference at that point, but 28”, even 24” would still be considered a standard size for an interior door. Your use and traffic through said door would be factor for me
     
  18. Apr 9, 2024 at 4:19 PM
    theesotericone

    theesotericone Well-Known Member

    Joined:
    Jul 27, 2018
    Member:
    #260800
    Messages:
    12,373
    Gender:
    Male
    Bishop CA
    What will you notice, ie bother you, more? A filler that will for sure look out of place or shelves/doors that are 1 1/8" wider then the left side? If I came and looked at the finished product I probably wouldn't notice the difference in the shelf width but I would for sure see the filler as out of place. To each there own though. lol
     
  19. Apr 9, 2024 at 4:33 PM
    soundman98

    soundman98 Well-Known Member

    Joined:
    May 31, 2021
    Member:
    #367288
    Messages:
    6,162
    Gender:
    Male
    NW Indiana
    Vehicle:
    '18 Taco Sport, '14 Ranger
    what about making the door 'tunnel' 2-1/8" wider?

    it would give you a little more moving space to get to the door, making only the one cabinet face above it needing to be slightly larger


    and also, you pulled measurements along the wall, but are the walls the cabinets butt up to actually square? many times one wall is at 87 degrees or so, which makes for an additional inch or more at the cabinet face, which would require a larger filler anyways. or if the walls are tapered in, you can cheat your wall-side panel down to a 1/8" facia panel that brings it back to square, but appears almost flush at the front edge.
     
  20. Apr 9, 2024 at 5:38 PM
    kmorgan3

    kmorgan3 Redside Electric, LLC | VLEDS

    Joined:
    Aug 22, 2019
    Member:
    #302994
    Messages:
    1,952
    Gender:
    Male
    First Name:
    Kyle
    PNW
    Vehicle:
    2020 4Runner SR5 Premium | RAM 1500
    Gotcha — I decided to just make that side a little bigger. I agree that a bigger fill strip would be more noticeable than 2 1/4” stretched across 4 doors. I got the left side lower carcasses finished today and I’ll do the right side lowers tomorrow and spread the width difference across them.

    Making the door opening wider would more than likely expose the edges of the pocket door that need to be trimmed in. I think to do it 100% right I’d need to re frame a bit if I want to mess with the door and keep the reveal around the door the same. Unless I’m not understanding fully.

    I shot a laser to the walls and I’m only reading about 1/8” to 1/4” of run-out across the 8 ft of height on the left side measured from the door edge. Closer to about 1/2” on the right side. Relative to each other it looks like the walls bow in toward each other slightly.
     

Products Discussed in

To Top