

-
Welcome to Tacoma World!
You are currently viewing as a guest! To get full-access, you need to register for a FREE account.
As a registered member, you’ll be able to:- Participate in all Tacoma discussion topics
- Communicate privately with other Tacoma owners from around the world
- Post your own photos in our Members Gallery
- Access all special features of the site
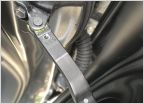 I think the dealer ordered the wrong part
 Bilstein 5100/ Recommended coils for lift
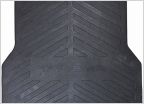 New Toyota bed mat for my Limited
 Starlink Mini Wiring
 Thoughts on ARB Skid Plates?
 Security System and Remote Start
Closed - Internal Stiffeners
Discussion in '3rd Gen. Tacomas (2016-2023)' started by Kwikvette, Jul 10, 2024.
Page 6 of 77
Page 6 of 77
Products Discussed in


