1. Welcome to Tacoma World!

    You are currently viewing as a guest! To get full-access, you need to register for a FREE account.

    As a registered member, you’ll be able to:
    • Participate in all Tacoma discussion topics
    • Communicate privately with other Tacoma owners from around the world
    • Post your own photos in our Members Gallery
    • Access all special features of the site

What have you done to your Tacoma today? 1st Gen Edition

Discussion in '1st Gen. Tacomas (1995-2004)' started by SlimDigg, Feb 7, 2011.

  1. May 23, 2025 at 11:21 PM
    unstpible

    unstpible Well-Known Member

    Joined:
    Aug 16, 2012
    Member:
    #84909
    Messages:
    3,707
    Gender:
    Male
    First Name:
    Derek
    Cedar City, Utah
    Vehicle:
    03 4x4 boosted V6 Auto 341k miles
    CX Racing Turbo kit. TransGo shift kit. All Pro Apex bumper and skids. Smittybilt XRC 9.5 winch. All Pro Upper control arm's. Bilstein 6112's with 600lb coils. Eimkeith's lower control arm reinforcement plates. Perry Parts bump stops. All Pro spindle gussets and alignment cam tabs. All Pro standard 3" leaf springs. Bilstein 5125's rear. Extended rear brake lines. Rear diff breather relocation. MagnaFlow catback with resonator. Bluetooth stereo. Memphis 6x9 door speakers. Diode Dynamics SS3 Pro Amber fog lights. Single piece headlights. aftermarket grille. Anzo taillights. LED 3rd brake light. 4runner sunglass holder and dome lights. Master Tailgaters rear view mirror with 3 directional cameras, G shock sensors, and anti theft system. Honda windshield washer nozzles. Stubby antenna. Scan Guage II. 2nd Gen Snowflake wheels powder coated black. Cooper Discoverer ST Maxx 235-75/16 Denso 210-0461 105 amp alternator. Speedytech7's big wire harness upgrade. Aeromotive 340 fuel pump. Haltech Elite 2500. Tacomaworld sticker. Tundra brakes with Adventure Taco's hardline kit
    Oof didn't notice that it was just the first one I saw
     
  2. May 24, 2025 at 4:13 AM
    cynicalrider

    cynicalrider #NFG

    Joined:
    Jul 25, 2012
    Member:
    #83399
    Messages:
    17,086
    Gender:
    Male
    Jersey
    Vehicle:
    01 SR5 TRD 4x4, '23 Bronco Wildtrak, 2017 HSQV FE350
    Drop bracket lift and booger welds
    Ha not faulting you, just hate that shitty strategy some ebay sellers use.
     
    This site contains affiliate links for which the site may be compensated.
    unstpible[QUOTED] likes this.
  3. May 24, 2025 at 5:02 PM
    Bolt Head

    Bolt Head Well-Known Member

    Joined:
    Aug 22, 2020
    Member:
    #338476
    Messages:
    212
    Gender:
    Male
    Colorado
    Vehicle:
    Silver 2001 SC DC LTD
    Fox 2.5 w/resi and adjusters, LR UCAs, Wheeler's minus 2 leaf pack, Toytec rear shocks, FN 5 Star w 33" Toyo OC AT3, Pinch-weld mod, Supercharger, Heated/Cooled Leather Seats, Pioneer DVD w/backup cam, Alpine PDX amp, Remote Start, Spray-on bed liner
  4. May 25, 2025 at 9:31 AM
    Logans2001

    Logans2001 What’s crackin’

    Joined:
    Jan 23, 2016
    Member:
    #175792
    Messages:
    1,968
    Gender:
    Male
    San Diego, CA
    Vehicle:
    2001 v6 4WD auto
    LCA bushings and lower shock bushings are done. I think it drives a little better? Best part is it hardly ever rubs when turning now.
    I’m also due for brake pads which will get done in a few days and I also need a brake booster.

    IMG_1307.jpg
     
  5. May 25, 2025 at 7:31 PM
    El Taco Diablo

    El Taco Diablo Professional Pinstriper

    Joined:
    Nov 6, 2017
    Member:
    #235223
    Messages:
    13,967
    Gender:
    Male
    First Name:
    Matt - KN6DZP
    Hughson, CA
    Vehicle:
    Impulse Red DC, 5vz-fe, 4wd swap, LT, dual case, F/R locked
    Just 3 tons of fun!!!
    Haven't posted much about what I've done to my 1st gen... cause I haven't done much to my 1st gen lately.

    But a 3rd gen 4Runner is close enough.

    Sliders

    20250302_150235.jpg

    Rear bumper

    20250407_125217.jpg 20250407_174616.jpg 20250407_182503.jpg 20250407_184018.jpg 20250410_202531.jpg 20250418_181413.jpg 20250427_132956.jpg 20250420_161628.jpg

    Tire clearancing

    20250501_180933.jpg 20250519_195626.jpg 20250525_181555.jpg 20250518_211513.jpg 20250519_195643.jpg

    Front bumper

    20250504_124915.jpg 20250517_183224.jpg
    20250525_125109.jpg 20250525_131202.jpg 20250525_142115.jpg 20250525_142053.jpg 20250525_165732.jpg

    Coil bucket reinforcement - and mounts to add a tower to tower cross over brace later.

    20250510_193848.jpg 20250511_112004.jpg 20250511_142624.jpg 20250511_164619.jpg 20250512_191901.jpg 20250516_142648.jpg
     
    Last edited: May 25, 2025 at 8:06 PM
  6. May 25, 2025 at 7:35 PM
    El Taco Diablo

    El Taco Diablo Professional Pinstriper

    Joined:
    Nov 6, 2017
    Member:
    #235223
    Messages:
    13,967
    Gender:
    Male
    First Name:
    Matt - KN6DZP
    Hughson, CA
    Vehicle:
    Impulse Red DC, 5vz-fe, 4wd swap, LT, dual case, F/R locked
    Just 3 tons of fun!!!
    Also re-wired the main fuse box (meaning spliced ALL the wires coming out of it), replaced the evap canister, and replaced the air filter box.

    All these items were damaged in a front end collision (previous owner).

    20250427_133111.jpg 20250516_142631.jpg
     
    Last edited: May 26, 2025 at 12:31 PM
    chrslefty and unstpible like this.
  7. May 25, 2025 at 8:03 PM
    El Taco Diablo

    El Taco Diablo Professional Pinstriper

    Joined:
    Nov 6, 2017
    Member:
    #235223
    Messages:
    13,967
    Gender:
    Male
    First Name:
    Matt - KN6DZP
    Hughson, CA
    Vehicle:
    Impulse Red DC, 5vz-fe, 4wd swap, LT, dual case, F/R locked
    Just 3 tons of fun!!!
    I notched the frame ends and front body mounts, to account for the 1 inch body lift. (To get rid of the 1 inch gap between fenders/grill and bumper)

    20250509_165624.jpg

    It gave me about a 3/8 gap between fenders/grill and bumper. Which is pretty close to the original gap. And definately within my tolerances.

    20250517_183224.jpg

    I reinforced the frame ends and body mounts.

    20250516_142641.jpg
     
  8. May 26, 2025 at 2:19 PM
    El Taco Diablo

    El Taco Diablo Professional Pinstriper

    Joined:
    Nov 6, 2017
    Member:
    #235223
    Messages:
    13,967
    Gender:
    Male
    First Name:
    Matt - KN6DZP
    Hughson, CA
    Vehicle:
    Impulse Red DC, 5vz-fe, 4wd swap, LT, dual case, F/R locked
    Just 3 tons of fun!!!
    Bumper got first coat of Raptorliner. I'll let it sit till tomorrow, then I'll turn it over for final coat on the front.


    Pro tip. Just paint the inside of the winch cradle with good paint. And then just let it get the overspray. That area would take a lot of Raptorliner to cover completely. Paint is cheaper than RL.

     
    unstpible, tacomakid96 and Phessor like this.
  9. May 26, 2025 at 2:20 PM
    El Taco Diablo

    El Taco Diablo Professional Pinstriper

    Joined:
    Nov 6, 2017
    Member:
    #235223
    Messages:
    13,967
    Gender:
    Male
    First Name:
    Matt - KN6DZP
    Hughson, CA
    Vehicle:
    Impulse Red DC, 5vz-fe, 4wd swap, LT, dual case, F/R locked
    Just 3 tons of fun!!!
    Who else keeps aluminum foil in their paint prep kit?


    Undercoating complete

     
  10. May 26, 2025 at 4:11 PM
    NerdyRockLady

    NerdyRockLady Member

    Joined:
    Nov 4, 2016
    Member:
    #201514
    Messages:
    7
    Gender:
    Female
    North Idaho
    Vehicle:
    1998 Tacoma SR5
    None
    It’s not a big upgrade but it made for a nice afternoon. Upgraded two of the 12V power outlets to USB-A and USB-C ports so I don't need a separate plug-in for phone, laptop, GPS, etc. The volt meter is kinda nice. Replaced the nonfunctional cigarette lighter with a new 12v outlet for a portable air compressor. Also cleaned up the wiring from a previous owner.
    IMG_5279.jpg
     
    unstpible, semco-inc, turbodb and 2 others like this.
  11. May 26, 2025 at 8:52 PM
    CrustyTaco

    CrustyTaco Well-Known Member

    Joined:
    Jan 20, 2019
    Member:
    #279940
    Messages:
    1,040
    Gender:
    Male
    First Name:
    Todd
    Louisville, KY
    Vehicle:
    04 Ext Cab V6 5MT 4X4 185k
    881/5100/Dakars 4R wheels / TBU / New frame
    Picked up a tilt trailer last year with a braked axle, so I'd been wanting to get a trailer brake controller installed. It was a bigger project than I anticipated, but I finally got things wrapped up last week and was able to test it out this weekend.

    I managed to fit the 7 way plug in a pre-existing hole in the middle of my Relentless fab bumper, I paired this with a flip up license plate adapter.


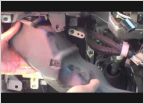
    For the controller I went with the Redarc Tow Pro Liberty, I liked that the control dial/button was separate from the control unit. I mounted the control unit down by the kick panel:


    I found a trim bezel on eBay without a clock, drilled a hole in it and mounted the control knob where the clock used to be.


    I wanted to avoid having to splice into the factory wiring, so I bought some brake switch connectors on Alibaba and created a adapter that lets me splice out the brake signal. If anyone would want an adapter or the parts to make one just let me know.


    I needed to run 12V to both the brake controller and the 7 pin wiring so I added a Blue Seas System battery terminal mount.


    It's all working good, and came together in time to do some ditch digging this weekend.
     
    This site contains affiliate links for which the site may be compensated.
  12. May 26, 2025 at 9:24 PM
    oldgreg

    oldgreg Well-Known Member

    Joined:
    Feb 22, 2024
    Member:
    #444449
    Messages:
    167
    Gender:
    Male
    First Name:
    Greg
    Vehicle:
    2001 2.7 reg cab 4x4
    Nice, looks clean. Been meaning to add a 2-lo switch to make my life easier reversing a trailer. But like you I’m hesitant to cut up factory wiring, might have to look into a similar kind of pig tail
     
    This site contains affiliate links for which the site may be compensated.
  13. May 26, 2025 at 10:00 PM
    betterbuckleup

    betterbuckleup Well-Known Member

    Joined:
    Jun 26, 2017
    Member:
    #222483
    Messages:
    4,735
    Gender:
    Male
    First Name:
    Ian
    Concord, CA
    Vehicle:
    2000 Tacoma SC 2.7 4x4 5spd
    I also towed stuff this weekend
    IMG-20250522-WA0004(1).jpg
     
    chrslefty and oldgreg like this.
  14. May 27, 2025 at 7:39 AM
    Speedytech7

    Speedytech7 Toyota Cult Ombudsman

    Joined:
    Feb 20, 2014
    Member:
    #123587
    Messages:
    57,420
    Gender:
    Male
    FCQM+VG Cheney, Washington
    Vehicle:
    96 Turbo Taco V6 405WHP & 482lbft
    It's less Tacoma and more mod
    What undercoating did you use in the wheel wells, everything I've used in there has tended to come off mine, though I probably could have prepped better.
     
  15. May 27, 2025 at 8:46 AM
    BYJOSHCOOK

    BYJOSHCOOK Mr. Mojo Risin

    Joined:
    Jun 9, 2013
    Member:
    #105887
    Messages:
    27,904
    Gender:
    Male
    First Name:
    Josh
    Woodstock and Alpharetta Ga
    Vehicle:
    2000 SR5 4WD Lunar Mist
    Check Out My Builds
    Not much here but started to teach the fiancée how to drive manual! She did pretty good, she was nervous at first but got the hang of it
     
    jubei and chrslefty like this.
  16. May 27, 2025 at 9:02 AM
    El Taco Diablo

    El Taco Diablo Professional Pinstriper

    Joined:
    Nov 6, 2017
    Member:
    #235223
    Messages:
    13,967
    Gender:
    Male
    First Name:
    Matt - KN6DZP
    Hughson, CA
    Vehicle:
    Impulse Red DC, 5vz-fe, 4wd swap, LT, dual case, F/R locked
    Just 3 tons of fun!!!
    I used this

    Screenshot_20250527_084400_Amazon Shopping.jpg

    https://a.co/d/9cJ5jP5

    To do this part

    20250519_195626.jpg

    Highly, highly recommend this product. It goes on with a caulking gun. It applies out of the caulking gun easily. And it lays down flat when dry. Even in areas where it's upside down. And it is on there, where you can tell it will not come off.

    1000 times better than the 3M I've used in the past.

    Only took 1 of the 2 tubes to do what I did (including doing this to the back wheel wells)

    20250519_195643.jpg

    Then I used this

    20250525_181545.jpg

    https://www.amazon.com/dp/B083ZL8QFT

    For this part

    20250526_130310.jpg

    It went on with a brush... but it's HELLA thick. Like, 3x thicker than paint. It's doesn't lay down quite as nice as the caulking did, but it's a thick and covered really well.

    Took about 2/3 of a can to cover what I did.

    Then I used this

    Screenshot_20250527_085501_Amazon Shopping.jpg

    https://www.amazon.com/dp/B07PHQ4Y9J

    To do this part

    It stays flexible. (The Barrier Bond stays flexible). I wanted to cover the Barrier Bond with something flexible, so it didn't all just start cracking and peeling off the Barrier bond.

    Took half a can to do the front wheel wells.

    20250526_141231.jpg
     
  17. May 27, 2025 at 9:56 AM
    chrslefty

    chrslefty Well-Known Member

    Joined:
    Apr 20, 2012
    Member:
    #77258
    Messages:
    3,005
    Gender:
    Male
    First Name:
    chris
    Mesa az
    Vehicle:
    01 trd
    Stockish
    @El Taco Diablo how bad was the front end damage? My 4runner was in a t-bone I was thinking about trying to repair it. The frame might be bent and I'll need some new clip pieces for sure.
    20250506_083412.jpg
     
  18. May 27, 2025 at 9:58 AM
    Speedytech7

    Speedytech7 Toyota Cult Ombudsman

    Joined:
    Feb 20, 2014
    Member:
    #123587
    Messages:
    57,420
    Gender:
    Male
    FCQM+VG Cheney, Washington
    Vehicle:
    96 Turbo Taco V6 405WHP & 482lbft
    It's less Tacoma and more mod
    Ah okay, I used SEM paintable seam sealer (that stuff has been excellent)...

    [​IMG][​IMG]

    But I probably should have done that brush on coating as well and maybe should sand or scotchbrite the inner well before coating again. I had used the Duplicolor Truck Bed Coating in the blue can last time.
     
  19. May 27, 2025 at 10:07 AM
    El Taco Diablo

    El Taco Diablo Professional Pinstriper

    Joined:
    Nov 6, 2017
    Member:
    #235223
    Messages:
    13,967
    Gender:
    Male
    First Name:
    Matt - KN6DZP
    Hughson, CA
    Vehicle:
    Impulse Red DC, 5vz-fe, 4wd swap, LT, dual case, F/R locked
    Just 3 tons of fun!!!

    Not really sure how bad the damage was, actually.

    The truck looked like this when my son bought it (I've since bought it from him, when he moved to Florida).

    Screenshot_20191219-114539_Facebook.jpg

    It was a salvage title when the guy my son bought it from, bought the truck.

    I know the radiator, fenders, and hood were replaced, the air box, fuse box, evap canister where all still damaged when we got it. The ends of the frame (at the body mounts) were bent in the wreck... and "straightened" by, what appears to be a redneck with a come along, and a sledge hammer. The bumper sub structure was missing, the lower bumper valance was held on with bailing wire. (Which meant there was nothing to mount the frontskid plate to) I reinforced and straightened all that work when I did the work to lift the bumper, to account for the body lift. And the new bumper provides the mounting for the skid plate.
     
    chrslefty[QUOTED] likes this.
  20. May 27, 2025 at 10:09 AM
    El Taco Diablo

    El Taco Diablo Professional Pinstriper

    Joined:
    Nov 6, 2017
    Member:
    #235223
    Messages:
    13,967
    Gender:
    Male
    First Name:
    Matt - KN6DZP
    Hughson, CA
    Vehicle:
    Impulse Red DC, 5vz-fe, 4wd swap, LT, dual case, F/R locked
    Just 3 tons of fun!!!
    I used a sand paper flapper wheel on a die grinder to knock down all the welds, then used red scotch brite on the bare metal before I applied anything to it.
     

Products Discussed in

To Top