1. Welcome to Tacoma World!

    You are currently viewing as a guest! To get full-access, you need to register for a FREE account.

    As a registered member, you’ll be able to:
    • Participate in all Tacoma discussion topics
    • Communicate privately with other Tacoma owners from around the world
    • Post your own photos in our Members Gallery
    • Access all special features of the site
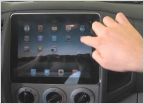
09+ Access Cab install with Mr Marv Sub

Discussion in 'Audio & Video' started by 84Hilux, Aug 9, 2011.

  1. Aug 9, 2011 at 1:28 PM
    #1
    84Hilux

    84Hilux [OP] Well-Known Member

    Joined:
    Jul 6, 2010
    Member:
    #39877
    Messages:
    542
    Gender:
    Male
    First Name:
    Gary
    Vancouver, Canada
    Vehicle:
    09 SR5 Access Cab V6 4X4
    Stock Fog Lights, Camera Mirror, Arrow Canopy, Lighted 4x4switch, Weathertech Mats (Black), Wet Okoles- Black/Charcoal, Alpine CDA117 Headunit/ Alpine PDX4150 Amp/Alpine PDX M6 Amp/ Hybrid Legatia SE Components/ JL 10W6V2 Subwoofer/ Prototype MR Marv Sub Enclosure
    I just completed my install in my '09 Access Cab. Those of you with '09 and newer Access Cabs are probably aware that there are not many options for decent sub enclosures and amp placement in the jump seat area.

    After deciding that the JL Stealthbox was too crazy, I gave Mr Marv a call. It turned out that Marv was working on a prototype box design for the new style cab and needed somebody to field test it. I quickly realized that Marv is a storehouse of information on system design and volunteered to help with his project.

    I started with the Alpine CDA-117 head unit. This unit is similar to the discontinued CDA-9886, but does not come with an audio processor. If you want to run active crossovers, you have to buy the Imprint Audio Processor separately. Also must purchase Bluetooth Module and Steering Wheel Adapter.

    I tried both the Pac Swi-JACK and Axxess ASWC steering wheel adapters. The Axxess unit is by far the best of these two. It automatically recognizes your vehicle and head unit and self-programs. Also, unlike the PAC unit, the Axxess unit retains its memory if power is lost and does not exhibit a half second delay in responding to commands.
    [​IMG]

    I opted to go with a Scosche dash adapter. I quickly discovered that the large volume knob on the front of the head unit hits the adapter when you flip it forward to insert a CD or remove the faceplate. Using a Dremel tool and scrap pieces of ABS plastic and plumbing cement, I modified the adapter to hold the head unit on a better angle. I also added plastic shims underneath the head unit to help support it.
    [​IMG]

    After removing the A-pillar and Roof Console, fishing a microphone wire to the Bluetooth unit was easy. Just keep the wiring clear of the air bag equipment.
    [​IMG]
    [​IMG]

    I glued a layer of ABS plastic inside the mirror wiring cover to thicken it. Then, I drilled a hole and glued in a tiny hose barb fitting to support the microphone. The hose fitting is similar to the type used for vacuum lines or mini lawn sprinklers.

    [​IMG]

    Next, I removed the door panels and covered the largest holes with Plexiglas. I sealed it in place with Sikaflex body panel sealant. This might not be ideal, since the Plexiglas is not flexible enough to conform to the curves in the panel. The body sealant filled the gaps, but smelled bad for days as it cured.
    [​IMG]

    Next, I covered the door panels with Dynamat and worked it flat with a small plastic roller. A heat gun was helpful to get the mat to conform nicely.

    I installed JL Audio C2-650 components in ********* adapters.

    Speaker wires were fished through the door wiring boots by taping the wires to a long Zip-Tie and working it through.
    [​IMG]

    I ran into problems when I reinstalled the door panels. The 1" thick ********* adapter is too thick to fit under the '09+ door panels, so I had to modify it to fit. I cut off the plastic weld point that was hitting the adapter and then used body adhesive to replace the plastic weld point.
    [​IMG]

    [​IMG]


    The next problem was amp placement. I opted to go with Alpine PDX series amps, because of their high power output in a compact package. I had envisioned placing them in the utility storage under the jump seats, but they would not fit. I also thought about putting them on the wall behind the rear seats, but they would not fit there either without losing the seats. I finally put them under the front seats, because they would not really fit anywhere else.
    [​IMG]

    I used Stinger's 4 gauge amp connect kit for the power wiring. This is a really nice kit and included most of what I needed to complete the install. Do yourself a favor and strip out the seats and console for wiring, it saves time in the long run. I disconnected the negative terminal on the battery before removing the connectors for the seat airbags- safety first!
    [​IMG]

    Since I wanted to use active crossovers, I had to install the Alpine Imprint Audio Processor. My truck is an SR5, so I do not have the power inverter under the console. I am not sure if there is room to install the processor in TRD models with the power inverter. The Imprint unit fits perfectly between the console bolt holes on the mounting bracket. The ports for hooking up a computer and microphone line up with holes in the bottom of the storage bin, so it is possible to use the Imprint Software without removing the console.
    [​IMG]

    Next came the Mr Marv Sub Enclosure. Marv's cabinetry skills are amazing.
    [​IMG]

    Sub enclosure mounts to the bracket from the original rear seat console.
    [​IMG]

    This enclosure is designed for a JL Audio 10W6v2 subwoofer. It is a sealed enclosure that provides tight sounding bass and requires a much smaller enclosure than a ported unit.
    [​IMG]

    I liked the look of the wood grain on the sub cabinet, so I had a custom stain mixed at Benjamin Moore Paints to match the interior gray of my Tacoma. I put on 2 coats of stain and 6 coats of oil-based matte clear until I got the look I wanted. Fine sanding was required between each coat of clear.
    [​IMG]
    [​IMG]

    I later swapped out the JL Audio component mids and tweeters and replaced them with Hybrid Audio Legatia Series. The Hybrid Components provide a much more refined sound quality.
    [​IMG]

    I am very happy with the way my system sounds now. Refined highs and super tight bass. Many thanks to Mr Marv for his patient advice and awesome woodworking skills. If anyone is interested in one of these sub enclosures, get in touch with Marv.

    I hope this information is helpful!

    Gary- 84Hilux
     
  2. Aug 9, 2011 at 3:11 PM
    #2
    fbconvert

    fbconvert Well-Known Member

    Joined:
    Apr 25, 2011
    Member:
    #55535
    Messages:
    423
    Gender:
    Male
    First Name:
    Brian
    Seacoast, NH
    Vehicle:
    2005 Tacoma Double Cab TRD Sport
    Nice and clean! good job :thumbsup:
     
  3. Aug 10, 2011 at 12:07 AM
    #3
    Bozack

    Bozack Well-Known Member

    Joined:
    May 23, 2010
    Member:
    #37649
    Messages:
    48
    Gender:
    Male
    First Name:
    Rube
    Dirty South
    Vehicle:
    2010 DC
    Your install looks professional. And your right! The Alpine series amps are hard hitting, but clean and crisp. Nice setup.
     
  4. Nov 11, 2011 at 5:16 AM
    #4
    84Hilux

    84Hilux [OP] Well-Known Member

    Joined:
    Jul 6, 2010
    Member:
    #39877
    Messages:
    542
    Gender:
    Male
    First Name:
    Gary
    Vancouver, Canada
    Vehicle:
    09 SR5 Access Cab V6 4X4
    Stock Fog Lights, Camera Mirror, Arrow Canopy, Lighted 4x4switch, Weathertech Mats (Black), Wet Okoles- Black/Charcoal, Alpine CDA117 Headunit/ Alpine PDX4150 Amp/Alpine PDX M6 Amp/ Hybrid Legatia SE Components/ JL 10W6V2 Subwoofer/ Prototype MR Marv Sub Enclosure
    Upgraded system with Ensolite Peel and Stick foam and Hybrid Legatia SE Pro Series Components!

    Ensolite Foam
    [​IMG]

    Hybrid Audio Legatia SE R2 Ring Radiator Tweeter- I was somewhat hesitant to go with a ring radiator, since I had heard that most of them are not great mounted off-axis. I am happy to report that the R2 seems to be better off-axis than the L1V2 dome tweeters that I had in before.
    [​IMG]

    Hybrid Audio Legatia SE L6 Mid/Woofer
    [​IMG]

    These Drivers sound truly amazing! I expected and incremental upgrade from the previous components I had and instead found and entirely different realm of sound. Much better power handling and improved clarity and sound stage. These drivers also produce much wider bandwidth to allow greater flexibility when tuning the system.

    I am happy to say that the stereo upgrade is now complete- (except for tweaking the crossover points and maybe adding some sound deadening material to the roof and rear wall of the cab).

    Next spring it is time to start on suspension!

    Thanks again to Marv for all his help and advice!!
     
  5. Nov 11, 2011 at 7:13 AM
    #5
    saitcho

    saitcho Well-Known Member

    Joined:
    Oct 21, 2011
    Member:
    #65596
    Messages:
    80
    Gender:
    Male
    New Orleans
    Vehicle:
    '11 DC 4x4 trd off road
    Very nice. I just ordered my sub box and Hybrid Clarus comps from Mr Marv. Can't wait to get them installed.

    I'll also be doing sound deadening but in addition to what you've done I'll be using MLV sheeting on top of the CCF.

    I'll try to post pics but every time I say I'll do that I wind up forgetting to take enough pictures.
     
  6. Nov 11, 2011 at 7:16 AM
    #6
    theduck911

    theduck911 Max's Canadian Twin

    Joined:
    Oct 28, 2010
    Member:
    #45374
    Messages:
    3,938
    Gender:
    Male
    First Name:
    Max
    Northwestern Ontario, Canada
    Vehicle:
    Locked and Geared!
    I've got a similar setup coming for my truck from Mr. Marv as well, very clean install:thumbsup:

    Did you notice a big difference between the Ensolite & the Dynamat?
     
  7. Nov 11, 2011 at 8:19 AM
    #7
    saitcho

    saitcho Well-Known Member

    Joined:
    Oct 21, 2011
    Member:
    #65596
    Messages:
    80
    Gender:
    Male
    New Orleans
    Vehicle:
    '11 DC 4x4 trd off road
    Check out this site: http://www.sounddeadenershowdown.com/cgi-bin/index.cgi

    According to Don, and based on my own personal experience too, the ensolite by itself the way he did it here isn't going to do much to block noise. It needs to be combined with a sound blocking barrier like MLV.

    I had a lot of leftover asphalt based deadening from previous installs and I'll be using that on the doors and back wall, but not to cover the entire door as the OP did. Instead I'll just add enough to stop panel resonance as per that site. Then I'll create a sound blocking barrier to cover the entire doors and back wall out of a layer of CCF with a layer of MLV glued on top of that. I think this will do a much nicer job at soundproofing the vehicle than dynamat and ensolite alone.
     
  8. Nov 11, 2011 at 8:26 AM
    #8
    theduck911

    theduck911 Max's Canadian Twin

    Joined:
    Oct 28, 2010
    Member:
    #45374
    Messages:
    3,938
    Gender:
    Male
    First Name:
    Max
    Northwestern Ontario, Canada
    Vehicle:
    Locked and Geared!
    Sorry, I don't know what MLV or CCF is?
     
  9. Nov 11, 2011 at 8:41 AM
    #9
    saitcho

    saitcho Well-Known Member

    Joined:
    Oct 21, 2011
    Member:
    #65596
    Messages:
    80
    Gender:
    Male
    New Orleans
    Vehicle:
    '11 DC 4x4 trd off road
    CCF is closed cell foam. Ensolite is a brand of closed cell foam.
    MLV is mass loaded vinyl which is basically a fancy name for a heavy sheet of vinyl that is very good at blocking sound. By using MLV and CCF together you can create a very good sound barrier.

    Check out that link for more details.
     
  10. Nov 11, 2011 at 8:42 AM
    #10
    theduck911

    theduck911 Max's Canadian Twin

    Joined:
    Oct 28, 2010
    Member:
    #45374
    Messages:
    3,938
    Gender:
    Male
    First Name:
    Max
    Northwestern Ontario, Canada
    Vehicle:
    Locked and Geared!
    Okay, thanks :thumbsup:
     
  11. Nov 11, 2011 at 9:14 AM
    #11
    theduck911

    theduck911 Max's Canadian Twin

    Joined:
    Oct 28, 2010
    Member:
    #45374
    Messages:
    3,938
    Gender:
    Male
    First Name:
    Max
    Northwestern Ontario, Canada
    Vehicle:
    Locked and Geared!
    So is it nesscary to use the tiles & the rope (not sure what the rope is really for) that they offer as well or is it over kill?
     
  12. Nov 11, 2011 at 9:33 AM
    #12
    saitcho

    saitcho Well-Known Member

    Joined:
    Oct 21, 2011
    Member:
    #65596
    Messages:
    80
    Gender:
    Male
    New Orleans
    Vehicle:
    '11 DC 4x4 trd off road
    It's all a personal preference. The more important thing is understanding what each different product does and using them as needed to control unwanted noise in your specific application. The tiles and rope are both to help control unwanted resonance in panels and other problem areas.

    I personally decided against purchasing any of the rope product, and I also decided not to order any of his own version of asphalt deadener tiles (which I think is nearly the same as dynamat and other similar products). I think my needs will be met by using the deadener I already have to control panel resonance and then using Don's MLV/CCF combo to create a noise barrier. I know from firsthand experience in previous vehicles that the CCF by itself doesn't seem to help much with controlling noise.
     
  13. Nov 11, 2011 at 9:37 AM
    #13
    ItalynStylion

    ItalynStylion Sounds Gooooood

    Joined:
    Jun 15, 2009
    Member:
    #18467
    Messages:
    5,926
    Gender:
    Male
    First Name:
    Steven
    DFW, Tx.
    Vehicle:
    09 Double Cab TRD Sport 4x4
    Those Hybrid SE components are baller. Way too baller for me!
     
  14. Nov 11, 2011 at 9:47 AM
    #14
    theduck911

    theduck911 Max's Canadian Twin

    Joined:
    Oct 28, 2010
    Member:
    #45374
    Messages:
    3,938
    Gender:
    Male
    First Name:
    Max
    Northwestern Ontario, Canada
    Vehicle:
    Locked and Geared!
    So using dynamat with the CCF/MLV would be a well rounded combination for my truck, I plan on doing the doors, rear-wall & headliner (due to the light bar I plan to add which will most likely creste lots of noise)
     
  15. Nov 11, 2011 at 9:51 AM
    #15
    Sproulesxrunner

    Sproulesxrunner Well-Known Member

    Joined:
    Oct 27, 2010
    Member:
    #45328
    Messages:
    530
    Gender:
    Male
    Canada
    Vehicle:
    08 Xrunner
    Too much for TW to know
    Looks nice. Is the sub box bolted down or does it slide forward when you slam on the brakes?
     
  16. Nov 11, 2011 at 11:38 AM
    #16
    saitcho

    saitcho Well-Known Member

    Joined:
    Oct 21, 2011
    Member:
    #65596
    Messages:
    80
    Gender:
    Male
    New Orleans
    Vehicle:
    '11 DC 4x4 trd off road
    I think it would be a good improvement. Check out ItalynStalyn's thread on sound deadening that's stickied in this forum for more. He uses the same technique but does the entire truck. I'm not going quite that far but I am sure if you did it will sound even better. I didn't want to pay a fortune for more MLV and CCF nor did I want to take the truck apart that much.
     
  17. Nov 11, 2011 at 2:20 PM
    #17
    84Hilux

    84Hilux [OP] Well-Known Member

    Joined:
    Jul 6, 2010
    Member:
    #39877
    Messages:
    542
    Gender:
    Male
    First Name:
    Gary
    Vancouver, Canada
    Vehicle:
    09 SR5 Access Cab V6 4X4
    Stock Fog Lights, Camera Mirror, Arrow Canopy, Lighted 4x4switch, Weathertech Mats (Black), Wet Okoles- Black/Charcoal, Alpine CDA117 Headunit/ Alpine PDX4150 Amp/Alpine PDX M6 Amp/ Hybrid Legatia SE Components/ JL 10W6V2 Subwoofer/ Prototype MR Marv Sub Enclosure
    It is hard to say how much difference the Ensolite made- Since I installed the new drivers at the same time. It did make a subtle difference in road noise- I noticed that more of the high frequency wind noise etc. was dampened when I was driving before I installed the speakers. I think the Ensolite would make a big difference on the roof- I hear a lot of wind through the tinny sounding roof panels.
     
  18. Nov 11, 2011 at 2:22 PM
    #18
    84Hilux

    84Hilux [OP] Well-Known Member

    Joined:
    Jul 6, 2010
    Member:
    #39877
    Messages:
    542
    Gender:
    Male
    First Name:
    Gary
    Vancouver, Canada
    Vehicle:
    09 SR5 Access Cab V6 4X4
    Stock Fog Lights, Camera Mirror, Arrow Canopy, Lighted 4x4switch, Weathertech Mats (Black), Wet Okoles- Black/Charcoal, Alpine CDA117 Headunit/ Alpine PDX4150 Amp/Alpine PDX M6 Amp/ Hybrid Legatia SE Components/ JL 10W6V2 Subwoofer/ Prototype MR Marv Sub Enclosure

    Sub box mounts to the stock rear console mounting bracket. It fits like a glove- no movement of the sub box.
     
  19. Nov 11, 2011 at 2:35 PM
    #19
    84Hilux

    84Hilux [OP] Well-Known Member

    Joined:
    Jul 6, 2010
    Member:
    #39877
    Messages:
    542
    Gender:
    Male
    First Name:
    Gary
    Vancouver, Canada
    Vehicle:
    09 SR5 Access Cab V6 4X4
    Stock Fog Lights, Camera Mirror, Arrow Canopy, Lighted 4x4switch, Weathertech Mats (Black), Wet Okoles- Black/Charcoal, Alpine CDA117 Headunit/ Alpine PDX4150 Amp/Alpine PDX M6 Amp/ Hybrid Legatia SE Components/ JL 10W6V2 Subwoofer/ Prototype MR Marv Sub Enclosure
    Yeah- this is my first attempt at a professional install. If I was starting over, I would spend a lot more time on getting the deadening just right. The system sounds phenomenal when I am parked, but I have to turn it up pretty loud when I am on the highway to cover road noise. My feeling is that more deadening in the door would be beneficial (and also the roof and rear wall). I considered adding a second layer of Dynamat just around the woofer area, but I decided to just get the project done and tweak it later as necessary. I would also have added more Dynamat to the outside panel of the door.

    My understanding of MLV is that it is very effective because of the decoupling layer created by placing foam underneath it. Can I add MLV by gluing it over top of the Ensolite?
     
  20. Nov 11, 2011 at 2:44 PM
    #20
    84Hilux

    84Hilux [OP] Well-Known Member

    Joined:
    Jul 6, 2010
    Member:
    #39877
    Messages:
    542
    Gender:
    Male
    First Name:
    Gary
    Vancouver, Canada
    Vehicle:
    09 SR5 Access Cab V6 4X4
    Stock Fog Lights, Camera Mirror, Arrow Canopy, Lighted 4x4switch, Weathertech Mats (Black), Wet Okoles- Black/Charcoal, Alpine CDA117 Headunit/ Alpine PDX4150 Amp/Alpine PDX M6 Amp/ Hybrid Legatia SE Components/ JL 10W6V2 Subwoofer/ Prototype MR Marv Sub Enclosure
    Great link- I may try adding MLV over top of the Ensolite.
     

Products Discussed in

To Top