1. Welcome to Tacoma World!

    You are currently viewing as a guest! To get full-access, you need to register for a FREE account.

    As a registered member, you’ll be able to:
    • Participate in all Tacoma discussion topics
    • Communicate privately with other Tacoma owners from around the world
    • Post your own photos in our Members Gallery
    • Access all special features of the site

How-to: Automatic Bed Tool Box Light (led)

Discussion in 'Lighting' started by Fractured, Feb 4, 2012.

  1. Feb 4, 2012 at 5:40 PM
    #1
    Fractured

    Fractured [OP] FPS-a-holic

    Joined:
    Dec 23, 2011
    Member:
    #69293
    Messages:
    821
    Gender:
    Male
    First Name:
    Corey
    NOR*Cal
    Vehicle:
    2012 MGM DCSB 4x4
    TRD wheels, TRD cat back exhaust, ScanGauge 2, Debadged, Avid sliders, UWS bed box w/automatic LED light, Led Interior/Reverse/Lic. Plate lights, Yellow Fogs, Flyzeye Light, Color matched grill, Rearview mirror relocate bracket, Power Sliding rear window, Plasti-dipped bumper/"T" emblem
    Overview:


    This is a pretty straight-forward mod, that will add a light inside your bed tool box that automatically turns on when you lift the lid. There is an inline switch so you can shut it off if the box will be open for a long period, or you want it disabled.
    The light is turned on and off with a simple self grounding switch.


    This mod is performed on a 2012 Tacoma double cab, short bed automatic 4x4 Off road TX pro equipped with a UWS bed box. Your installation may vary to your trim level/vehicle/bed box/materials. Please feel free to post any questions specifically related to your OWN vehicle and I will do what I can to help you.
    In this how-to when I refer to a hole size to drill, I am referring to the size that I require for my installation, please double check all sizes before drilling. Also, "negative" will be referred to as (-) and "positive" as (+). I chose to use wire loom to cover wire as I went along, and some of the pics might show that. Please let me know if anything needs to be clarified.

    Goals:
    NO permanent modification to the truck.
    All/most electrical terminations in dry areas (inside cab, tool box itself)
    As clean and close to OEM as possible
    Waterproof ALL connections not in the cab


    Difficulty:

    2-4 hours depending on ability.

    This is an easy-moderate mod if you have a little bit of 12v electrical wiring experience. It also helps to have a basic knowledge of how electricity works. Throughout the write up, I refer to a digital volt meter/continuity tester as a "meter".

    If you do not know how to use one of these, please visit http://www.youtube.com/watch?v=Ftc3EQGZowk .
    Some drilling is required.

    Disclaimer:

    The writer of this how-to is not responsible to any damage/property loss, injury, death or Armageddon due to any individuals inability, mistakes, or negligence. Attempt at your own risk. Please use safety glasses when appropriate. Please use common sense at all times.

    Tools needed:
    Drill
    Drill bit set (I used a 3/8 and 5/16)
    Wire strippers/Crimpers
    9/16 wrench or adjustable wrench (for 3/8 bolts)
    Digital multimeter/continuity tester
    Basic hand tools
    Scotch 33 electrical tape/shrink tubing


    Materials used:
    [​IMG]


    12v led strip light (waterproof), 28" from oznium.com
    "on-off" toggle switch (not pictured)
    Self grounding switch/lock nut (usually used for car alarms, door buzzers)
    Mini add-a-circuit
    #14 AWG Black, and Red
    Butt Splices, fork connectors, male bullet connectors
    Wire loom
    zip ties/sticky backs
    small automotive grommets (rubber)
    Some scrap aluminum/steel to make a small bracket (not shown)
    Mini-fuse kit if you do not want to use your spares (not shown)


    Before we get started:

    Assess the situation.
    [​IMG]

    Gather all your materials, and tools. Make sure your area is well lit, if not grab a flashlight.


    Find out if your tool box is "grounded".

    [​IMG]


    Basically you need to see if your tool box has continuity with the negative (-) terminal on the battery. Do this by setting your meter to continuity (ohms, Ώ) finding a non- painted surface on the tool box, and another on any other bare metal surface on the vehicle and touching them with the meter leads. If there is any continuity at all (anything other than infinity, open, OL) then you are OK. I chose the J-olt that holds the box down, and the door striker as my two points. The reason why we do this is because we are using a self grounding switch. When the tool box lid is opened, then the switch is "closed " and the voltage can travel through the lamps back to the battery to make a complete circuit. If your box is not grounded, follow directions normally until step 5- then see the note. Enough school, lets get started.


    Step 1.
    Locate where you want to mount your switch bracket and toggle. I chose the driver side, because it is the side than the tool box lock is on.

    Step 2.
    Drill your hole for your ON/OFF toggle, as well as a hole to the outside of the box.

    [​IMG]


    Make sure there is free space on the outside of the box where you choose to drill, so you can run your wires and you don't damage your truck. Install a grommet in the hole.

    Step 3.
    Fabricate a small bracket to mount your self grounding switch.

    [​IMG]


    I chose to paint mine to make the install cleaner. Drill a 3/8 hole so you can mount the bracket/switch. Make sure you pay attention to the height of your switch- some tool box lids have a "cavity" underneath, some are completely flat. When the lid closes, the switch only needs to be depressed a bit to open the circuit. The other side of the coin is that you don't want it to be mounted so high that the switch hampers the lid closing. Another way to mount it is to drill a hole in a "lip" of the box for the switch to go in. I chose the bracket method because I didn't want a lot of sheer force on the self grounding switch. Mount the switch/bracket assembly.
    [​IMG]


    Step 4.
    Choose where you are going to mount your light. I chose the little "lip" on the back of the box, because the led bar will be protected, and its a good location. It will be mounted with the tape oznium.com supplied with the bar, but not yet. Mount it temporarily for the time being.
    [​IMG]


    Step 5.
    Install a bullet connector on the (-) side of the light bar ("gold wire"). Use extra black #14 wire and a butt splice if you need to extend the wire to where the self grounding switch is. The wire that comes with the led is very thin (like #22?) It might need to be stripped back farther, then double or triple folded so the termination will "bite" on the wire. I try to wrap all my terminations with scotch 33 electrical tape, just as an extra precaution. Connect it to the self grounding switch.
    [​IMG]


    *note- if your box is not self grounded, you will need to supply a ground to the switch. This can be done with a eye terminal, some wire and a known ground spot (any unpainted bolt). Sandwich the eye between the lock nut for your switch, and the tool box.

    Step 6.
    Install a fork terminal to the (+) wire of the light bar ("silver wire"). Extend with #14 wire red if needed to where you chose to mount your toggle. Land the fork on one of the terminals of your toggle, it doesn't matter which one.
    [​IMG]


    Step 7.
    Start to map out where you are going to run your (+) wire to the cab. Keep it away from any moving parts, hopefully close to a factory harness. I chose to run it down the back of the bed, close to the parking brake cable, then piggy backing on a factory harness. I used sticky backs where support was needed, wire looming and zip tying every 1 1/2 feet or so.
    [​IMG]

    [​IMG]
    [​IMG]
    [​IMG]


    Step 8.
    We need to find where we are going to get into the cab. I located a grommet under the driver seat, and made a very small hole. Please be careful that you do not nick any factory wires.
    [​IMG]


    To access the grommet from inside the cab, the sill plate and kick panel need to be removed.

    [​IMG]
    [​IMG]

    To remove sill plate, lift straight up. To remove kick panel, pull on dead pedal. It will take some "oomph". Then unscrew the little plastic nut, and pull the kick panel straight back towards the bed. It might be tough, but work at it.

    Run your wire up into the cab, and along the factory harness up into the dash area. Secure with zip ties.
    [​IMG]


    To remove the little pocket to access the fuse panel, pull up and back at a 45 degree angle.

    Step 9.
    We now need to find where we are going to add our circuit in the fuse block. I checked all the unused spots, but did not find any that had power while the key was off (constant power). I did find that the 15a fuse that controlled the accessory outlets did have constant power, so I chose to piggy back onto that.

    [​IMG]
    (excuse the crappy paint skills)


    I used my meter to check for voltage in the fuse block by setting the meter to "DC voltage", and probing the fuse (or empty socket) with one lead and touching the other lead to ground (door striker). As soon as I got 12v DC, even though the key was off, I knew that was my spot.


    *note- if you use your acc. outlets for high draw accessories, it may blow the fuse, even though the amp draw on these leds is not much. If you choose to not use the same fuse as I did, I found that the 10a horn fuse in the engine compartment has constant power. The process is the same, but it will require you to get the positive into the engine compartment.
    [​IMG]


    Installing your add-a-circuit is as simple as removing your fuse, installing a spare fuse of the same rating in the lower spot of the add-a-circuit, installing the fuse for your leds in the upper spot of the add-a-circuit. You then will install the whole add-a-circuit assembly into the fuse block- It will cover the fuse next door, which is ok (but the add-a-circuit will need to be removed to replace the covered fuse if needed)
    [​IMG]


    The fuses my Tacoma uses are "flush" mini fuses to keep the fuses flush with the block- the mini replacements are not. They are interchangeable.

    Do not terminate your (+) wire to the add-a-circuit yet.

    Step 10.
    Go back to the tool box. Terminate your (+) wire that you ran up to the cab with a fork, and land it on the other side of your toggle.
    Install your toggle, but don't tighten it down yet because we need to make sure the switch is in the right position (on is up, off is down).
    [​IMG]
    [​IMG]


    Step 11.

    Go back to the fuse block. Strip your (+) wire and connect it to the add-a-circuit via the butt splice.

    [​IMG]

    Go back to your leds, and see if they are on. If they are, pat yourself on the back. If not, flip your toggle. They should be on now. If they are still not on, go back and double check all your connections/fuses.
    [​IMG]

    Now is also a good time to make sure your switch is causing the light to shut off when the lid is closed. Since you cannot see inside the box while it is closed, put your cellphone or camera on video mode and put it in there and close the lid, then watch the video. If the light is not shutting off, your switch needs adjustment "up".
    If your toggle is not pointing up while the lights are on, rotate your toggle. Mine came with a little "ON-OFF" plate- orient that if needed.

    Step 12.
    We are in the final stretch!!! It is now time to mount the led, install the rest of our wire loom, ziptie and go back and clean everything up.
    [​IMG]
    [​IMG]
    [​IMG]

    I used the 3m tape supplied from oznium.com to mount the led. It worked great. Be liberal with the electrical tape for securing your wire loom ends. We didn't do any terminations outside where water can get trapped, but I always try to make my modifications as watertight as possible.


    Reinstall interior trim components in this order:

    [​IMG]


    Kick panel, nut
    Dead pedal
    Sill plate

    Do one final inspection. Make sure everything is secure, and out of the way of moving parts. Clean up, step back, and enjoy a job well done!!!
    [​IMG]
    [​IMG]
    [​IMG]


    Thanks for looking at my how-to. I hope it helped you and was informative. Please let me know if you think I have done something wrong, or if you have any issues with my write up.
    Also, please excuse the terrible photography and MS paint skills.

    Questions, comments and concerns are always appreciated.
     
  2. Feb 4, 2012 at 5:42 PM
    #2
    Fractured

    Fractured [OP] FPS-a-holic

    Joined:
    Dec 23, 2011
    Member:
    #69293
    Messages:
    821
    Gender:
    Male
    First Name:
    Corey
    NOR*Cal
    Vehicle:
    2012 MGM DCSB 4x4
    TRD wheels, TRD cat back exhaust, ScanGauge 2, Debadged, Avid sliders, UWS bed box w/automatic LED light, Led Interior/Reverse/Lic. Plate lights, Yellow Fogs, Flyzeye Light, Color matched grill, Rearview mirror relocate bracket, Power Sliding rear window, Plasti-dipped bumper/"T" emblem
    Stay tuned for night pics.
     
  3. Feb 4, 2012 at 5:43 PM
    #3
    Steves104x4

    Steves104x4 Well-Known Member

    Joined:
    Apr 17, 2010
    Member:
    #35468
    Messages:
    15,884
    Gender:
    Male
    First Name:
    Steve
    Buffalo NY
    Vehicle:
    2010 RC 2.7 4x4
    BUCKLE UP! It makes it harder for Aliens to pull you out of your Truck.
  4. Feb 4, 2012 at 5:46 PM
    #4
    Foihdzas

    Foihdzas VA7PTZ

    Joined:
    Sep 14, 2010
    Member:
    #43276
    Messages:
    1,103
    Gender:
    Male
    First Name:
    Danny
    B.C Canada
    Vehicle:
    2010 Dbl Cab 5' Box 6 Speed
    2010 Tacoma, sold...
    Can't wait for the pics!
     
  5. Feb 4, 2012 at 7:14 PM
    #5
    ROGU3 PR3DATOR

    ROGU3 PR3DATOR Space Shuttle Door Gunner

    Joined:
    Aug 9, 2010
    Member:
    #41451
    Messages:
    1,048
    Gender:
    Male
    First Name:
    Jake
    Eagle River, Alaska
    Vehicle:
    MGM 2011 TRD Off-Road
    Lifted, Supercharged, Armored, and lots more
    Not my cup of tea, as I don't have a tool box. But nice write up just the same. Very clean end product and easy to follow DIY. Maybe its just me, but any time I make a splice or connection I try to use heat shrink to help seal it off. Just something to consider in the future.
     
  6. Feb 4, 2012 at 7:39 PM
    #6
    Fractured

    Fractured [OP] FPS-a-holic

    Joined:
    Dec 23, 2011
    Member:
    #69293
    Messages:
    821
    Gender:
    Male
    First Name:
    Corey
    NOR*Cal
    Vehicle:
    2012 MGM DCSB 4x4
    TRD wheels, TRD cat back exhaust, ScanGauge 2, Debadged, Avid sliders, UWS bed box w/automatic LED light, Led Interior/Reverse/Lic. Plate lights, Yellow Fogs, Flyzeye Light, Color matched grill, Rearview mirror relocate bracket, Power Sliding rear window, Plasti-dipped bumper/"T" emblem

    Yeah, heat shrink would be the best way to do it, that's why I put it in the materials list. I just don't have the patience for it nor do I ever use it at work so I just kind of stay away from it. Scotch 33 is just as good in my opinion, although it is pretty ugly. But it gets the job done.
     
  7. Feb 4, 2012 at 8:09 PM
    #7
    NC15TRD

    NC15TRD Well-Known Member

    Joined:
    Sep 14, 2010
    Member:
    #43212
    Messages:
    6,517
    Gender:
    Male
    First Name:
    Nick
    PA
    Vehicle:
    16 Sierra SLT All Terrain
    Readylift, Truxedo, Husky Liners, Carven
    Subbed for pics and future use!
     
  8. Feb 4, 2012 at 8:18 PM
    #8
    wordtothis

    wordtothis Well-Known Member

    Joined:
    Aug 25, 2011
    Member:
    #62363
    Messages:
    166
    Gender:
    Male
    First Name:
    david
    atlanta
    Vehicle:
    '11 DC SB, V6 4X4, 6spd
    Husky floor liners, in-channel vent visors, billies, khaki softopper, Wet Okoles, OTHER STUFF - kinda STOCKISH!
    Nice one man!

    Just a thought, but don't you think the light would be much more usable coming off of the lid itself rather than in the box?
    Once all of your gear is in there, the light will do little more than illuminate the backs of bins and tools, whereas if you had it mounted to the lid, it would shine down and illuminate the entire box and consequently your work area. I mean, the night shots will be the true determining factor.

    Still think it's a cool idea though!
    Cheers.
     
  9. Feb 4, 2012 at 9:14 PM
    #9
    Fractured

    Fractured [OP] FPS-a-holic

    Joined:
    Dec 23, 2011
    Member:
    #69293
    Messages:
    821
    Gender:
    Male
    First Name:
    Corey
    NOR*Cal
    Vehicle:
    2012 MGM DCSB 4x4
    TRD wheels, TRD cat back exhaust, ScanGauge 2, Debadged, Avid sliders, UWS bed box w/automatic LED light, Led Interior/Reverse/Lic. Plate lights, Yellow Fogs, Flyzeye Light, Color matched grill, Rearview mirror relocate bracket, Power Sliding rear window, Plasti-dipped bumper/"T" emblem

    Good input- I did think of this after the install was completed. There were a few downsides in my opinion so I'm kind of glad I didn't do it on the lid. One of the downsides to it being on the lid is that the wires would be constantly flexing. It gets opened and closed a lot! Those wires are very thin, and I don't know how they would last.

    Another is that the lid on the UWS that I have opens past 90 degrees- probably closer to 100-110 degrees. Unless the light was right near the hinge on the lid, I don't know how effective it would be. It would get diffused up and out.

    The last is that I rarely have the box filled up to the point where the light would be obstructed. I do keep a lot of tools/stuff in there but never that much.

    One of the great things about modding is that what works for someone else might be different than my setup. I would love to see if someone mounted theirs on the lid, and how it worked.

    Thanks for pointing that out for discussion though, +rep for you!
     
  10. Feb 4, 2012 at 9:20 PM
    #10
    Fractured

    Fractured [OP] FPS-a-holic

    Joined:
    Dec 23, 2011
    Member:
    #69293
    Messages:
    821
    Gender:
    Male
    First Name:
    Corey
    NOR*Cal
    Vehicle:
    2012 MGM DCSB 4x4
    TRD wheels, TRD cat back exhaust, ScanGauge 2, Debadged, Avid sliders, UWS bed box w/automatic LED light, Led Interior/Reverse/Lic. Plate lights, Yellow Fogs, Flyzeye Light, Color matched grill, Rearview mirror relocate bracket, Power Sliding rear window, Plasti-dipped bumper/"T" emblem
    Now its time for some night pics....:worthless:

    Before-
    [​IMG]

    After!!-
    [​IMG]
    [​IMG]


    This thing tosses off a lot of light. Its almost too bright because it kind of shocks your eyes if you are looking straight at it when you open the box.

    Overall, I am very happy with how it turned out for 2 hours on a Saturday!

    P.s. Sorry for my terrible pics. We have a great camera, but I have no idea how to take night pics other than to cover up the flash with my hand!
     
  11. Feb 4, 2012 at 9:39 PM
    #11
    Forster46

    Forster46 Very nice how much?

    Joined:
    Jul 20, 2010
    Member:
    #40487
    Messages:
    3,366
    Gender:
    Male
    First Name:
    Nick
    Mount Vernon, WA
    Vehicle:
    The doritos locos taco
    6000k HID's, AUX Reverse Lights, 3" Rough Country Suspension Lift, Pioneer AVH-P4200 Double Din, Underglow and footwell Lights, Camo Seat Covers, Duralast Tool Box, Blacked Out Badges, Grill, Front Emblem, Midland CB Radio, Amber Strobes, POWER REAR WINDOW, cup holder LED's, Firestik 3' in bed, console divider, Ultragauge.
    Awesome write up! Maybe you can make up a simple wiring diagram when you have a chance? That would be a helpful thing to add in this.
     
  12. Feb 4, 2012 at 9:52 PM
    #12
    Fractured

    Fractured [OP] FPS-a-holic

    Joined:
    Dec 23, 2011
    Member:
    #69293
    Messages:
    821
    Gender:
    Male
    First Name:
    Corey
    NOR*Cal
    Vehicle:
    2012 MGM DCSB 4x4
    TRD wheels, TRD cat back exhaust, ScanGauge 2, Debadged, Avid sliders, UWS bed box w/automatic LED light, Led Interior/Reverse/Lic. Plate lights, Yellow Fogs, Flyzeye Light, Color matched grill, Rearview mirror relocate bracket, Power Sliding rear window, Plasti-dipped bumper/"T" emblem

    Sure I will get on it right away but be prepared for some terrible paint skills!:poking:
     
  13. Feb 4, 2012 at 9:53 PM
    #13
    Forster46

    Forster46 Very nice how much?

    Joined:
    Jul 20, 2010
    Member:
    #40487
    Messages:
    3,366
    Gender:
    Male
    First Name:
    Nick
    Mount Vernon, WA
    Vehicle:
    The doritos locos taco
    6000k HID's, AUX Reverse Lights, 3" Rough Country Suspension Lift, Pioneer AVH-P4200 Double Din, Underglow and footwell Lights, Camo Seat Covers, Duralast Tool Box, Blacked Out Badges, Grill, Front Emblem, Midland CB Radio, Amber Strobes, POWER REAR WINDOW, cup holder LED's, Firestik 3' in bed, console divider, Ultragauge.
    Lol can't be worse than mine!

    Feel free to continue in the write-up business, this is very detailed and good.
     
  14. Feb 4, 2012 at 10:13 PM
    #14
    Fractured

    Fractured [OP] FPS-a-holic

    Joined:
    Dec 23, 2011
    Member:
    #69293
    Messages:
    821
    Gender:
    Male
    First Name:
    Corey
    NOR*Cal
    Vehicle:
    2012 MGM DCSB 4x4
    TRD wheels, TRD cat back exhaust, ScanGauge 2, Debadged, Avid sliders, UWS bed box w/automatic LED light, Led Interior/Reverse/Lic. Plate lights, Yellow Fogs, Flyzeye Light, Color matched grill, Rearview mirror relocate bracket, Power Sliding rear window, Plasti-dipped bumper/"T" emblem
    I hope this helps, I am not great at MS paint!

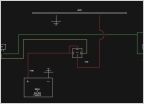
    Wiring diagram:
    [​IMG]

    You might need to save it to your computer and reopen it so you can zoom around, because it is very small. I don't know how to make it larger.
     
  15. Feb 4, 2012 at 10:27 PM
    #15
    Fractured

    Fractured [OP] FPS-a-holic

    Joined:
    Dec 23, 2011
    Member:
    #69293
    Messages:
    821
    Gender:
    Male
    First Name:
    Corey
    NOR*Cal
    Vehicle:
    2012 MGM DCSB 4x4
    TRD wheels, TRD cat back exhaust, ScanGauge 2, Debadged, Avid sliders, UWS bed box w/automatic LED light, Led Interior/Reverse/Lic. Plate lights, Yellow Fogs, Flyzeye Light, Color matched grill, Rearview mirror relocate bracket, Power Sliding rear window, Plasti-dipped bumper/"T" emblem

    Thanks man!:humble:
     
  16. Feb 4, 2012 at 10:54 PM
    #16
    ROGU3 PR3DATOR

    ROGU3 PR3DATOR Space Shuttle Door Gunner

    Joined:
    Aug 9, 2010
    Member:
    #41451
    Messages:
    1,048
    Gender:
    Male
    First Name:
    Jake
    Eagle River, Alaska
    Vehicle:
    MGM 2011 TRD Off-Road
    Lifted, Supercharged, Armored, and lots more
    "CTRL" + "+" Will zoom the whole screen, But good for a quick look. "CTRL" + "-" will zoom out.
     
  17. Feb 5, 2012 at 7:06 PM
    #17
    Fractured

    Fractured [OP] FPS-a-holic

    Joined:
    Dec 23, 2011
    Member:
    #69293
    Messages:
    821
    Gender:
    Male
    First Name:
    Corey
    NOR*Cal
    Vehicle:
    2012 MGM DCSB 4x4
    TRD wheels, TRD cat back exhaust, ScanGauge 2, Debadged, Avid sliders, UWS bed box w/automatic LED light, Led Interior/Reverse/Lic. Plate lights, Yellow Fogs, Flyzeye Light, Color matched grill, Rearview mirror relocate bracket, Power Sliding rear window, Plasti-dipped bumper/"T" emblem

    Ah thanks! Its still kind of hard to read though! Hopefully people will figure it out!!
     
  18. Feb 6, 2012 at 7:20 PM
    #18
    DIVERMAN

    DIVERMAN Well-Known Member

    Joined:
    Jan 23, 2010
    Member:
    #29888
    Messages:
    459
    Gender:
    Male
    First Name:
    Cullen
    Louisiana
    Vehicle:
    2012 Pyrite Mica 4x4 TRD O/R SWB
    Tailgate theft prevention, Locking rear window, Blind spot mirrors, Fogs on anytime, Rear diff breather relocated, Bed storage locks, LEDs in/out, Relocated trailer plug(custom!), OEM bed mat, OEM running boards, OEM bed divider, Bed lights, Rev lights, Raptor lights, WeatherTech floor mats and window vents, Extra D-rings, ImMrYo Bracket, UWS low pro black toolbox, Carhartt seat covers,
    nice write up! sub'd for the future.
     
  19. Mar 7, 2012 at 7:58 PM
    #19
    goufcustom

    goufcustom 7.62x63mm

    Joined:
    Oct 3, 2011
    Member:
    #64586
    Messages:
    1,321
    Gender:
    Male
    First Name:
    Mike
    MD
    Vehicle:
    2021 4x4 TRD Sport DCLB
    Well done, once I put lights in my bed I use them all the time, and can see what I am grabbing for.
     
  20. Jan 14, 2013 at 10:36 PM
    #20
    rubenc87

    rubenc87 Cobra

    Joined:
    Feb 2, 2009
    Member:
    #13214
    Messages:
    1,808
    Gender:
    Male
    Texas
    Vehicle:
    2013 Tacoma DCSB 4x4
    DTRL,HID's, Redline Elite Hood Struts,IVD Coilovers and Rear Shocks W/ Ext. Res.,N-FAB Light Bar W/ KC Titanium Lights, Alcan AAL,Wet Okole's, URD T.C.A.I. M/T Classic Lock's BFG AT, Chrome TC UCA'S,TRD Exhaust, Bed Mat,Painted Roof Rack,Access LE,Weathertech's F&R,P&L Lock
    Nice write up.
     

Products Discussed in

To Top