

-
Welcome to Tacoma World!
You are currently viewing as a guest! To get full-access, you need to register for a FREE account.
As a registered member, you’ll be able to:- Participate in all Tacoma discussion topics
- Communicate privately with other Tacoma owners from around the world
- Post your own photos in our Members Gallery
- Access all special features of the site
 Power cables from cab to bed
 Tore a CV boot, anybody have recommendations for a replacement?
 1st Gear Problem
 Tailgate lock other than Pop & Lock?
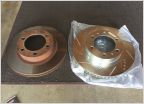 Power Stop Brake Kit Install w/ Pics
 Clutch slipping. Need advice.
OEM roof rack installation
Discussion in '2nd Gen. Tacomas (2005-2015)' started by Jesse22876, Mar 3, 2012.
Page 1 of 2
Page 1 of 2


