

-
Welcome to Tacoma World!
You are currently viewing as a guest! To get full-access, you need to register for a FREE account.
As a registered member, you’ll be able to:- Participate in all Tacoma discussion topics
- Communicate privately with other Tacoma owners from around the world
- Post your own photos in our Members Gallery
- Access all special features of the site
 TRANSMISSION SWAPS - Convert to 4 wheel drive or automatic to manual
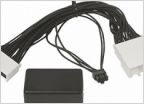
 Sound effect switch in cab? Wiring?
 Oil Change
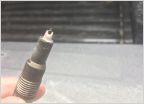 The Truth About Spark Plugs....
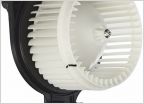 Fan not blowing
 How To: Retractable iPhone 5 Constant Hot Charger
Cheap/Free Mods
Discussion in 'Technical Chat' started by piercedtiger, Dec 28, 2007.
Page 62 of 124
Page 62 of 124
Products Discussed in


