

-
Welcome to Tacoma World!
You are currently viewing as a guest! To get full-access, you need to register for a FREE account.
As a registered member, you’ll be able to:- Participate in all Tacoma discussion topics
- Communicate privately with other Tacoma owners from around the world
- Post your own photos in our Members Gallery
- Access all special features of the site
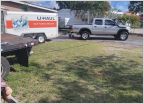 Cross Country Trip With 6x12 Trailer.
 Weird Ball Joint Issue
 LCA Bushings: OEM, Energy Suspension, Whiteline
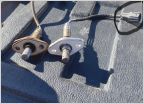 O2 sensor location.
 Dumb Bosch Icon Wiper Blade P/N Question
 Weird LED map/dome light issue
How To: Replacing Spark Plugs and Wires on 5VZ-FE 3.4 V6
Discussion in '1st Gen. Tacomas (1995-2004)' started by TacomaJPP, Jan 31, 2013.
Page 1 of 9
Page 1 of 9
Products Discussed in


