1. Welcome to Tacoma World!

    You are currently viewing as a guest! To get full-access, you need to register for a FREE account.

    As a registered member, you’ll be able to:
    • Participate in all Tacoma discussion topics
    • Communicate privately with other Tacoma owners from around the world
    • Post your own photos in our Members Gallery
    • Access all special features of the site

Mangled my brake dust shield trying to get drum off!

Discussion in '1st Gen. Tacomas (1995-2004)' started by Moco, Jun 9, 2013.

  1. Jun 9, 2013 at 5:54 PM
    #1
    Moco

    Moco [OP] Well-Known Member

    Joined:
    Sep 23, 2012
    Member:
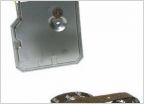
    #87518
    Messages:
    405
    Gender:
    Male
    First Name:
    Eric
    NoVA
    Vehicle:
    96 Regular Cab 4x4 5spd
    Guys,

    I was trying to pull my rear drums to take a look at the condition of my brakes. I tried the old M8x1.25 bolt trick but that didnt work. I then resorted to trying to gorilla the drum off withi a long screwdriver/prybar. While I got the drum to move a bit, I mostly succeeded in mangling the hell out of my brake shield.

    Now I get this low pitch grating/scratching/squeeling noise from that wheel (driver rear). Is this as a result of the mangled brake shield interfering with the drum or the wheel itself? I know this was a result of the brake shield because I didnt have the noise prior to messing with it.

    Is my only solution to replace the brake shield? And if so, does that require pulling the whole axle?

    Thanks,
    Eric
     
  2. Jun 9, 2013 at 5:59 PM
    #2
    92LandCruiser

    92LandCruiser Well-Known Member

    Joined:
    Feb 20, 2010
    Member:
    #31761
    Messages:
    8,317
    Gender:
    Male
    Nevada
    Vehicle:
    80 series Land Cruiser
    Cummins, tons, 40s
    On the 2nd gens you have to press the whole damn bearing off the shaft. Not positive on 1st gens but my suggestion is to try and straighten it. Back off the shoes until you can fit the drum up and spin it by hand. Find where it rubs and then massage it out of the way.

    Next time, use the adjuster to back of the shoes before you pry the drum off.

    Just FYI it's a backing plate if you go to search for the part.
     
    Last edited: Jun 9, 2013
  3. Jun 9, 2013 at 5:59 PM
    #3
    Buckoma

    Buckoma Well-Known Member

    Joined:
    Jan 26, 2013
    Member:
    #96125
    Messages:
    1,060
    Gender:
    Male
    First Name:
    Chris
    Buckeye, AZ
    Vehicle:
    2016 TRD Sport 4x4
    Bend the dust shield back slightly away from the drum/hub. No biggie.
     
  4. Jun 9, 2013 at 6:43 PM
    #4
    Moco

    Moco [OP] Well-Known Member

    Joined:
    Sep 23, 2012
    Member:
    #87518
    Messages:
    405
    Gender:
    Male
    First Name:
    Eric
    NoVA
    Vehicle:
    96 Regular Cab 4x4 5spd
    Sounds like it worth a try. So the noise is coming from the friction between the drum and shield?

    I guess I could kill two stones by removing the drum first and then re-shaping the shield.
     
  5. Jun 9, 2013 at 6:55 PM
    #5
    TACO TX

    TACO TX Well-Known Member

    Joined:
    Sep 29, 2012
    Member:
    #87962
    Messages:
    2,309
    Gender:
    Male
    First Name:
    Kelly
    Denison ,Texas
    Vehicle:
    2017 DC TRD Off Road 4x4(Barcelona red)
    Weather tech liners, Ranch Sierra truck cap
    Next time you can try turning the adjuster to loosing the shoes off the drumb first if its tight, then the bolt trick. Turn of the bolt, whoop with BFH, turn of the bolt, whoop with BFH.
     
  6. Jun 9, 2013 at 7:55 PM
    #6
    Buckoma

    Buckoma Well-Known Member

    Joined:
    Jan 26, 2013
    Member:
    #96125
    Messages:
    1,060
    Gender:
    Male
    First Name:
    Chris
    Buckeye, AZ
    Vehicle:
    2016 TRD Sport 4x4
    Yeah, it's happened on my front end a couple times... loud "scraping" because the shield got pushed in too much. I assume it works the same for the rear.
     
  7. Jun 10, 2013 at 8:38 AM
    #7
    Moco

    Moco [OP] Well-Known Member

    Joined:
    Sep 23, 2012
    Member:
    #87518
    Messages:
    405
    Gender:
    Male
    First Name:
    Eric
    NoVA
    Vehicle:
    96 Regular Cab 4x4 5spd
    For future searchers regarding drum brakes - Parts Plus has a really good 5 page primer on servicing drum brakes, broken down potato head style for non-pros:

    http://www.partsplus.com/PDFs/DrumBrakes.pdf

    EDIT: Steps 9-12 show really well how to adjust the adjuster to take a stuck drum off.
     
  8. Jun 10, 2013 at 9:21 PM
    #8
    Moco

    Moco [OP] Well-Known Member

    Joined:
    Sep 23, 2012
    Member:
    #87518
    Messages:
    405
    Gender:
    Male
    First Name:
    Eric
    NoVA
    Vehicle:
    96 Regular Cab 4x4 5spd
    OK.

    A bit of a dumb question guys... which direction should I turn the star adjuster to loosen the drum.

    If I'm working on the driver's side rear wheel, do I apply the blade of the screwdriver up towards the sky, turning the adjuster up or do I apply the blade of the screwdriver down towards the ground, turning the adjuster down?

    The reason I ask is that I attacked the drum again tonight, I managed to wiggle my upper body in the wheel well so I could see the teeth of the adjuster, I think I managed to turn the adjuster about 5 clicks 'up'. This resulted in a completely stuck drum - where as before I was able to slide it back and forth on the hub about a 1/4 in.

    It was dark, late, and my screwdriver was too long for the space I was working in so I gave up without adjusting the opposite way to see if it made any difference. Did I go the wrong way?

    Also, I read elsewhere that as a last resort you can remove the axle and bang the studs on a piece of wood to free up the drum. Is the axle only held on by the 4 bolts on the backing plate?
     
  9. Jun 11, 2013 at 5:12 AM
    #9
    Southern01Taco

    Southern01Taco Well-Known Member

    Joined:
    Jul 20, 2010
    Member:
    #40457
    Messages:
    1,954
    Gender:
    Male
    First Name:
    Sean
    Holden, La
    Vehicle:
    01 V6 4x4 Xtra Cab SR5
    I know this probably goes without being said but just to make sure you know, if you have the parking brake set, it will make it ridiculously hard to get the drum off. The drum shouldn't be hard to get off every single time.
     
  10. Jun 11, 2013 at 6:09 AM
    #10
    Moco

    Moco [OP] Well-Known Member

    Joined:
    Sep 23, 2012
    Member:
    #87518
    Messages:
    405
    Gender:
    Male
    First Name:
    Eric
    NoVA
    Vehicle:
    96 Regular Cab 4x4 5spd
    Yes, absolutely. The parking brake was in fact off. Im always sure to make sure thats off when working on rear brakes.
     
  11. Jun 11, 2013 at 8:20 AM
    #11
    Southern01Taco

    Southern01Taco Well-Known Member

    Joined:
    Jul 20, 2010
    Member:
    #40457
    Messages:
    1,954
    Gender:
    Male
    First Name:
    Sean
    Holden, La
    Vehicle:
    01 V6 4x4 Xtra Cab SR5
    Ok, just making sure. I've done it on accident before :eek:, is the reason I ask.
     
  12. Jun 11, 2013 at 8:29 AM
    #12
    tan4x4

    tan4x4 Well-Known Member

    Joined:
    Nov 30, 2011
    Member:
    #67982
    Messages:
    3,809
    Gender:
    Male
    First Name:
    Rick
    Folsom, CA
    Vehicle:
    99 Tacoma EC 4x4 2.7L Auto
    Bilsteins, OME 881's, 3-leaf AAL, Detroit TruTrac, Tundra brake swap, Michelin LTX AT2, Tranny skidplate, TC skidplate, CBI rear bumper, TG sliders, UltraGauge, PowerTank, Reverse Camera
    Yes you did. Now you are worse off.

    To backoff the adjuster, however, you need an extra tool to stick in there to push on the thingee that prevents the adjuster from going down (the way you want it to go). Kinda like the come-along mechanism. Its pretty awkward, but that's what you have to do. Hope you have a lot of patience. You will not hear any clicking, though, since you have pushed the thingee away that makes the clicking.

    This stuff really makes one appreciate disk brakes.
     
  13. Jun 11, 2013 at 8:32 AM
    #13
    YOTA LOVER

    YOTA LOVER Stay Calm, and Fire For Effect

    Joined:
    Jul 17, 2012
    Member:
    #82814
    Messages:
    4,165
    Gender:
    Male
    First Name:
    Chris
    NH
    Vehicle:
    2011 MGM Tacoma DCLB SR5
    A slew of pricey stuff my wife hates me for.
    I always go in one direction until either: 1. I have gone the wrong way and pushed the pads against the drum or 2. I have loosed them up.

    If you're really lucky you can spot the "catch" mechanism on the adjuster, which under normal use only allows the auto adjuster to move in one direction (tighten the shoes as they wear down)... That's usually how I tell which way to turn it because I can never remember. And then I believe the adjuster will turn the opposite direction on the other side.

    Either way, you have to back them off before you try and remove the drum (as others have mentioned earlier). The shoes wear a groove into the drum over time, and there is a small lip of material which remains, and if the shoes aren't backed off they remain inside that groove and the drum isn't coming off. Once they are backed off you can pound on the drum with a heavy weighted plastic/hard rubber mallet to break up the rust holding the drum onto the axle while using the "bolt trick". It'll come off.

    I've never ever had to pull an axle to get a drum off.
     
  14. Jun 11, 2013 at 9:40 AM
    #14
    Moco

    Moco [OP] Well-Known Member

    Joined:
    Sep 23, 2012
    Member:
    #87518
    Messages:
    405
    Gender:
    Male
    First Name:
    Eric
    NoVA
    Vehicle:
    96 Regular Cab 4x4 5spd
    Yes, Im 31, the first few cars I've owned have all been disc brakes all around and Im unfamiliar with drums. Pulling a caliper off and sliding rotors out sure as hell beats wrestling with this medievil design with drum brakes.

    To top it off, the adjuster slot is on the top end of the backing plate which makes it necessary to contort ones self to get a view of the adjuster wheel.

    Now to be honest, I was expecting a 'thingy' but I couldnt find the thingy to lift up. I could clearly see the adjuster wheel though.

    At least the noise from earlier is gone now. So that's a positive.
     
  15. Jun 11, 2013 at 9:41 AM
    #15
    Moco

    Moco [OP] Well-Known Member

    Joined:
    Sep 23, 2012
    Member:
    #87518
    Messages:
    405
    Gender:
    Male
    First Name:
    Eric
    NoVA
    Vehicle:
    96 Regular Cab 4x4 5spd
    Roger.

    Im going to keep working on it, till I get it. My brakes work OK, so Im not stuck absolutely needing to get them off, Im just doing this because I need to eventually do brakes on this truck and I figure its better to do it now then later.
     
  16. Jun 11, 2013 at 3:17 PM
    #16
    tan4x4

    tan4x4 Well-Known Member

    Joined:
    Nov 30, 2011
    Member:
    #67982
    Messages:
    3,809
    Gender:
    Male
    First Name:
    Rick
    Folsom, CA
    Vehicle:
    99 Tacoma EC 4x4 2.7L Auto
    Bilsteins, OME 881's, 3-leaf AAL, Detroit TruTrac, Tundra brake swap, Michelin LTX AT2, Tranny skidplate, TC skidplate, CBI rear bumper, TG sliders, UltraGauge, PowerTank, Reverse Camera
    Yeah, its a bitch to get at. Pre-86 Toyota 4x4's had a different design, and the adjuster access hole was on the bottom.
    The 'thingee' is called the 'automatic adjuster lever', I just looked it up in my Haynes manual. You really can't see it since its behind the star wheel, you have to shove an awl behind the star wheel, to push it away from you. Then, while holding it away, turn the star-wheel down with a screwdrive, or brake adjusting tool. I have attached a photo (taken from the drum side obviously) that I took when working on my brakes many years ago

    [​IMG]
     
  17. Jun 11, 2013 at 3:45 PM
    #17
    Moco

    Moco [OP] Well-Known Member

    Joined:
    Sep 23, 2012
    Member:
    #87518
    Messages:
    405
    Gender:
    Male
    First Name:
    Eric
    NoVA
    Vehicle:
    96 Regular Cab 4x4 5spd
    Ohhhhhhhhhhhhhhh! Son of a bitch. OK, that makes more sense - the part about shoving it away. I was trying blindly lift it up and out of the way, your description makes more sense.

    Thanks.
     
  18. Jun 11, 2013 at 4:15 PM
    #18
    snoope

    snoope Well-Known Member

    Joined:
    Jun 13, 2009
    Member:
    #18414
    Messages:
    3,419
    Gender:
    Male
    Winter Haven Florida
    Vehicle:
    2002 Tundra Limited 4x4

    WOW, PLEASE RE-READ your Parts Plus info and the last 3 post....

    Brakes are the LAST thing you want to make an OOP'S on..

    Be patient and careful...by the time you finish with this "drum removal" one of two things will have happened ;
    1) you understand and respect them enough to work on them or
    2) you save up enough $$$ to have a "Tech" do the work for you and make it home safely after every ride...


    One last item...Use a dead blow instead of a ball pien hammer :)...My son forgot that 1 step and luckily Advance had one drum in stock....his final "Whack" broke the outer rim off my drum............Patience, patience, patience
     
    Last edited: Jun 11, 2013
  19. Jun 11, 2013 at 5:56 PM
    #19
    Moco

    Moco [OP] Well-Known Member

    Joined:
    Sep 23, 2012
    Member:
    #87518
    Messages:
    405
    Gender:
    Male
    First Name:
    Eric
    NoVA
    Vehicle:
    96 Regular Cab 4x4 5spd
    Thanks for the input. I'll be fine.

    I dont do my own maintenance because I dont have money to pay a tech to do it. I do it because I enjoy it and I like to know the intricacies of what Im driving. I value safety and use OEM or like quality parts in important systems.
    It just so happens, Im not that experienced with drum brakes.
     
  20. Jun 13, 2013 at 5:34 PM
    #20
    Moco

    Moco [OP] Well-Known Member

    Joined:
    Sep 23, 2012
    Member:
    #87518
    Messages:
    405
    Gender:
    Male
    First Name:
    Eric
    NoVA
    Vehicle:
    96 Regular Cab 4x4 5spd
    Rick,

    Thanks a million for the photo. Finally got that stuck drum off - but not before I spent an hour on my back srtruggling with and cursing the wheel adjuster...

    ... only to find out...

    I had my parking brake on! :eek::eek::eek:

    Anyway, after release the parking brake, I was able to adjust the wheel the correct way. A few turns at the adjuster, some WD40, and about 3 dozens slams of the 3lb hammer and the drum came right off! :D

    Your photo really helped align the blade of the screwrdiver on the automatic adjuster plate. Whats funny is after getting the drum off, it made so much more sense to look at and manipulate the adjuster and plate from the front.

    Anyway, drums and shoes look to have some life still in them, but I'll consider doing brakes sometime soon just because.

    Thanks again.
     

Products Discussed in

To Top