

-
Welcome to Tacoma World!
You are currently viewing as a guest! To get full-access, you need to register for a FREE account.
As a registered member, you’ll be able to:- Participate in all Tacoma discussion topics
- Communicate privately with other Tacoma owners from around the world
- Post your own photos in our Members Gallery
- Access all special features of the site
 Dual Battery Questions.
 Bluetooth obd2???
 Dual Battery Wiring Question
 Switch Pros/ARB Lockers ?s
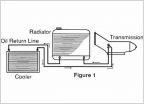 TRANSMISSION . Transmission coolers for all Toyotas ... Write up with many pictures
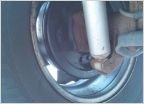 Gimme your .02 cents... and nobody gets hurt! -- Leaking rear axle (seal?)
Replacing my own air conditioning compressor, and now the rest of the system...help?
Discussion in 'Technical Chat' started by billygoat, Apr 25, 2012.
Page 2 of 4
Page 2 of 4


