1. Welcome to Tacoma World!

    You are currently viewing as a guest! To get full-access, you need to register for a FREE account.

    As a registered member, you’ll be able to:
    • Participate in all Tacoma discussion topics
    • Communicate privately with other Tacoma owners from around the world
    • Post your own photos in our Members Gallery
    • Access all special features of the site

How To Install A Pioneer X5500 in 2nd Gen Tacoma with ASWC1 Module and Parking Bypass

Discussion in 'Audio & Video' started by NorCalTRD, Oct 4, 2013.

  1. Oct 4, 2013 at 7:52 PM
    #1
    NorCalTRD

    NorCalTRD [OP] Well-Known Member

    Joined:
    Mar 23, 2013
    Member:
    #100418
    Messages:
    265
    Gender:
    Male
    Northern California
    Vehicle:
    '06 Indigo Ink DCLB TRD Sport V6
    40% Front Tint, Viper 5704 Alarm, Steel Cable Dog Tie, Super Sexy Driver Mod
    Hi everybody, I just got done putting the Pioneer X5500-BHS in my Tacoma and thought Id post up some pointers on making this wiring job easier and getting the info all into one post :)

    For reference this information is correct for a 2006 Toyota Tacoma TRD Sport Double Cab.

    Pre-cursors: DISCONNECT THE NEGATIVE BATTERY WIRE BEFORE EVER MESSING WITH ELECTRONICS!
    Dont cut the factory harnesses EVER! (I know most of you know but someone out there doesnt)
    Use vampire clips to make these connections, the ones 18-22 awg should work well (the red ones, blue ones are fine too)

    WHAT YOU WILL NEED:
    Pioneer AVH-X5500BHS Head Unit
    Metra Axxess ASWC-1 Steering Wheel Control Module
    X5500BHS Parking Brake Bypass
    Twenty five (25) vampire clips, also called tap/splices (18-22 awg size, the RED ones)
    A medium to small sized pliers

    LETS GET STARTED!

    First, use a small pry tool on bottom lip of the A/C controls area.
    It should pop towards you a little, then just pull it straight out and let it dangle near the shifter.

    Next pull straight towards the rear of the truck and up just a little frpm the bottom of the main radio face, it should pop off with ease.
    Disconnect the harnesses from the rear of the radio.
    You will need to remove the clock and hazard section from your OEM radio, I believe it only took undoing a small clip on either side of that area and pulling it straight out.
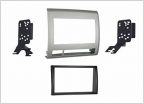
    You will want to harvest the yellow pieces off of the stock radio faces five pop in points, you will reuse these on your metra/scosche dash kit.
    Find something to do with your OEM radio as its pretty much useless. I keep a spare parts box for all my vehicles, so my radio will end up there.

    ------------------------------------------------------------------------------------

    CONNECTING THE AVH-X5500BHS HARNESS WIRES:

    NOTE:
    Car Radio Battery Constant 12v+ Wire: BLUE/yellow
    Car Radio Accessory Switched 12v+ Wire: GRAY
    Car Radio Ground Wire: BROWN
    Car Radio Illumination Wire: GREEN
    THESE FOUR WIRES ARE ALL ON THE SAME HARNESS!

    Also, the FAT DARK BROWN one is the real BROWN and the SMALL KINDA BROWN OR TAN is actually GRAY! (this confused the shit out of me :p)

    Radio = new head units connections
    Harness = your OEM radio harness wires

    Harness 1:
    The YELLOW radio wire goes to your SMALL BLUE/yellow harness wire
    The ORANGE/white radio wire goes to your SMALL GREEN harness wire
    The RED radio wire goes to your SMALL GRAY harness wire
    The BLACK radio wire goes to your BIG BROWN harness wire

    IF YOU ARE USING ANY STOCK SPEAKERS:
    NOTE: These wires are on the other two harnesses, none are on the one harness for the connections above!

    Harness 2:
    Left Front Speaker Positive Wire (+): PINK goes to WHITE harness
    Left Front Speaker Negative Wire (-): VIOLET goes to WHITE/black harness
    Right Front Speaker Positive Wire (+): LIGHT GREEN goes to GRAY harness
    Right Front Speaker Negative Wire (-): BLUE goes to GRAY/black harness

    Harness 3
    Left Rear Speaker Positive Wire (+): BLACK goes to GREEN harness
    Left Rear Speaker Negative Wire (-): YELLOW goes to GREEN/black harness
    Right Rear Speaker Positive Wire (+): RED goes to VIOLET harness
    Right Rear Speaker Negative Wire (-): WHITE goes to VIOLET/black harness

    IF YOU ARE INSTALLING A BACK UP CAMERA:
    Head Units Reverse Sensor wire goes to RED/white 12v reverse wire in the driver kick panel.
    Connect the yellow RCA to the BROWN RC.IN connector on the back of the head unit.

    Once you have done that plug in your radio connections and attach the ground wire of your battery again.
    If using stock speakers make sure speakers work.
    If using back up camera, go to settings and set the camera to BATTERY mode, then check that shifting to reverse queries the unit and displays the camera feed.

    ------------------------------------------------------------------------------------

    CONNECTING YOUR AMPLIFIERS:

    Connect the BLUE/white radio wire to whatever color wire you ran from your amplifiers remote turn on. (usually BLUE)

    Connect your RCA's, remember to mark them when you run them so you can distinguish FRONT LEFT/RIGHT from REAR LEFT/RIGHT and SUB LEFT/RIGHT.

    I used some Rockford Fosgate RCA's which had two color wire making it easier to remember the LEFT/RIGHT orientation but still needed markings to distinguish FRONT/REAR/SUB

    Reconnect your negative battery terminal and test the unit and make sure amplifiers are turning on and off with the accessories.
    Make sure your speakers are working and firing from their appropriate positions (use fade and balance to check)

    ------------------------------------------------------------------------------------

    CONNECTING YOUR METRA AXXESS AWSC-1

    BLACK AWSC wire goes to BIG BROWN harness wire, or piggy back onto head units BLACK ground wire.
    RED AWSC wire goes to SMALL GRAY harness wire, or piggy back onto head units RED 12v acc wire

    The next wires are on their own harness and are the only three out of 20 available slots, very easy to find.

    GREEN/orange wire goes to PIN 7 harness wire
    BLACK/green wire goes to PIN 8 harness wire
    Tap the last wire on this harness, PIN 6, over to the BIG BROWN harness wire or piggy back onto the radio's BLACK ground wire. (all your doing here is grounding the PIN 6 wire.

    Reattach your NEGATIVE battery terminal, return to the drivers seat, turn your key to acc mode and watch the Axxess AWSC-1 Module.
    It should blink alot and then pause then blink some more, and eventually end up solid red meaning your good to go.
    Test your controls and make sure they work.

    ------------------------------------------------------------------------------------

    CONNECTING YOUR PARKING BRAKE BYPASS:

    BLACK bypass wire goes to BLACK radio ground wire
    BLUE bypass wire goes to BLUE radio amp remote wire
    GREEN bypass wire goes to LIGHT GREEN radio parking brake wire

    Easy.

    ------------------------------------------------------------------------------------

    And that should do it ;)
     
    Last edited: Oct 5, 2013
  2. Oct 4, 2013 at 8:31 PM
    #2
    patho

    patho Member

    Joined:
    Sep 2, 2013
    Member:
    #111714
    Messages:
    12
    Gender:
    Male
    First Name:
    Mark
    Ontario, Canada
    Vehicle:
    2005 SR5 TRD Sport Doublecab
    Sub'd! Nice write up.. i'm hoping to be doing a similar install shortly.

    Post up some pics!
     
  3. Oct 4, 2013 at 8:59 PM
    #3
    anders99

    anders99 The Sailing Member

    Joined:
    May 28, 2013
    Member:
    #105101
    Messages:
    1,920
    Gender:
    Male
    First Name:
    Matthew
    Penscola, FL
    Vehicle:
    (07 Base 4cyl 4x4 - RIP) -> 2018 4Runner SR5 Premuim
    Taco SOS Offroad Concepts hybrid front bumper Iggy Corp. Switch panel Famous Fab ditch lights and cb antenna mount Pioneer Appradio 2 Halo Led Headlights Led Taillights 3'' toytech spacer lift on front end Toytec AAL on rear AFE cold air intake 4Runner Stock
    I like. I installed the pioneer app radio in april but instead of a bypass attachment I just hooked it up to a grounded switch that I just have to toggle back and forth to override the system. This also makes it so it will always work if there is a firm where update
     
  4. Oct 4, 2013 at 9:09 PM
    #4
    NorCalTRD

    NorCalTRD [OP] Well-Known Member

    Joined:
    Mar 23, 2013
    Member:
    #100418
    Messages:
    265
    Gender:
    Male
    Northern California
    Vehicle:
    '06 Indigo Ink DCLB TRD Sport V6
    40% Front Tint, Viper 5704 Alarm, Steel Cable Dog Tie, Super Sexy Driver Mod
    Anders, the new radio units require a double pulse signal to bypass the parking brake.
    A simple toggle switch no longer works :\ Tricky bastards lol
     
  5. Oct 5, 2013 at 8:54 AM
    #5
    anders99

    anders99 The Sailing Member

    Joined:
    May 28, 2013
    Member:
    #105101
    Messages:
    1,920
    Gender:
    Male
    First Name:
    Matthew
    Penscola, FL
    Vehicle:
    (07 Base 4cyl 4x4 - RIP) -> 2018 4Runner SR5 Premuim
    Taco SOS Offroad Concepts hybrid front bumper Iggy Corp. Switch panel Famous Fab ditch lights and cb antenna mount Pioneer Appradio 2 Halo Led Headlights Led Taillights 3'' toytech spacer lift on front end Toytec AAL on rear AFE cold air intake 4Runner Stock
    Well thats a bummer for new buyers. With my radio it has to feel the parking brake on off then back on again and stay on to use it. So i just wiggle my switch until it is happy
     
  6. Oct 5, 2013 at 12:23 PM
    #6
    NorCalTRD

    NorCalTRD [OP] Well-Known Member

    Joined:
    Mar 23, 2013
    Member:
    #100418
    Messages:
    265
    Gender:
    Male
    Northern California
    Vehicle:
    '06 Indigo Ink DCLB TRD Sport V6
    40% Front Tint, Viper 5704 Alarm, Steel Cable Dog Tie, Super Sexy Driver Mod
    Lol maybe you have beaten the Pioneer masterminds with your double pulsing switcheroo flicking haha

    I got some more updates and will be putting up pictures today as well.
     
  7. Oct 5, 2013 at 1:10 PM
    #7
    anders99

    anders99 The Sailing Member

    Joined:
    May 28, 2013
    Member:
    #105101
    Messages:
    1,920
    Gender:
    Male
    First Name:
    Matthew
    Penscola, FL
    Vehicle:
    (07 Base 4cyl 4x4 - RIP) -> 2018 4Runner SR5 Premuim
    Taco SOS Offroad Concepts hybrid front bumper Iggy Corp. Switch panel Famous Fab ditch lights and cb antenna mount Pioneer Appradio 2 Halo Led Headlights Led Taillights 3'' toytech spacer lift on front end Toytec AAL on rear AFE cold air intake 4Runner Stock
    Sweet. I wish I took pictures of my install but it was 10 degrees out with about a foot of snow so I made it short and sweet.
     
  8. Oct 5, 2013 at 2:30 PM
    #8
    NorCalTRD

    NorCalTRD [OP] Well-Known Member

    Joined:
    Mar 23, 2013
    Member:
    #100418
    Messages:
    265
    Gender:
    Male
    Northern California
    Vehicle:
    '06 Indigo Ink DCLB TRD Sport V6
    40% Front Tint, Viper 5704 Alarm, Steel Cable Dog Tie, Super Sexy Driver Mod
    Honestly pictures dont really help that much for the radio wiring, its all about matching the colors up right.
    Only one I needed a picture of was the RED/white reverse wire in driver kick panel.
     
  9. Oct 5, 2013 at 8:18 PM
    #9
    anders99

    anders99 The Sailing Member

    Joined:
    May 28, 2013
    Member:
    #105101
    Messages:
    1,920
    Gender:
    Male
    First Name:
    Matthew
    Penscola, FL
    Vehicle:
    (07 Base 4cyl 4x4 - RIP) -> 2018 4Runner SR5 Premuim
    Taco SOS Offroad Concepts hybrid front bumper Iggy Corp. Switch panel Famous Fab ditch lights and cb antenna mount Pioneer Appradio 2 Halo Led Headlights Led Taillights 3'' toytech spacer lift on front end Toytec AAL on rear AFE cold air intake 4Runner Stock
    Right now as we speak I am installing a after market back up camera but I am going to make it so I can have it on anytime. I dont feel comfortable touching to factory wiring.
     
  10. Oct 5, 2013 at 8:51 PM
    #10
    NorCalTRD

    NorCalTRD [OP] Well-Known Member

    Joined:
    Mar 23, 2013
    Member:
    #100418
    Messages:
    265
    Gender:
    Male
    Northern California
    Vehicle:
    '06 Indigo Ink DCLB TRD Sport V6
    40% Front Tint, Viper 5704 Alarm, Steel Cable Dog Tie, Super Sexy Driver Mod
    Nice, what are you going to wire it to?
    Toggle switch in the cab for power?
    How do you like that AppRadio unit?
     
  11. Oct 6, 2013 at 7:52 AM
    #11
    anders99

    anders99 The Sailing Member

    Joined:
    May 28, 2013
    Member:
    #105101
    Messages:
    1,920
    Gender:
    Male
    First Name:
    Matthew
    Penscola, FL
    Vehicle:
    (07 Base 4cyl 4x4 - RIP) -> 2018 4Runner SR5 Premuim
    Taco SOS Offroad Concepts hybrid front bumper Iggy Corp. Switch panel Famous Fab ditch lights and cb antenna mount Pioneer Appradio 2 Halo Led Headlights Led Taillights 3'' toytech spacer lift on front end Toytec AAL on rear AFE cold air intake 4Runner Stock
    I am going to wire it a switch in the cab. So far I love the Appradio no problems with it. The biggest thing I love about is now i have in dash navigation.
     
  12. Oct 10, 2013 at 3:26 AM
    #12
    Tom103

    Tom103 Member

    Joined:
    Oct 1, 2013
    Member:
    #113638
    Messages:
    20
    Gender:
    Male
    Really great thread this is helping me a lot! Just a quick question does the USB underneath the temp clusters still work with the radio?
     
  13. Oct 11, 2013 at 11:46 PM
    #13
    NorCalTRD

    NorCalTRD [OP] Well-Known Member

    Joined:
    Mar 23, 2013
    Member:
    #100418
    Messages:
    265
    Gender:
    Male
    Northern California
    Vehicle:
    '06 Indigo Ink DCLB TRD Sport V6
    40% Front Tint, Viper 5704 Alarm, Steel Cable Dog Tie, Super Sexy Driver Mod
    Thanks Tom, I am glad its being usefull :)
    I dont have a USB there, I have two 12 v car charge ports, but if you do it should not be affected by replacing the head unit.
     
  14. Oct 12, 2013 at 3:49 AM
    #14
    Tom103

    Tom103 Member

    Joined:
    Oct 1, 2013
    Member:
    #113638
    Messages:
    20
    Gender:
    Male
    Okay great thanks! I should have everything Monday waiting on the ups guy xD can't wait. I currently don't have a back up cam but it's prewired for it at least in the tail gate. I'm guessing the RCA cables are either behind the current stock head unit or up in the over head console? Anyone have any input on this?
     
  15. Oct 14, 2013 at 12:40 PM
    #15
    NorCalTRD

    NorCalTRD [OP] Well-Known Member

    Joined:
    Mar 23, 2013
    Member:
    #100418
    Messages:
    265
    Gender:
    Male
    Northern California
    Vehicle:
    '06 Indigo Ink DCLB TRD Sport V6
    40% Front Tint, Viper 5704 Alarm, Steel Cable Dog Tie, Super Sexy Driver Mod
    For a back up camera it should be one yellow RCA for the video feed and a set of red and black wires for the power.
    What year/model of Tacoma do you have?
    The Tacomas that have OEM cameras feed to the special rear view mirror which has a screen in it.
     
  16. Oct 14, 2013 at 1:03 PM
    #16
    Edpsx

    Edpsx Well-Known Member

    Joined:
    Oct 7, 2013
    Member:
    #114018
    Messages:
    147
    Gender:
    Male
    DFW
    Vehicle:
    13' Double Cab Limited MGM
    K&N Intake, Stainless Tube Steps, Pioneer 8500BHS, Coming Soon:, Morimoto H1 Mini, Viper 5704
    I have a 2013 AVH-8500BHS on a toggle switch to ground and it works fine. No special bypass needed for DVD playback.
     
  17. Oct 15, 2013 at 2:53 AM
    #17
    Tom103

    Tom103 Member

    Joined:
    Oct 1, 2013
    Member:
    #113638
    Messages:
    20
    Gender:
    Male
    I have a 2012 DC I found the wire tucked up in the head liner and also on the tail gate. Just need the camera for the handle and then I just want the back up to show up on the double din
     
  18. Oct 15, 2013 at 6:11 PM
    #18
    NorCalTRD

    NorCalTRD [OP] Well-Known Member

    Joined:
    Mar 23, 2013
    Member:
    #100418
    Messages:
    265
    Gender:
    Male
    Northern California
    Vehicle:
    '06 Indigo Ink DCLB TRD Sport V6
    40% Front Tint, Viper 5704 Alarm, Steel Cable Dog Tie, Super Sexy Driver Mod
    Not sure what to tell you, the unit may have been manufactured in 2012 and sold in 2013.
    From what I researched the new double pulse head units will not work with a simple toggle ground.

    Also I like just starting my truck and not fiddling with yet another switch lol.
    It just works :)
     
  19. Oct 15, 2013 at 6:14 PM
    #19
    NorCalTRD

    NorCalTRD [OP] Well-Known Member

    Joined:
    Mar 23, 2013
    Member:
    #100418
    Messages:
    265
    Gender:
    Male
    Northern California
    Vehicle:
    '06 Indigo Ink DCLB TRD Sport V6
    40% Front Tint, Viper 5704 Alarm, Steel Cable Dog Tie, Super Sexy Driver Mod
    So you have a 2012 DC that came with an OEM camera system and the camera was removed? Or it has wiring for it and a space for the camera but not the special rear view mirror with a screen in it?

    For mine I just bought the camera for $20 and it attaches to my license plate frame, perfect view for hooking up hitches.
    You wouldnt even need to bother with the other wires, just power and ground in the tail light and run your yellow RCA up through the floor grommet under driver seat and then along step board, up kick panel, and across to the head unit.

    This is my camera:
    http://www.amazon.com/TaoTronics%C2%AE-TT-CC22-Waterproof-170-Degree-Distance/dp/B00BUJ6MW0/
     
    Last edited: Oct 15, 2013
  20. Oct 15, 2013 at 6:19 PM
    #20
    Tom103

    Tom103 Member

    Joined:
    Oct 1, 2013
    Member:
    #113638
    Messages:
    20
    Gender:
    Male
    It's all pre wired never had the mirror with the cam or the cam in the tailgate. I don't need the one in the mirror I like it in the deck. So it would be simple for me to just throw it in the tailgate and be done with it I think
     

Products Discussed in

To Top