

-
Welcome to Tacoma World!
You are currently viewing as a guest! To get full-access, you need to register for a FREE account.
As a registered member, you’ll be able to:- Participate in all Tacoma discussion topics
- Communicate privately with other Tacoma owners from around the world
- Post your own photos in our Members Gallery
- Access all special features of the site
 BD harness switch wires
 License Plate Lights
 Switchback DRL/front directionals
 Switch-Pros 9100/RCR-FORCE 12 mounting solution for 2023 Tacoma
 Dumb switch question - I do welding, not wiring...
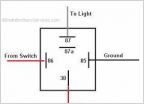 Wiring in switches and how to
How to: Retrofit Morimoto FX-R & Mini H1- in depth
Discussion in 'Lighting' started by InSight Retrofits, Nov 21, 2013.
Page 1 of 28
Page 1 of 28


