

-
Welcome to Tacoma World!
You are currently viewing as a guest! To get full-access, you need to register for a FREE account.
As a registered member, you’ll be able to:- Participate in all Tacoma discussion topics
- Communicate privately with other Tacoma owners from around the world
- Post your own photos in our Members Gallery
- Access all special features of the site
 Rattling with subs
 What part secures the interior door pull handle (double cab)?
 2013 Tacoma,
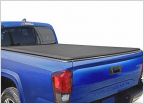 Looking for a tonneau cover roll up
 Brake fluid quantity to buy??
 Over the cab bed rack - 2015 Taco.
OFFICIAL 2nd gen 4x4 front differential bearing vibration thread
Discussion in '2nd Gen. Tacomas (2005-2015)' started by BenWA, Apr 17, 2011.
Page 80 of 226
Page 80 of 226
Products Discussed in


