

-
Welcome to Tacoma World!
You are currently viewing as a guest! To get full-access, you need to register for a FREE account.
As a registered member, you’ll be able to:- Participate in all Tacoma discussion topics
- Communicate privately with other Tacoma owners from around the world
- Post your own photos in our Members Gallery
- Access all special features of the site
 Stock suspension isn't working well, what is appropriate upgrade for me?
 Opinions on planned suspension combo
 05 saggy front end. Replace with newer model struts?
 Rancho RS9000xl, SPC UCA and 285's
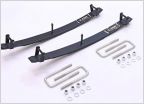 Lift options on my budget?
Toytec 3* Shim Install with AllPro Standard Leafs and more
Discussion in 'Suspension' started by Alfuh, Jun 15, 2014.


