1. Welcome to Tacoma World!

    You are currently viewing as a guest! To get full-access, you need to register for a FREE account.

    As a registered member, you’ll be able to:
    • Participate in all Tacoma discussion topics
    • Communicate privately with other Tacoma owners from around the world
    • Post your own photos in our Members Gallery
    • Access all special features of the site

Long Travel BS Thread

Discussion in 'Long Travel Suspension' started by amaes, Aug 20, 2010.

  1. Feb 6, 2015 at 9:20 AM
    SDSam

    SDSam from Dirt bike to Dezert Couch

    Joined:
    Jun 7, 2012
    Member:
    #80249
    Messages:
    690
    Gender:
    Male
    San Diego
    Vehicle:
    00 Tacoma prerunner
    Icon Shocks, BTF front, Deaver f67, 33's on stocks, Fiberwerxs 1pc, TDR S/C, Bed & Eng Caged
    Could you be side loading the Uniball Bolt against the cup at droop? that would move all the stress to those four bolts. or it could cause the upper spindle mount to break off depending which one side loads first. resolve it by adjusting or installing limit straps and bump stops.
    yeah you might lose an inch of bragging travel but it will keep you on all four :)
     
    Last edited: Feb 6, 2015
  2. Feb 6, 2015 at 9:46 AM
    jberry813

    jberry813 Professional Fluffer Moderator

    Joined:
    Jan 21, 2011
    Member:
    #49636
    Messages:
    28,476
    Gender:
    Male
    First Name:
    Jason
    Lake Tahoe
    Vehicle:
    2012 DCSB Sport
    ...too much shit to list.
    Looking at this from a computer instead of my phone. Those four bolts holding the spindle to the LBJ/uniball are not the largest of bolts by any means. Repeated removal/installation certainly doesn't help. And the big thing I've found, is unless you lock the steering wheel (pull the key out of the ignition and turn the steering wheel till it locks), you will over-torque the bolts just due to the rack being able to float (speaking from experience here...see below). This in turn will stretch and or stress the bolt ultimately fatiguing it.

    Still curious as to how you did a horizontal uniball adapter (well, i'm assuming horizontal based off the big nut and bolt) hanging off the bottom of the LCA.

    As an aside, it's always nice to see people trying to build their own kits. But I have a couple questions if you don't mind. Not trying to be a smart ass or undermind your work at all, just curious.
    1) Why square tube? Again I'm just going off the one picture, but it looks like you have heim uppers with a round bung, that goes into square tube.
    2) Are the joints on the square tube miter joints? If so...why did you blend the welds?
    3) Gussets? I don't see the LCA pivots wrapped to the square tube. Nor do I see any gussets that tie the upper uniball to the two side tubes. It looks like the side tubes are just welded to the uniball cup. That pivot takes a lot of load when you're beating on the truck. Simple piece of plate that ties all three pieces together does wonders for strength.
    4) What length coilover is in there? I'm guessing a 12" because it looks like you've got a ton of open threads at the top going up into the fender aprons. And if it is a 12...why such a short tender spring?
    5) How much CV plungs did you measure when you were designing the kit. From my experience, 14" of wheel travel is about all you're going to be able to get out of a 4wd kit.


    Oh yeah...obligatory broken bolt. Using a torque wrench without locked steering wheel.

    IMG_0835_0923bdf4f68bb9fae570b6db57321103075da3d4.jpg
     
    Last edited: Feb 6, 2015
  3. Feb 6, 2015 at 9:56 AM
    Bobber Bill

    Bobber Bill Well-Known Member

    Joined:
    Oct 3, 2011
    Member:
    #64554
    Messages:
    1,322
    Gender:
    Male
    Los Angeles, CA
    Vehicle:
    Prerunner Daily Driver
    Dood...he knows what he's doing. It's been designed and analyzed.

    Just ban me now.
     
  4. Feb 6, 2015 at 10:23 AM
    jberry813

    jberry813 Professional Fluffer Moderator

    Joined:
    Jan 21, 2011
    Member:
    #49636
    Messages:
    28,476
    Gender:
    Male
    First Name:
    Jason
    Lake Tahoe
    Vehicle:
    2012 DCSB Sport
    ...too much shit to list.
    LOL.

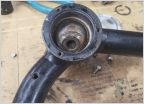
    Something else comes to mind. But this would completely depend on how the lower uniball adapter was designed to mate to a stock spindle. From a factory LBJ/Spindle perspective, the LBJ has little sleeves to center the ball joint correctly into the spindle on the outside two mounting bolts (two bolts closest to the hub face...see picture below). It does not rely on just the 4 bolts.
    So if the adapter was built with just the bolts in mind and not the countersunk sleeves that go into the spindle, there would be 3/16 of an inch where there was no contact of the LBJ adapter to the spindle. Meaning just 3/16" of loose threads right in the middle of the bolt that would allow for it to sheer easier. And judging by the original picture...that's about how far up where the bolts sheered in the spindle on the outside 2 bolts.

    Stock LBJ showing sleeves:

    [​IMG]


    Original posted picture:

    EB99B7DF-DD73-4216-9F37-90ED5A801628_zps_35297cf47ec4d30dfe4ec0bc5d5f77b5206a5e9e.jpg
     
  5. Feb 6, 2015 at 10:54 AM
    snivilous

    snivilous Member

    Joined:
    Jul 22, 2014
    Member:
    #134487
    Messages:
    10
    Gender:
    Male
    Colorado
    Vehicle:
    3rd Gen 4Runner
    No, it didn't seem necessary based on my FEA.

    Someone else has suggested this, and that certainly makes sense. Like you said, I don't yet have limit straps and I don't have much down travel from ride height.

    That's a good point you make on the repeated removal, my dad said something similar how you're supposed to replace bolts on high cost parts every time since just torquing them once removes their usability again--and obviously these were 14 year old bolts.

    For the LCA interface, I bought two LBJ and then if you grind down the top circular part (opposite the joint stud) on the crimped lip, then the backing cover will pop off and the actual joint will pull out. I then made a 1" tall steel spacer that was tight against the hole where the joint was and dropped it in, and then filled it in with weld. From there I just drilled out the weld/spacer to the size bolt I needed (3/4"). So the bolt drops through the LBJ piece, which bolts to the spindle like usual, and the 3/4" bolt then goes through the uniball on the LCA.

    C00E3D7F-0D84-4364-B525-D65EFAEAC4B4_zps_a81d36efe01f1daf99d1b1b67c609fa62398dc59.jpg


    The more questions the better, if I over looked something then it's better to find out at the keyboard than on the interstate or trail.

    1. The main reasoning was for simplicity. My buddy and I planned to LT at the same time, but to do so we had to first get a garage and then buy the tools we needed. It was much easier to just use square tubing where everything was a vertical cut versus getting fancy with bending round tube and notching it and the required tools we'd have to buy, versus just getting a compound miter saw. Like you said, that provided its own issues. We bought most of our parts off of Poly, but even from Ballistic and other places I couldn't find a corresponding square bung so we ultimately had to use the round bung and just fill it with weld over multiple passes. The square tubing is 3/16 wall so we could get a lot of penetration on it as well as the round bung. There only seemed to be square bungs for really large tubing, like 1.5" ID or bigger which would be way too big for our design so we just compromised and made the round bung work.

    2. Yes, the upper arm are all miter joints. Not sure what you mean by blend the weld?

    3. It wouldn't hurt, but I didn't see any need based on the FEA and weld analysis. Like you said, a lot of kits have gussets and I've seen a few that run a strap around the uniball cup. I think that'd be smart to do in the future on a second iteration, but for now I'll see how it works and keep inspecting everything.

    4. It's a 10" coilover, I mainly wanted to be able to run dual rate and I was originally planning for 16-17" of travel. My tender is way wrong which is why it's threaded down so much, the tender is essentially fully compressed with the weight of the truck on it.

    5. Not sure what you mean by CV plung. After I bought the CVs I did a rough cycling of them to see how much travel I could pull, it was a very rudimentary estimate but it seemed like I could get 19" of travel--that was playing with it by hand. Right now I'm getting 14" of useable travel, and the CV angle is more extreme on droop (which is limited by the CV) than it is at full bump which is limited by the UCA uniball. I want to run a horizontal uniball UCA this summer to try and pull more travel, I think I can realistically get 16" of travel with a horizontal upper (horizontal bolt). I think my geometry is different than other kits though because I'm pulling way more up travel but less down travel. I have 4" of droop from ride height, but 10" of up travel. The main difference mine has versus a bolt on kit, is that my frame/stock bump stop areas are chopped so I can get more up travel which is why I'm certain I can get over 14" since I can utilize all the additional up travel that's usually untapped. Though again, somehow I have a ton of up travel but only the same total travel as a bolt on.

    I thought I someone ask about the frame mounts for the LCA, they are the stock mounting locations but plated with 3/16" and no longer cammed. All adjustment is through the UCA heims.

    I have no issue with people giving advice or insight, this is my first stab into suspension design and I still have tons to learn obviously. My annoyances of the first few posts were because, regardless if the bolts were loose, you can still see the ends of them threaded all the way into the spindle so they should of still been reacting loads without issue.

    ----------------------------------------------------------------------------

    I think I will also redesign the LBJ/knuckle bolts. I don't know what loading made them fail, but I know what loading I designed the UCA, LCA, and steering linkage. I'll just make sure the four bolts are stronger than everything else, so in a worse case scenario the A-arms and steering will yield and absorb all the energy before the spindle shears from the suspension, and since the spindle has redundant mounts (LCA/UCA) then if one A-arm fails the tire will still stay attached to the truck. Like you said jberry, the LBJ bolts are way smaller than anything else on the suspension right now.
     
  6. Feb 6, 2015 at 10:58 AM
    snivilous

    snivilous Member

    Joined:
    Jul 22, 2014
    Member:
    #134487
    Messages:
    10
    Gender:
    Male
    Colorado
    Vehicle:
    3rd Gen 4Runner
    I hadn't thought of that, it's possible that contributed to the failure. I kinda doubt that would make enough difference since the bolts react shear way more than those alignment pins, based just on the area of the pins versus the bolts. I was always under the impression the alignment pins were just to stop the LBJ from rattling around and taking out any potential play, and weren't so much structural.
     
  7. Feb 6, 2015 at 11:19 AM
    BradyT88

    BradyT88 Well-Known Member

    Joined:
    Nov 3, 2011
    Member:
    #66419
    Messages:
    36,722
    So if I understood that right, you CV is limiting droop right not and your UCA uniball is limiting up travel, right? So if you redsign to a horizontal uniball that should give you more uptravel, while leaving droop the same right?

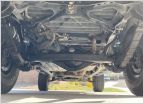
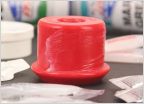
    How much up travel do you need? I've got a 2nd gen with stock LCA's and stock length UCA's and I'm on 33's. I swapped out the stock bumps for some Superbumps and I have too much uptravel now. On hard hits my diff skid literally plows out the ground and it hurts when it happens. I had to add a spacer to the superbumps.

    In these pics this is with my 33's at 50 psi and just statically sitting on the superbumps with the spacer. There are about 3-4" between my diff skid and the ground (and the diff skid rubs on my diff mounts it's tucked so tight). When I air down for the trail I drop at least another 1" just statically so on hard hit the tires and bumps compress even more and my skids skirts the ground. You can see that in the paint on that skid. It has be scraped away...

    [​IMG]

    [​IMG]

    To sum that up, how close is your frame to the ground when you pull the C/O's and let it sit on the bumps? Do you have room for more uptravel?
     
  8. Feb 6, 2015 at 12:15 PM
    anthony250f

    anthony250f Well-Known Member

    Joined:
    Feb 18, 2012
    Member:
    #73066
    Messages:
    16,710
    Gender:
    Male
    First Name:
    Anthony
    San Diego, CA
    Vehicle:
    2008 dcsb trd offroad 4wd
    You aren't really gonna get more than 14" with 4x4
     
  9. Feb 6, 2015 at 12:16 PM
    jberry813

    jberry813 Professional Fluffer Moderator

    Joined:
    Jan 21, 2011
    Member:
    #49636
    Messages:
    28,476
    Gender:
    Male
    First Name:
    Jason
    Lake Tahoe
    Vehicle:
    2012 DCSB Sport
    ...too much shit to list.
    See comments in red above
     
  10. Feb 6, 2015 at 12:31 PM
    MadTaco461

    MadTaco461 BRO runner

    Joined:
    Dec 30, 2009
    Member:
    #28470
    Messages:
    13,406
    Gender:
    Male
    First Name:
    Mike
    CA
    Vehicle:
    99 turbo 5 lug long travel
    Kinda stock
    I'm liking the homemade kit. Nice job for a first go around. It's always going to have bugs that you aren't going to find in solidworks maybe if you forgot to add in some directional impact load or not high enough factor of safety to account for fatigue. Maybe kit 2.0 is vertical uniball. You still beat me to a homemade kit and it's 4x4.
     
  11. Feb 6, 2015 at 12:41 PM
    snivilous

    snivilous Member

    Joined:
    Jul 22, 2014
    Member:
    #134487
    Messages:
    10
    Gender:
    Male
    Colorado
    Vehicle:
    3rd Gen 4Runner
    Thank you jberry! All of that was tremendously helpful. A few points/questions:

    Yea, I did long hand calcs and used solidworks finite element analysis for everything.

    I haven't had a chance to remove the coilovers and cycle the suspension to check for bump steer, however I had bad "droop steer". When the suspension would droop at all (even from just accelerating a little) the tires would toe in and start to push against each other and you could feel the whole front end rise up then. I had to put a spacer on the steering knuckle to stop that, which I plan to reinforce and double shear in the future. After doing that I don't know what my bump steer is like. When I've had the suspension compresses a lot offroad its felt fine and works fine, but I don't know exactly how the geometry is changing. That's my biggest fear is having really bad bump steer I can't fix.

    Can you go more in depth as to why miter joints aren't as strong as bent tubing? I would assume it'd be stronger since obviously the welds are stronger than the base material, but I can see where there'd be stress/moment spikes since it's not a continuous section.

    Thank you on the info for the RCVs, I was planning on talking to them to see if their axles would allow me to droop more. As I recall I'm using 28* for the maximum CV deflection when I calculated how much travel I could pull. I was planning on removing the UCA and trying to accurately jack up the suspension and see how much further it would bump and allow the CV to still function. Thanks again, I'll reference all those points you made for awhile.


    Brady, you have a good point. My main intention was to utilize as much travel as the CVs would allow me. My goal was to have around the standard 14" of travel, and anything more than that would be like reserve or extra travel that would only get used in a worse case scenario, where then it's acceptable to have the skid plate scrap the ground or whatever since the truck is landing so hard. Ideally I want to be valved so I'm never using the bump stops, and if I had an extra inch or two to stay away from the bump stops that would be nice. That's all hypothetical if I make new UCAs, I still need to sort out spring rates, valving, bump steer, fender clearances, etc. etc. before I start thinking about modifying for more travel (if even possible, which sounds unlikely).
     
  12. Feb 6, 2015 at 12:45 PM
    snivilous

    snivilous Member

    Joined:
    Jul 22, 2014
    Member:
    #134487
    Messages:
    10
    Gender:
    Male
    Colorado
    Vehicle:
    3rd Gen 4Runner
    Thanks! I'm happy with it so far, I hadn't even seen an LT truck before building it so I think it turned out decently considering my lack of experience. I want to get accelerometers and try to get telemetry on the suspension, since like you said there's tons of things I probably haven't accounted for let alone all the strange dynamics at work. I had a guy on dezert rangers give me some lateral/vertical/radially G-loadings that he used when he worked for an offroad racing team on all their trucks, I used that and then added a 1.25 factor of safety. Though again, I have no idea if the suspension is way overkill or just barely good enough to hit a curb besides comparing it to the stock suspension.
     
  13. Feb 6, 2015 at 1:17 PM
    jberry813

    jberry813 Professional Fluffer Moderator

    Joined:
    Jan 21, 2011
    Member:
    #49636
    Messages:
    28,476
    Gender:
    Male
    First Name:
    Jason
    Lake Tahoe
    Vehicle:
    2012 DCSB Sport
    ...too much shit to list.
    More inline in red
     
  14. Feb 6, 2015 at 2:00 PM
    anthony250f

    anthony250f Well-Known Member

    Joined:
    Feb 18, 2012
    Member:
    #73066
    Messages:
    16,710
    Gender:
    Male
    First Name:
    Anthony
    San Diego, CA
    Vehicle:
    2008 dcsb trd offroad 4wd
    I'm happy with my up travel haha.

    [​IMG]
     
  15. Feb 6, 2015 at 2:03 PM
    santabarbarataco

    santabarbarataco Well-Known Member

    Joined:
    Mar 7, 2012
    Member:
    #74387
    Messages:
    1,653
    Gender:
    Male
    First Name:
    jordan
    santa barbara
    Bump steeerrr :p
     
  16. Feb 6, 2015 at 2:03 PM
    BradyT88

    BradyT88 Well-Known Member

    Joined:
    Nov 3, 2011
    Member:
    #66419
    Messages:
    36,722
    Dat bump steer though:eek:

    Yes I know your wheel is just turned (I hope anyway!)
     
  17. Feb 6, 2015 at 2:14 PM
    anthony250f

    anthony250f Well-Known Member

    Joined:
    Feb 18, 2012
    Member:
    #73066
    Messages:
    16,710
    Gender:
    Male
    First Name:
    Anthony
    San Diego, CA
    Vehicle:
    2008 dcsb trd offroad 4wd
    Much bump steer

    Oh and also....

    Since you guys were taking about this recently
    [​IMG]
     
  18. Feb 6, 2015 at 2:16 PM
    Taco me elmo

    Taco me elmo Here, Eat some paint. Drink some Bleach.

    Joined:
    Sep 17, 2010
    Member:
    #43412
    Messages:
    4,551
    First Name:
    Tophat bobcat
    North of South, East of West
    Vehicle:
    Slow polished TuRD
    Anti theft 5-Speed
    I figured it was a stab at Engage.
     
  19. Feb 6, 2015 at 2:20 PM
    Supermoto

    Supermoto Well-Known Member

    Joined:
    Feb 7, 2012
    Member:
    #72373
    Messages:
    2,589
    Gender:
    Male
    First Name:
    Landon
    Fallbrook
    Thanks to the 37"s and the spindles i have a shit load of clearance at bump

    [​IMG]
     
  20. Feb 6, 2015 at 2:22 PM
    BradyT88

    BradyT88 Well-Known Member

    Joined:
    Nov 3, 2011
    Member:
    #66419
    Messages:
    36,722
    #4wdProblems...

    oh and #LittleTireProblems...
     

Products Discussed in

To Top