1. Welcome to Tacoma World!

    You are currently viewing as a guest! To get full-access, you need to register for a FREE account.

    As a registered member, you’ll be able to:
    • Participate in all Tacoma discussion topics
    • Communicate privately with other Tacoma owners from around the world
    • Post your own photos in our Members Gallery
    • Access all special features of the site

Fold-a-Cover G4 Elite install comments

Discussion in 'Tonneau Covers, Caps and Shells' started by Conumdrum, Nov 27, 2015.

  1. Nov 27, 2015 at 8:10 PM
    #1
    Conumdrum

    Conumdrum [OP] Well-Known Member

    Joined:
    Aug 21, 2014
    Member:
    #136685
    Messages:
    984
    Gender:
    Male
    Las Vegas
    Vehicle:
    2014 Tacoma
    2WD Sport Nav SC V-6 Mall crawler Home Depot truck
    Best to post my thoughts before I forget and my friend(s) Jack D. is still in my bloodstream. I'll update with pics etc over the next day or two.

    Well I bought one on 11 Nov, was delivered just fine. Big assed box had one hole from the tailgate lock tongue. Tounge was just fine, no damage. Inspected cover, looked great.

    On to 26 Nov when I started the install.

    Please watch the install video, it really helps but a few things need mentioned.

    Have 70% alcohol and BLUE Locktite and tools beforehand. A set of standard wrenches down to 1/4" and metric 9mm and a smallish crescent wrench is good. And a set of standard Allen wrenches.

    Make sure the FLAT top cover mount brackets, not the rounded ones go to the front.

    PIC

    Might make sure you have a Harbor Freight washer assortment in a plastic container, I was missing 4 split washers and 4 flat washers. And I went back and checked every bit of the directions, they were short a bit.

    The black bolts are for the rear mounts, the silver ones 'no workie' in the hole hehe.

    You will spend much time trying to figure out why when you close the rear cover part that the front cover won't close right. It's because the small bolts that align the lock front'back need to be adjusted. It's mentioned in the paperwork. You will need to make miniscule adjustments to the locks at the front and back locks front to back and the nuts aren't the size mentioned in the paperwork.

    To get the striker bolts 'just right' you will make teeny adjustments many times. The forward ones, I rolled my fat ass in the front of the bed and my lovely wife of 31 years operated the lock outside as I made adjustments on the striker bolts. Make sure they are perfectly centered and do NOT touch the latch assembly. Needs to be centered.

    The rotary latches. Prepare to be confused. Prepare to not have the right sized wrenches. Figure it out. Set the rear latches to perfection firstYou want a bit of slack when it's locked, just a bit, no tension on the 'bars' and they snap at the same time. Again, get your sweet wife of 31 years to help. Mine is still slim and sweet and cooks dinner and makes me sammiches. Ask her to stand outside while you deal with this stuff inside. I moved the latches a bit forward/back, adjusted the striker bolts, the latch timing. Finally I got it right. Many tweaks.

    Pretty much you adjust the striker bolts and the latch forward/back and the timing all at the same time. IF you want it perfect. You know you do! The Allens for the timing are small button head Allen heads. Make sure they stay locked to the latch and don't turn when you adjust the timing.

    Now you will notice that the windseal rails and the left to right of the cover can be off from you buffaloing over the mounting brackets etc. Time to go back and recheck the seals. This cover has a lotta parts, needs a lotta tweaks. But once done it's way solid and the best on the market.

    Takes a while folks to do it right, but one done, no rattles, solid locking, cover is down solid.

    Then you have to put the seals on the front and back on the cover.
    Since my temps outside were 57f, I opted to remove the cover removing these bolts, easy-peasy.

    They have in big letters ONLY above 70f install the gaskets. So I made sure.

    Laid it in the house and made the house 72f (usually 69f). A few hours later I used the wife's hair dryer to slowly heat the areas for the gaskets, to some arbitrary temp I was happy with. I used the alcohol, then the pre-adhesion stuff, and warmed up the gasket and the track to my happy temp. I then applied the gasket.

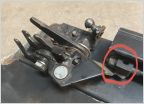
    But BEFORE I had even got started the Wife Unit (hero) stated that my wheel I had bought was too wide. I had bought a cheapo wheel in the furniture area at $2.50 to push on the contact area from Home Depot. Was too wide. So I ground it. Here is a pic after I was done. I couldn't find the special wheel, so this worked great. Thankfully before I had put down the pre-adhesion stuff. It smells pretty strong, it has Acetone in it for sure.


    IMG_0648.jpg
     
    Last edited: Nov 30, 2015
    syswalla likes this.
  2. Nov 29, 2015 at 3:48 PM
    #2
    Mako77

    Mako77 New Member

    Joined:
    Oct 19, 2015
    Member:
    #167119
    Messages:
    4
    Gender:
    Male
    Just got mine as well and thought I'd be long done. Not the happiest camper at the moment.

    Great idea doing the gaskets inside. I was about to wait til spring! I will have to get some help as I just can't get two corners to sit flush. Too many trips back-n-forth under the cover looking at those striker bolts and adjusting them. Have adjusted some latches as well. Killing me because it looks good underneath but when I go and look at top it doesn't sit right. Definitely post those pictures as I will benefit greatly.

    Thought maybe not using the torque wrench had some affect so bought one for $70 and still managed to snap a screw (On center "Q"). I'll get new pieces and regroup.

    Question - how big of a gap did you have between the cover and tailgate before putting the gasket on? I have just barely under an inch which seems like a lot.

    Thanks and if you live on Long Island and want to make a few bucks finishing mine off you just let me know!!!!

    Thanks again.
     
  3. Nov 30, 2015 at 4:27 AM
    #3
    Conumdrum

    Conumdrum [OP] Well-Known Member

    Joined:
    Aug 21, 2014
    Member:
    #136685
    Messages:
    984
    Gender:
    Male
    Las Vegas
    Vehicle:
    2014 Tacoma
    2WD Sport Nav SC V-6 Mall crawler Home Depot truck
    Well looking at my pics only the wheel one will help, the directions have better pics.

    One side high? Probably the latches aren't perfectly centered with the striker bolt. I did the front, then the back, back and forth, they kept moving. I finally did the front latches and striker bolts, and tightened the hinge clamp assembly (last two vertical bolts) (step 6). The cover quit shifting on me.

    If you look at step 10, the correct/incorrect picture you see how it needs to be aligned to hit the latch correctly. The striker pin also needs to PERFECTLY go straight up into the groove and not hit the sides AND be up to the top AND the latch should be fully seated on the bottom against the striker pin. It has no play up and down once adjusted properly and latched. Had the wife unit on the outside helped to push down and open/close the latch. Once I figured that out I was able to adjust the striker pin up and down to make the cover sit level when closed and no slack or looseness. The wife unit pushed down from the outside, then you tighten the striker bolt. And then you cuss, it's a bit off in the groove..

    Once the front latches were good, I went to the back ones and did the same thing. Yea, a chore. At times it seemed I was moving the latch 1/96 bazillion of an inch, but all good now. You do need a helper for sure. Ask her to make you a sammich once done, I did. She did, I'm blessed.

    I also had about an inch opening on the back. The gasket covers the back opening fine, the gasket is pretty 'tall'. I'll look at trimming them a bit and thinking how to make a seal to fully seal the front area better. Not a big deal, I really don't carry much but groceries and some wood now and then, and I live in Vegas, not a lot of rain etc. And garaged, I only put 5500 miles a year on it.
     
    Last edited: Nov 30, 2015
  4. Dec 1, 2015 at 7:40 PM
    #4
    Mako77

    Mako77 New Member

    Joined:
    Oct 19, 2015
    Member:
    #167119
    Messages:
    4
    Gender:
    Male
    Thanks!!
     
  5. Dec 5, 2015 at 4:21 PM
    #5
    Conumdrum

    Conumdrum [OP] Well-Known Member

    Joined:
    Aug 21, 2014
    Member:
    #136685
    Messages:
    984
    Gender:
    Male
    Las Vegas
    Vehicle:
    2014 Tacoma
    2WD Sport Nav SC V-6 Mall crawler Home Depot truck
    Well I cleaned the cover, bed liner, and the bed mat with 303 cleaner and protected with 303. It's shiny!

    LOL, took it to a self serve place and scrubbed the bed and mat with the brush and rinsed it all out. Then promptly drove off with the mat laying on the ground, it was still there once I turned around and drove like a madman back to the car wash thank goodness.

    Lets see how long it stays clean back there. Next week I'll attempt to put the tailgate seal on if it's warm enough. I'll try to keep a 6 month schedule for cleaning. Heck, I haven't washed a car or truck in 15 years. Why do it when you got a good cleaning place like mine down the street.
     
  6. Dec 18, 2015 at 4:33 PM
    #6
    Hit n Run

    Hit n Run Well-Known Member

    Joined:
    Nov 27, 2015
    Member:
    #170795
    Messages:
    113
    Gender:
    Male
    First Name:
    Steve
    Vehicle:
    14 Black DCLB Sport
    I love mine (bought it due to comments and pictures on this site), once adjusted it looks great.


Products Discussed in

To Top